

Menus Extended
Adds ACF options into the menus. Allows youu to attach icons and images to menu items.
1. Table of Contents
- 2.1. Built With
- 2.2. Installation
- 3.1. Config
- 3.2. Output the menus
- 3.3. CSS
2. About The Project
This gives you the ability to insert HTML into wordpress menus.
2.1. Built With
This project was built with the following frameworks, technologies and software.
2.2. Installation
These are the steps to get up and running with this plugin.
- Clone the repo into your wordpress plugin foldergit clone https://github.com/IORoot/wp-pluging__menu--code-inject ./wp-content/plugins/menus-extended
- Composer.cd ./wp-content/plugins/menus-extendedcomposer install
3. Usage
3.1. Config
Create two menus called "Main Menu" and "Sub Menu" to hook into the custom menu-walkers.
3.2. Output the menus
To output the main menu correctly, you must use the code:
wp_nav_menu(['theme_location' => 'menu-1','menu_id' => 'main-menu','container_class' => 'flex-1 z-50','menu_class' => 'flex justify-center text-center','walker' => new MainMenu_Walker,'before' => '','link_before' => '','after' => '',]);
for the sub-menu:
wp_nav_menu(['theme_location' => 'sub-menu','menu_id' => 'sub-menu','container_class' => 'flex-1','menu_class' => 'flex justify-start text-center','walker' => new SubMenu_Walker,'before' => '','link_before' => '','after' => '',]);
See the examples folder.
3.3. CSS
For the show/hide functionality of the sub-menus you need to include the following CSS on your webpage. (PostCSS / SASS)
/* SASS */header nav div #main-menu {/* For hovering */& > ul:hover > div,& > li:hover > div {display: block;}& > ul:hover > ul,& > li:hover > ul {display: block;}}
Setup
Top of the menu edit page, click on 'Screen Options' and enable: -> Link Target -> Title Attribute -> CSS Classes Layout All menu items are list items in an unordered list.
<ul><li><a href="/">Link Title</a></li><li><a href="/">Link Title 2</a></li></ul>
CSS Classes
By adding class names into the CSS Classes (optional) form field, you will inject it into the list item.
<ul><li class="added_class"><a href="/">Link Title</a></li><li><a href="/">Link Title 2</a></li></ul>
Link Classes
If you simply want to add classes into the link, you can use this textbox.
<ul><li ><a class="link_class" href="/">Link Title</a></li><li><a href="/">Link Title 2</a></li></ul>
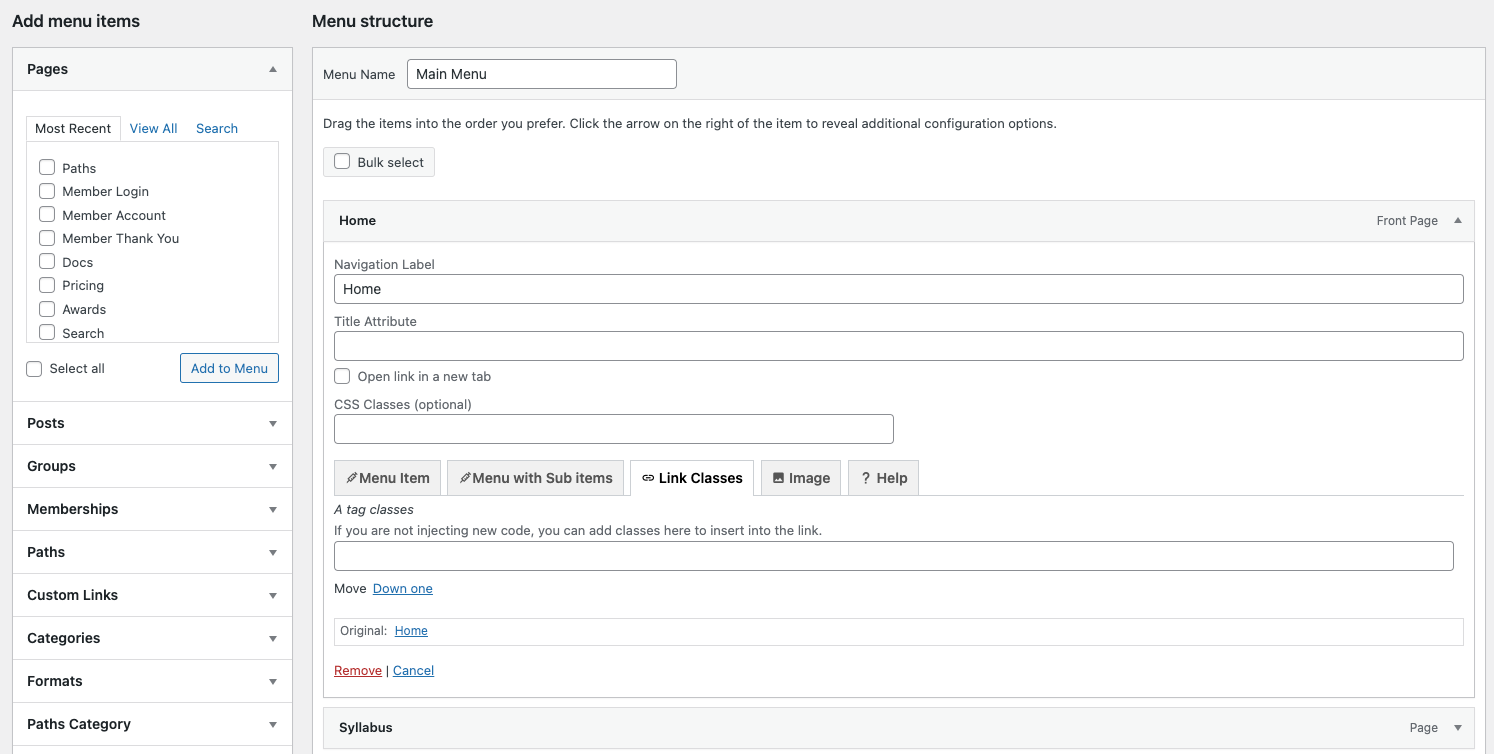
Menu Item
The “Menu Item” section allows you to completely replace that list-item for custom code.
<ul>[OPEN CODE][CLOSE CODE]<li><a href="/">Link Title 2</a></li></ul>
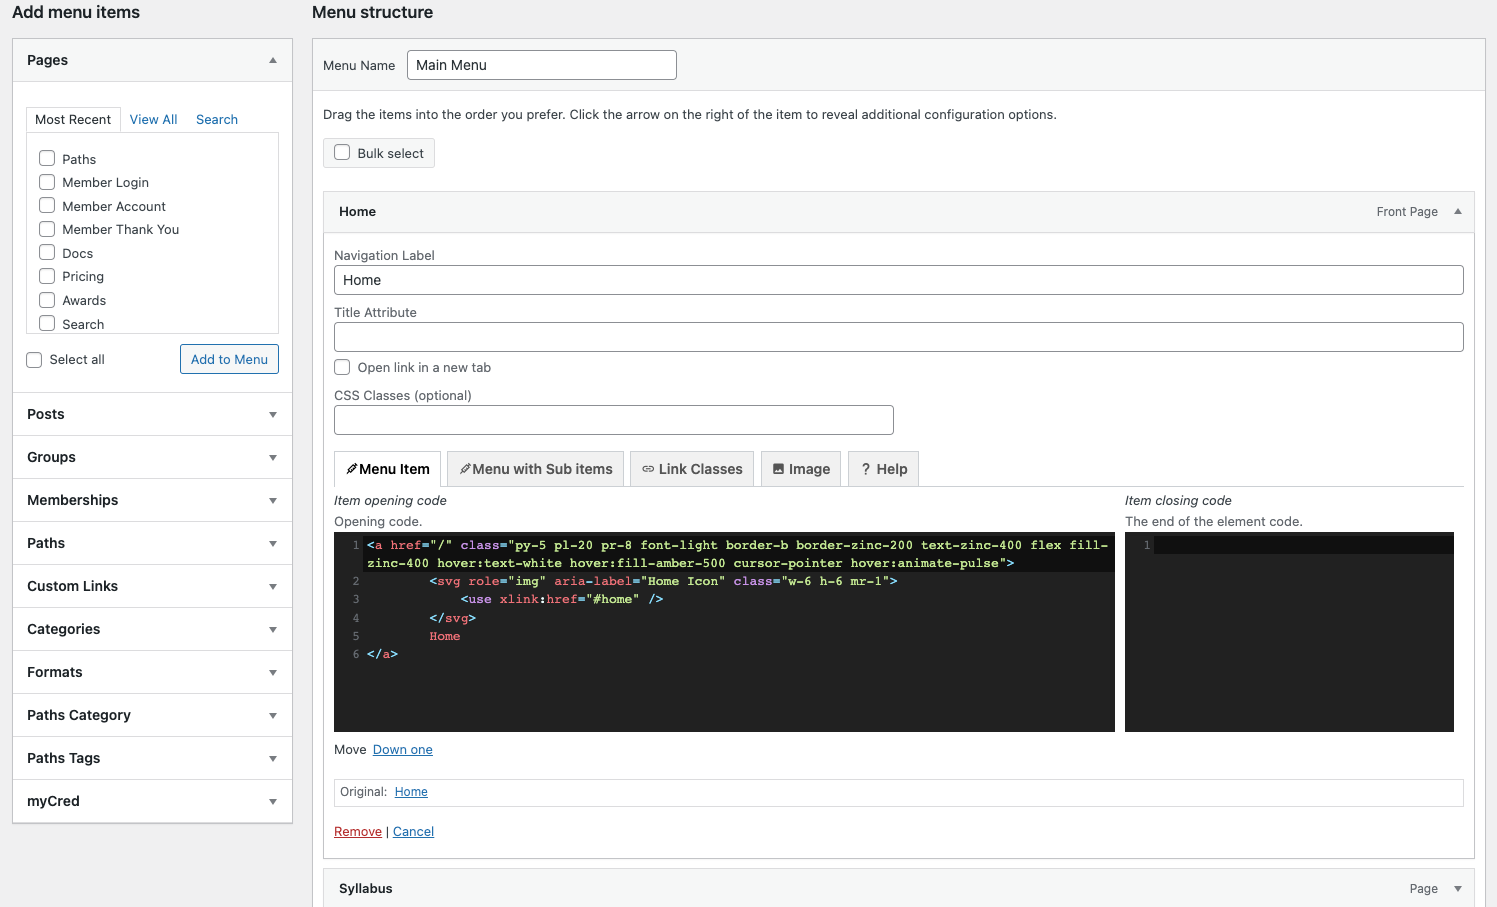
The reason we have both open and close code is if we have submenu items. Then this code will wrap that item. Menu with sub items
Menu with Sub-items
If a menu item has a sub item, then a nested unordered list will be injected into the main list.
<ul><li><a href="/">Title</a><ul class="sub-menu"><li><a href="/sub">Sub item title</a></li></ul></li><li><a href="/">Link Title 2</a></li></ul>
The 'Menu with sub items' opening and closing textareas allow you to change the unordered list to anything else.
<ul><li><a href="/">Title</a>[OPEN CODE]<li><a href="/sub">Sub item title</a></li>[CLOSE CODE]</li><li><a href="/">Link Title 2</a></li></ul>
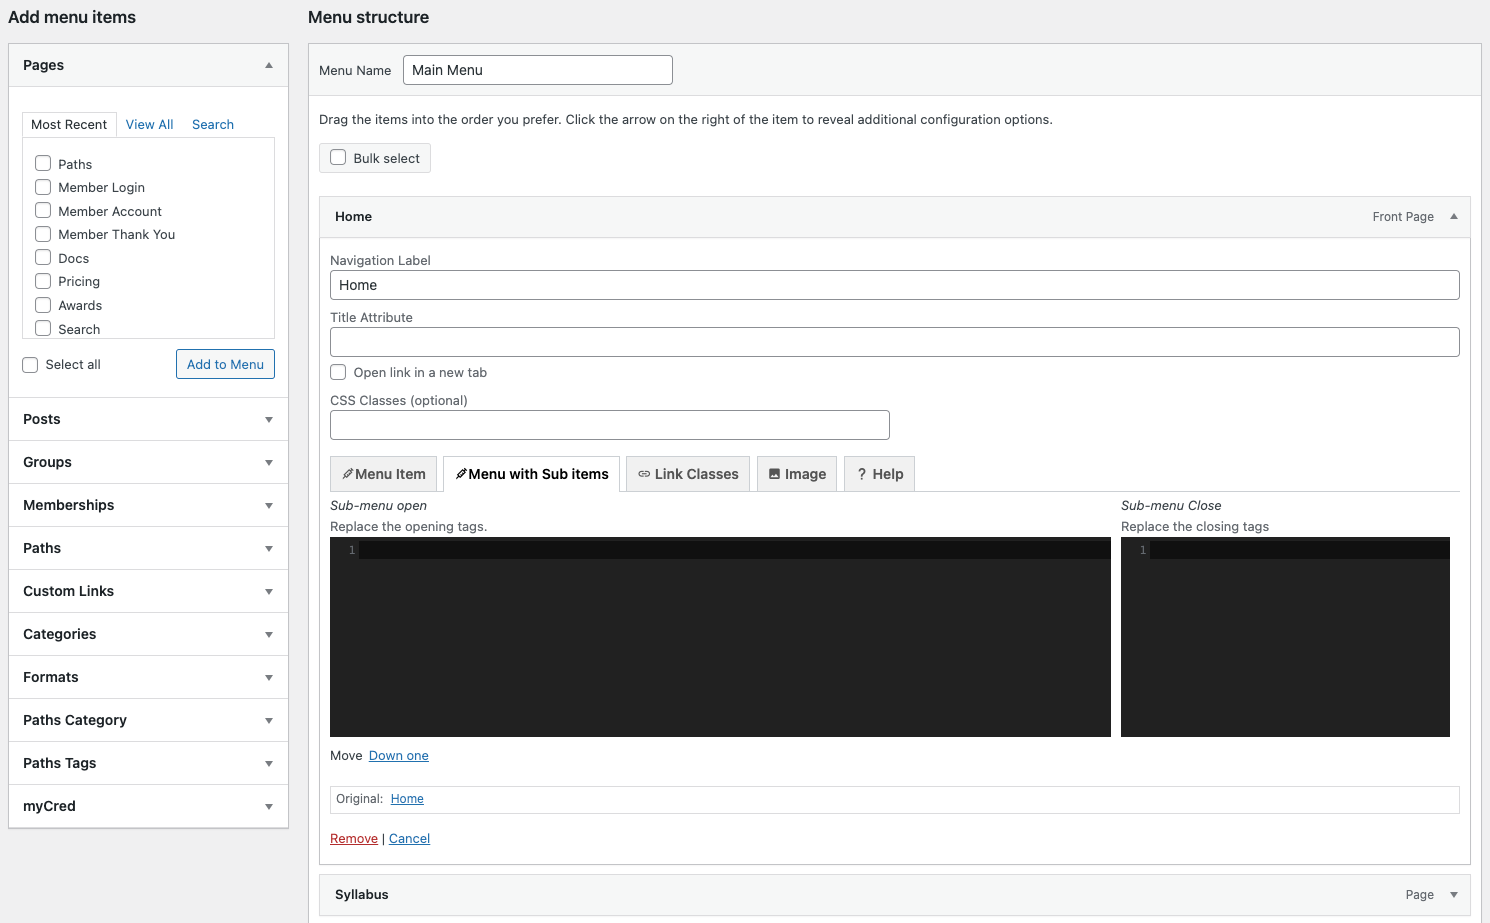
It replaces the unordered list tag with a class of “sub-menu”.
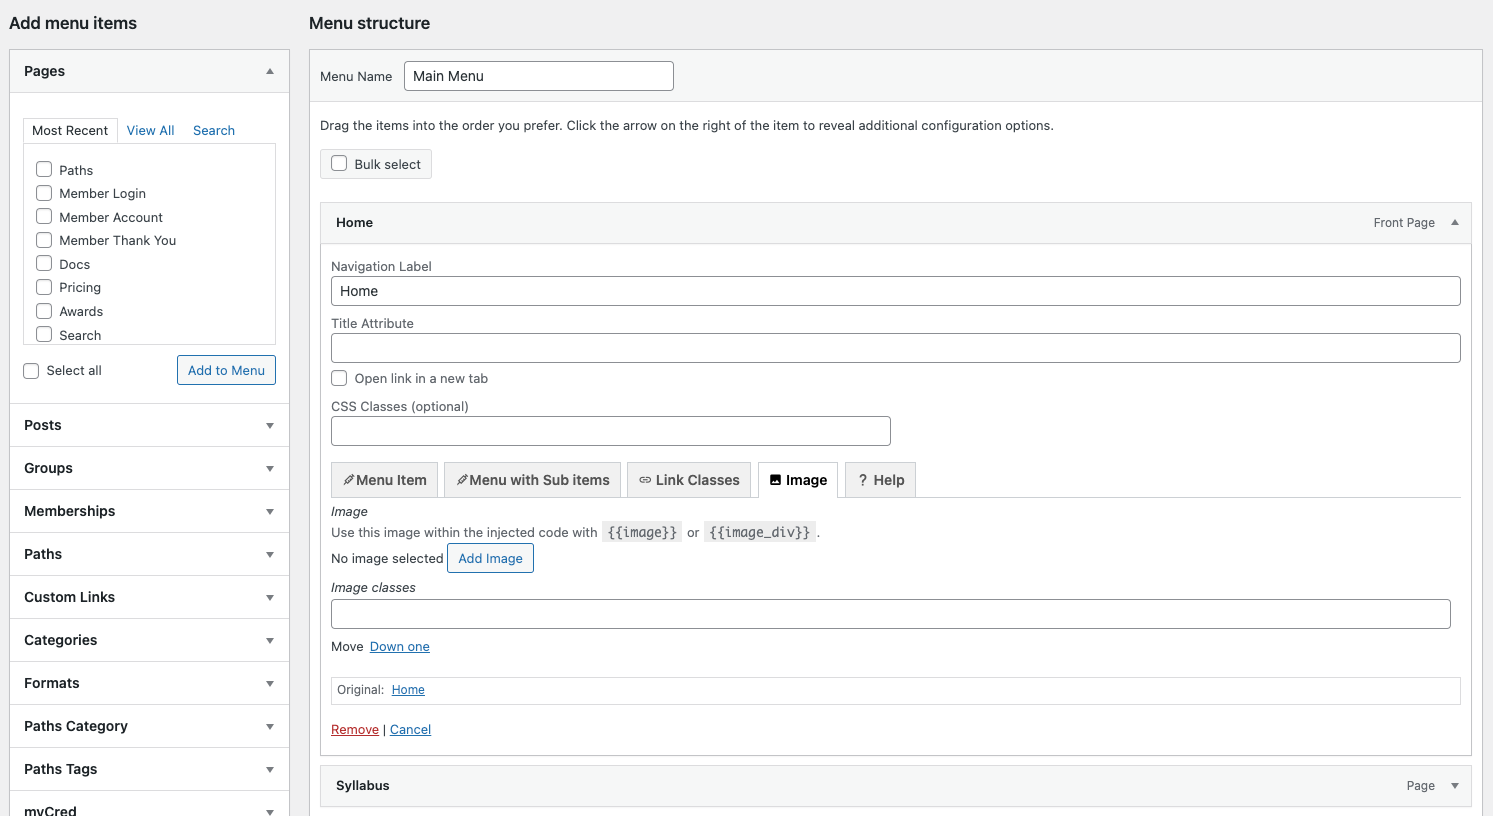
Images
Use the media picker to choose an image you wish to inject into the code. Once the image is selected you can embed it into any of the fields with one of the following moustache codes:
{{image}}
This injects the image as an image tag.
<img class="IMG_CLASSES" data-bg="IMG_URL" alt="IMG_ALT" src="IMG_URL" /></img>;
{{image_div}}
This injects the image as a background image to a div.
<div class="IMG_CLASSES" data-bg="IMG_URL" alt="IMG_ALT" style="background-image: url(IMG_URL);" ></div>;
Theme CSS
Make sure your theme contains the following CSS so that the hovering works for submenu items.
header nav div #main-menu {/* For hovering */& > ul:hover > div,& > li:hover > div {display: block;}& > ul:hover > ul,& > li:hover > ul {display: block;}}
Shortcodes
All [shortcodes] will be run within the menus.
4. Contributing
Contributions are what make the open source community such an amazing place to learn, inspire, and create. Any contributions you make are greatly appreciated.
If you have a suggestion that would make this better, please fork the repo and create a pull request. You can also simply open an issue. Don't forget to give the project a star! Thanks again!
- Fork the Project
- Create your Feature Branch (git checkout -b feature/AmazingFeature)
- Commit your Changes (git commit -m 'Add some AmazingFeature')
- Push to the Branch (git push origin feature/AmazingFeature)
- Open a Pull Request
5. License
Distributed under the MIT License.
MIT License
Copyright (c) 2022 Andy Pearson
Permission is hereby granted, free of charge, to any person obtaining a copy of this software and associated documentation files (the "Software"), to deal in the Software without restriction, including without limitation the rights to use, copy, modify, merge, publish, distribute, sublicense, and/or sell copies of the Software, and to permit persons to whom the Software is furnished to do so, subject to the following conditions:
The above copyright notice and this permission notice shall be included in all copies or substantial portions of the Software.
THE SOFTWARE IS PROVIDED "AS IS", WITHOUT WARRANTY OF ANY KIND, EXPRESS OR IMPLIED, INCLUDING BUT NOT LIMITED TO THE WARRANTIES OF MERCHANTABILITY, FITNESS FOR A PARTICULAR PURPOSE AND NONINFRINGEMENT. IN NO EVENT SHALL THE AUTHORS OR COPYRIGHT HOLDERS BE LIABLE FOR ANY CLAIM, DAMAGES OR OTHER LIABILITY, WHETHER IN AN ACTION OF CONTRACT, TORT OR OTHERWISE, ARISING FROM, OUT OF OR IN CONNECTION WITH THE SOFTWARE OR THE USE OR OTHER DEALINGS IN THE SOFTWARE.
6. Contact
Project Link: https://github.com/IORoot/...
7. Changelog
v1.3.0 - Add menu walkers for main-menu and sub-menu
v1.2.1 - Add ACF Panel back in.
v1.2.0 - Updated help, examples and layout.
v1.1.0 - Add fullwidth items on admin menu.
v1.0.0 - Initial Release.