

Page-Builder Metafizzy Isotope
This is Metafizzy Isotope built for the custom Page-Builder project.
1. Table of Contents
- 2.1. Built With
- 2.2. Installation
- 3.1. Isotope
- 3.2. WP_Query
- 3.3. Javascript
- 3.4. Filters
- 3.4.1. Taxonomies
- 3.4.2. Post / Meta Fields
- 3.4.3. Dates
- 3.4.4. Display as Button
- 3.4.5. Display as Select Box
- 3.5. Sorting
- 3.5.1. Sort Options
- 3.5.2. Sorting Classes
- 3.5.3. Sorting Direction (ASC/DESC)
- 3.6. Cells
- 3.7. CSS
- 3.7.1. Notes on CSS.
2. About The Project
ACF Pro-Based panels for wordpress to allow you build metafizzy isotope grids. See their website for more details on use.
2.1. Built With
This project was built with the following frameworks, technologies and software.
2.2. Installation
These are the steps to get up and running with this plugin.
- Clone the repo into your wordpress plugin foldergit clone https://github.com/IORoot/wp-plugin__page-builder--isotope ./wp-content/plugins/page-builder-isotope
- Activate the plugin.
Note: This plugin requires the page-builder plugin to work https://github.com/IORoot/wp-plugin__page-builder
Note: This also requires ACF Pro to work.
3. Usage
Isotope is excellent at filtering and sorting grid layouts. This Plugin helps to integrate Isotope into the Page-Builder.
Once the plugin is activated, it will be available through the page-builder as an "organism" to include into the page.
The organism has seven tabs with multiple sub-tabs to use:
3.1. Isotope
The main page for the isotope plugin.
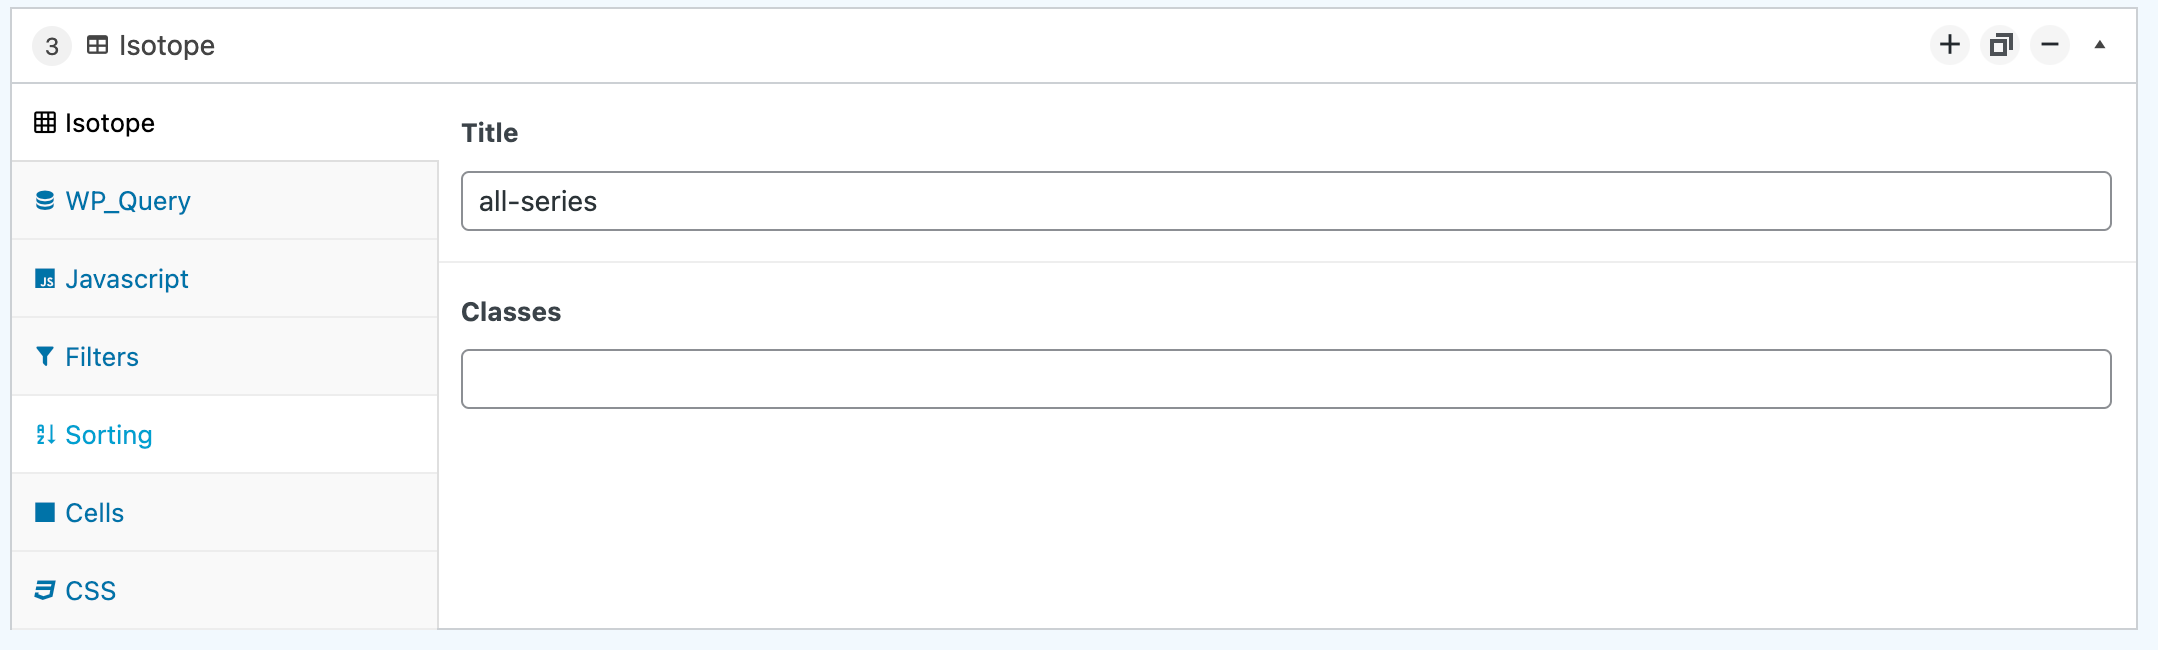
Title. The identifier for this instance.
Classes. Any class names you wish to give to the top-level container.
3.2. WP_Query
Define the query to get results from the database. The results as rendered as 'cells' within the grid.
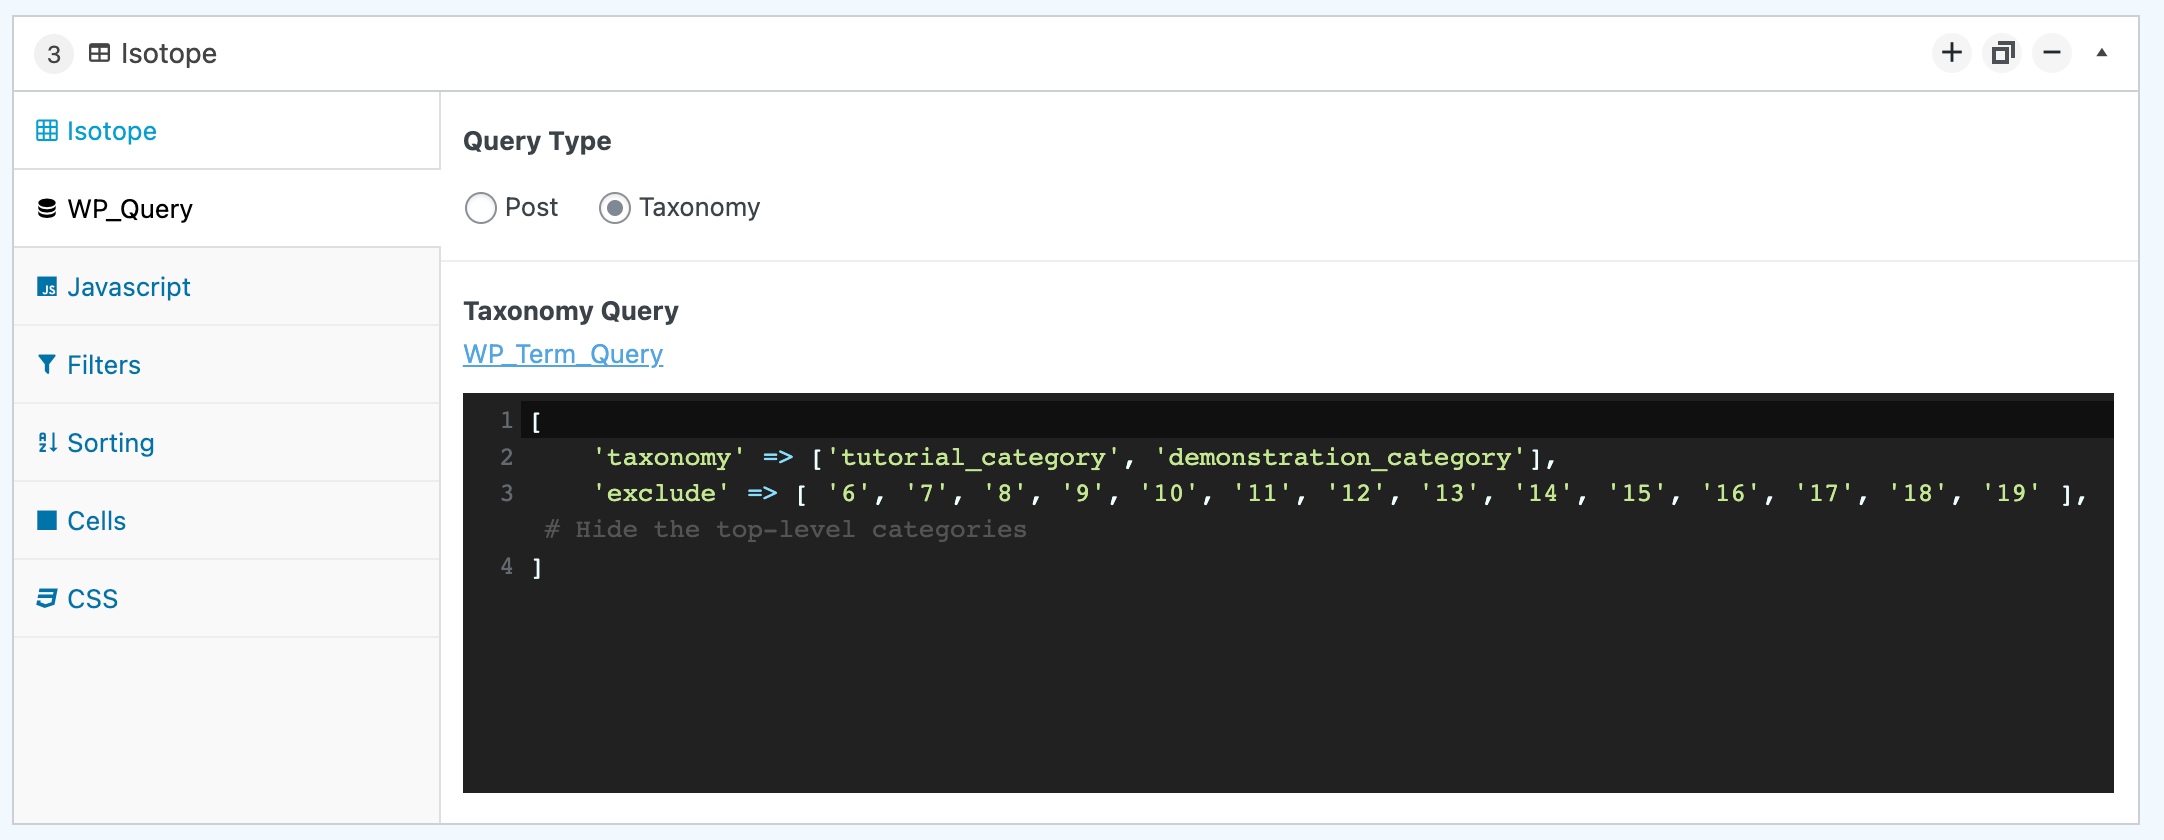
- Query Type. Post or Taxonomy.
You can select whether you want to run a WP_Query search or a WP_Term_Query search. If you want to retrieve posts/pages then the normal query is fine. However, if you wish to return taxonomies (Perhaps you wish to display all the sub-categories in a top-level one.) then use the WP_Term_Query instead.
- Post / Taxonomy Query.
This is where you supply an array for the query. Please see the documentation for formatting.
https://developer.wordpress.org/reference/classes/wp_query/ or https://developer.wordpress.org/reference/classes/WP_Term_Query/__construct/
A taxonomy example to display all the contents from two categories, excluding some.
['taxonomy' => ['tutorial_category', 'demonstration_category'],'exclude' => [ '6', '7', '8', '9', '10', '11', '12', '13', '14', '15', '16', '17', '18', '19' ], # Hide the top-level categories]
A post example:
['post_type' => ['tutorial','demonstration','blog'],'post_status' => 'publish','orderby' => 'rand','order' => 'ASC','numberposts' => 12,]
3.3. Javascript
The javascript tab is used to instantiate the Isotope instance however you wish.

For an example:
var elem = document.querySelector('.all-series .isotope-grid');var iso = new Isotope( elem, {itemSelector: '.grid-item',layoutMode: 'fitRows',});
This picks the class to attach the Isotope functionality to and then defines the configuration.
3.4. Filters
Once you have your results from the database are being shown you may wish to display buttons / drop-downs at the top of the grid to allow filtering.
The filter section gives you the ability to add different types of filters.
Note : You NEED to add the filtered words into each cell also. See the Cells section for more details.
Show Filters. Toggle filters on or off to be displayed.
Filters Classes. Classes to add to the wrapping class="filters" container.
3.4.1. Taxonomies
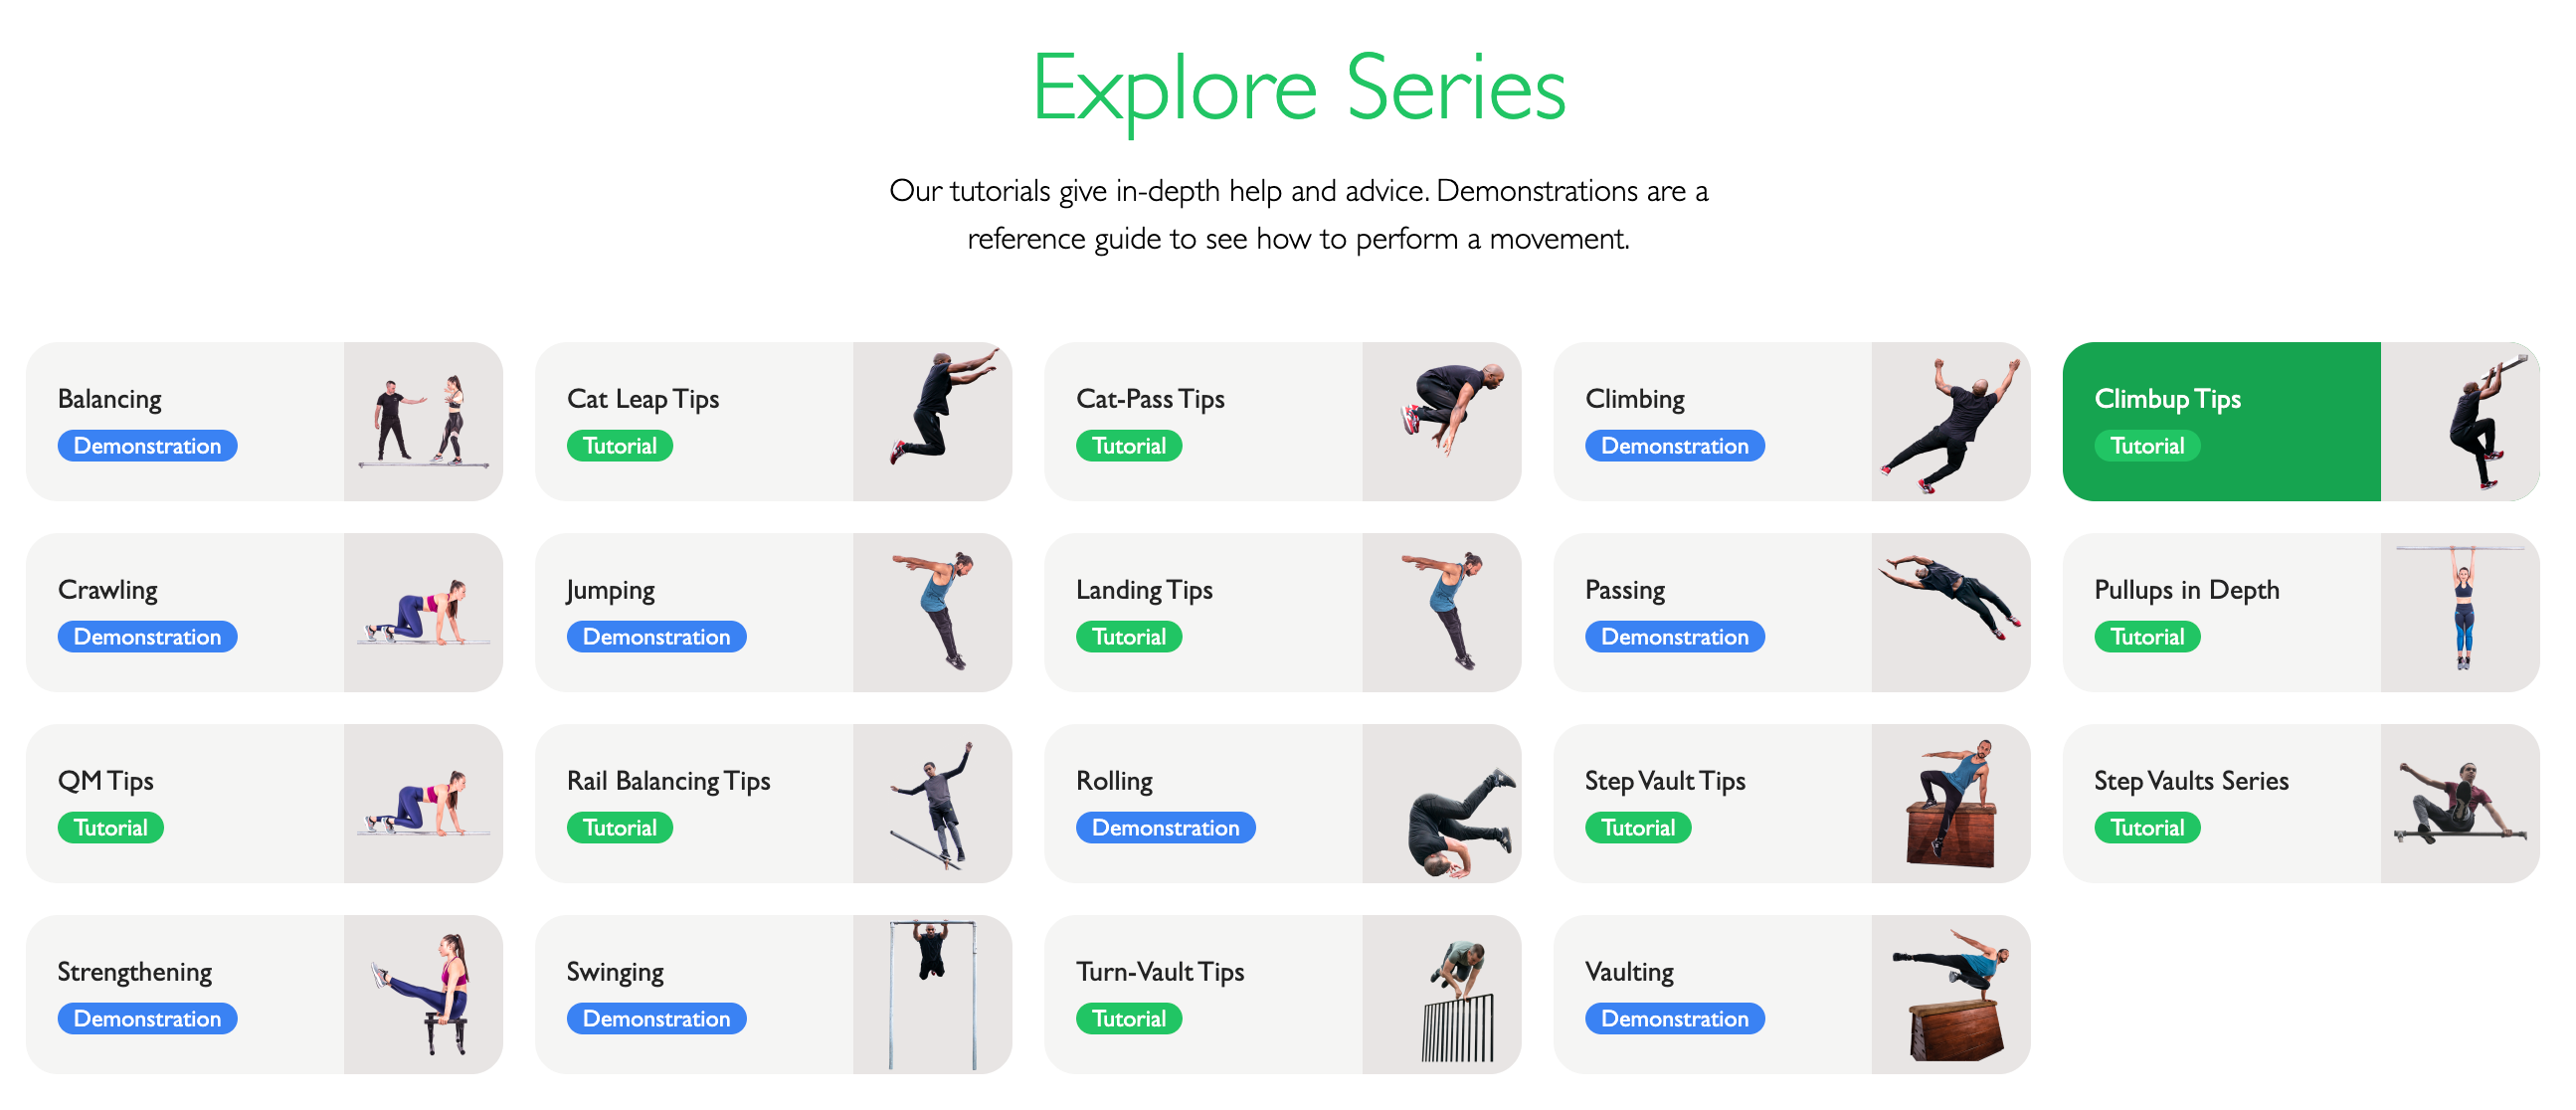
Use taxonomies to filter the posts. Use either buttons or dropdowns. The term query will create the list of buttons/dropdowns to display. Each option will filter on a class by the same name. I.e. “Balancing” will filter on a class called “.balancing” which will match any grid-item that has that as a class. By default, all grid-items have their own taxonomies and can be filtered on.
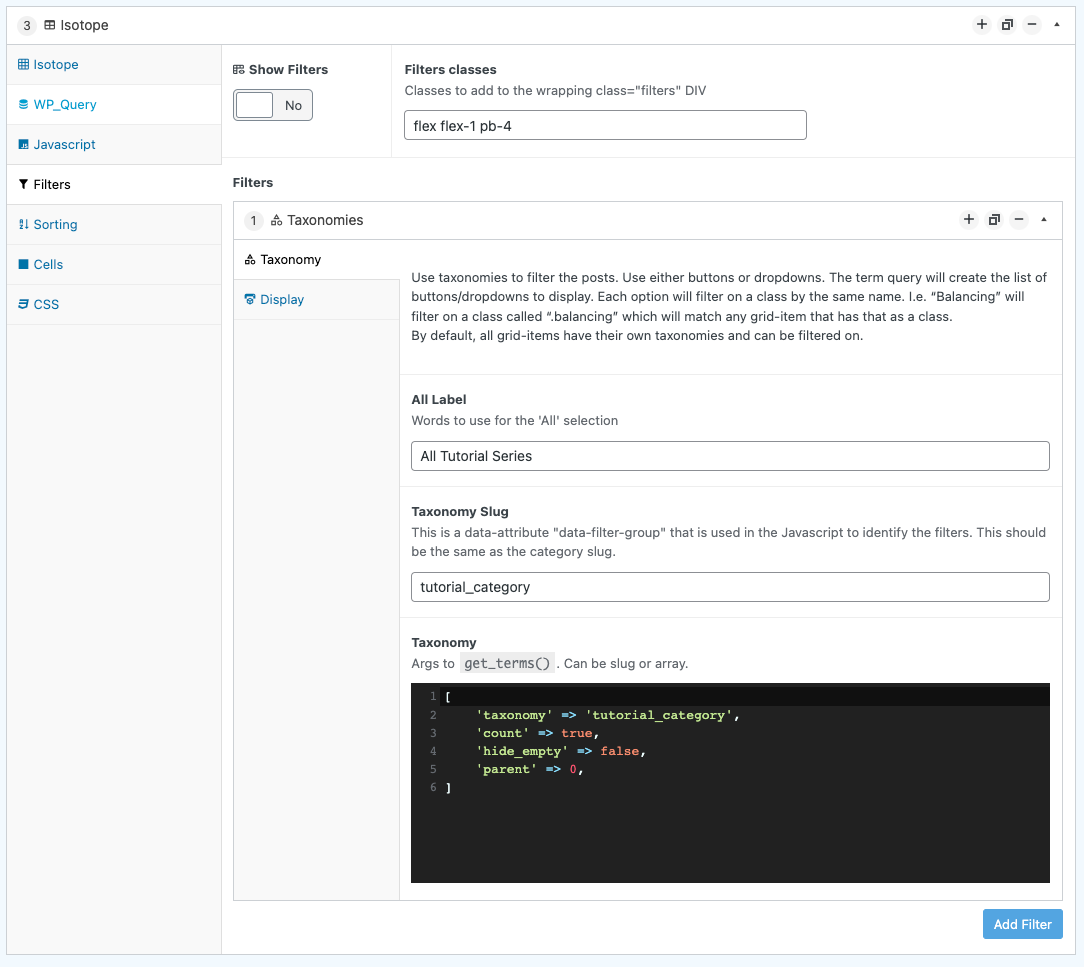
All Label. Words to use for the 'All' selection. When you wish to select all options at the same time - what word or phrase should identify that option.
Taxonomy Slug. This is a data-attribute "data-filter-group" that is used in the Javascript to identify the filters. This should be the same as the category slug.
Taxonomy. Arguments to the get_terms() function. Can be a slug or array. This generates the list of taxonomy options to be displayed.
For example:
['taxonomy' => 'tutorial_category','count' => true,'hide_empty' => false,'parent' => 0,]
This will display a list of taxonomies from the tutorial_category with their counts, even if they're empty.
See the WP_Term_Query for more details on how to construct this.
3.4.2. Post / Meta Fields
Use any post / meta field to create a list of options. Remember to add the {{FIELD}} into the cell template.
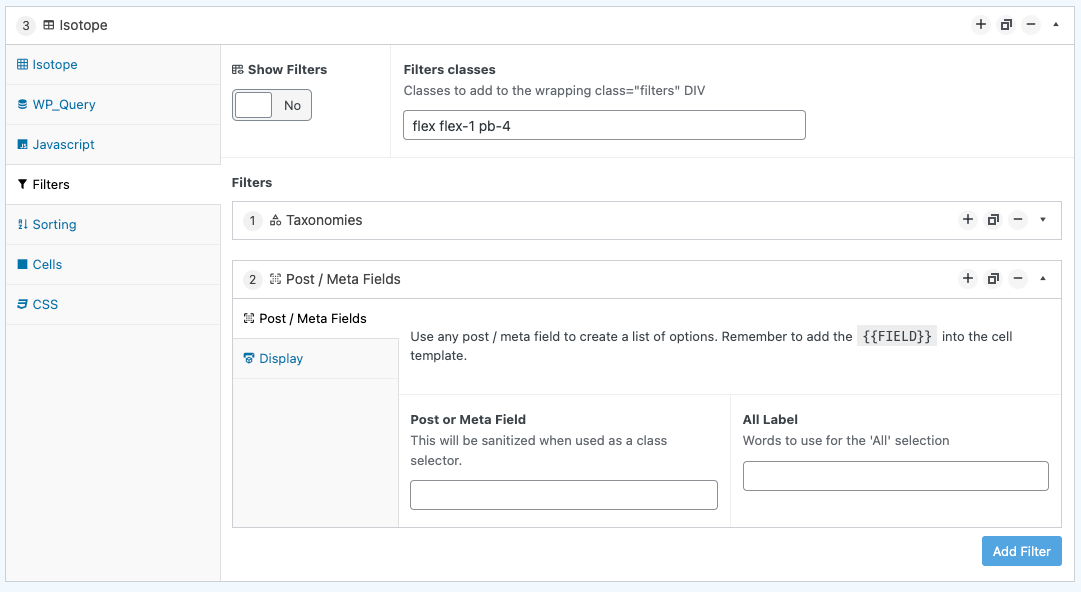
- Post or Meta Field. This will be sanitized when used as a class selector.
- All Label. Words to use for the 'All' selection.
When you add a post/meta field as a filter, Isotope will search for that particular field you select.
An Example:
Let's say you have three posts in the isotope results. Each has the post_title of:
- "Post One Title"
- "The Title for the Second Post"
- "The third post title"
Now, you pick post_title as the field to filter on. The filter will now list ALL three of those post_titles as a potential filter.
However, even though the filter will be listed, it won't actually filter the isotope grid unless you add the {{post_title}} moustache brackets into the cells.
Isotope searches each cell for that particular filter string and will display only the matches. So unless the cell has it, it won't filter.
Note : You MUST add the {{FIELD}} into the cell.
3.4.3. Dates
Filter by the published_date of the post. This filter is designed to give you options for different time-frames.
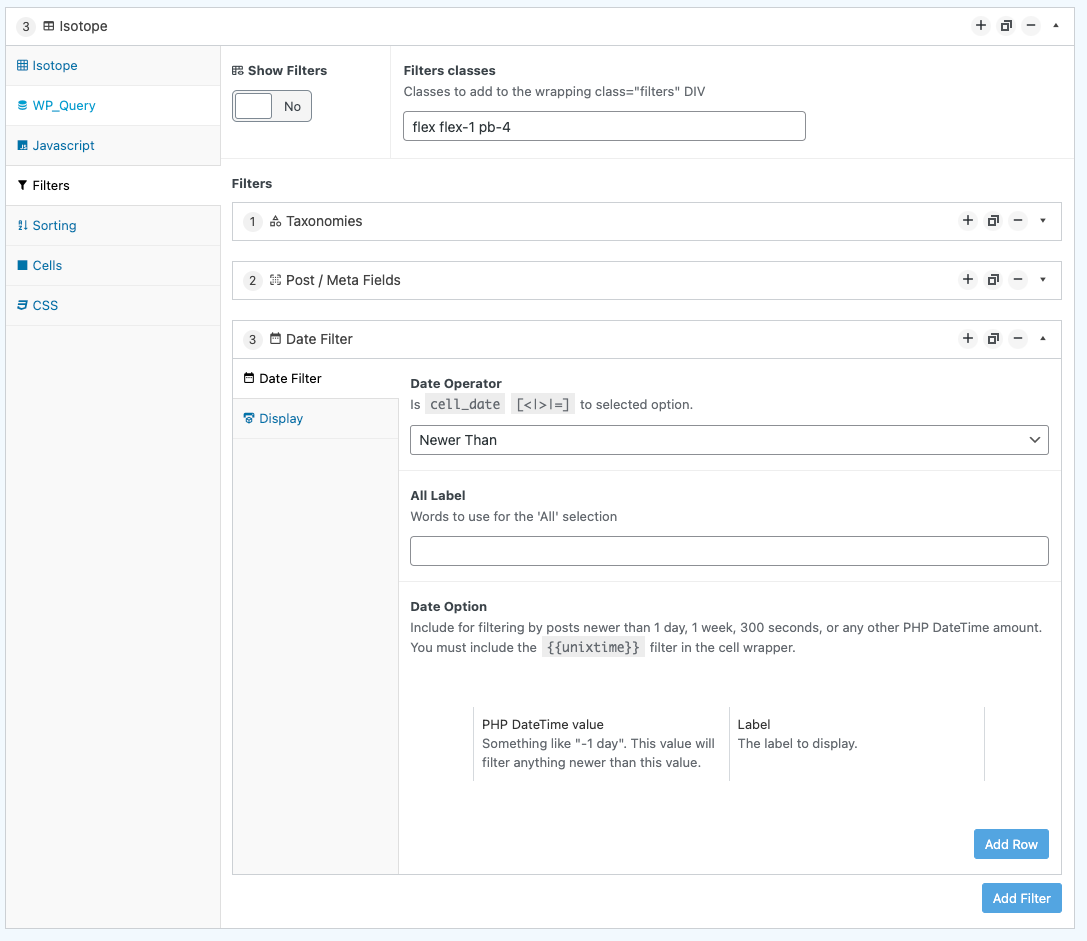
Date Operator. Do you want the options you supply to be Less than, Greater than or equal to the published_date.
All Label. Words to use for the 'All' selection.
Date Option. (row)
PHP DateTime value. Include for filtering by posts (newer, greater or equal to) 1 day, 1 week, 300 seconds, or any other PHP DateTime amount. You must include the {{unixtime}} filter in the cell wrapper.
Label. What to display to represent this date value.
An Example:
Lets say today is 1pm on the 1st of February 2022. You have three posts with the following published_dates:
- 2pm on 1st January 2022. (1 month ago)
- 2pm on 27th January 2022. (1 week ago)
- 2pm on 31st January 2022. (1 day ago)
Now, you could add an date filter that has a Newer than operator.
You can add the following three rows:
- PHP DateTime Value = "-1 day". Label = "Posts from the last day."
- PHP DateTime Value = "-1 week". Label = "Posts from the last week."
- PHP DateTime Value = "-1 month". Label = "Posts from the last month."
The filter "Posts from the last day" will now accurately show only post number 3 published 2pm on 31st January 2022. (1 day ago). The second filter will show both post 2 (1 week ago) and post 3 (1 day ago). The third filter will show all posts.
Note : {{unixtime}}MUST be added into the cell template for the date filter to work.
Note : By default, all grid items have a data-unixtime=”0123456789″ attribute that can be filtered on.
3.4.4. Display as Button
Any filter can be displayed as individual buttons for every potential option. This is usually suitable for things with a low number of options.
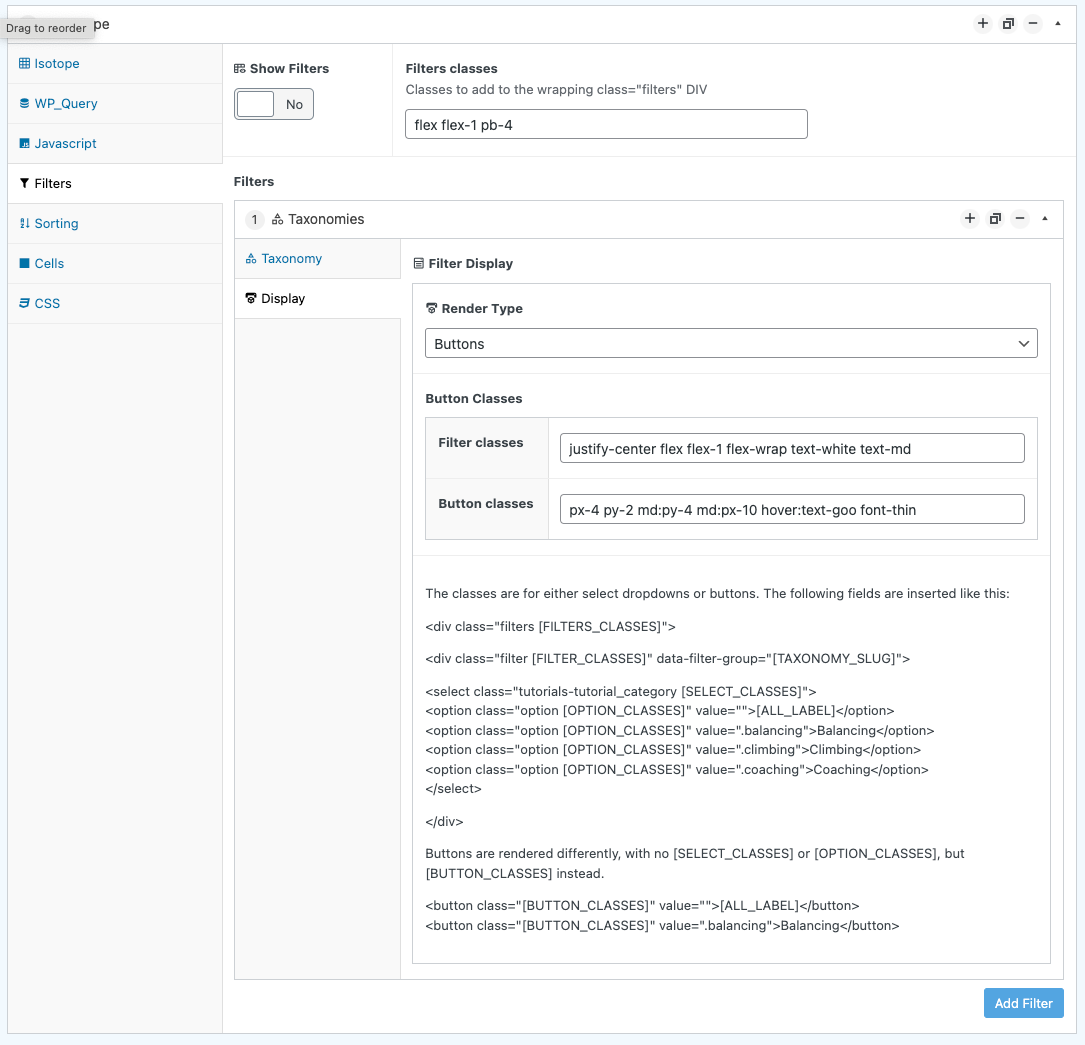
Render Type: Buttons.
Button Classes.
- Filter Classes. Add any class names to the (individual) wrapper.
- Button Classes. Add these classes to all buttons.
Buttons are rendered with the [BUTTON_CLASSES].
<div class="filters [FILTERS_CLASSES]"><div class="filter [FILTER_CLASSES]" data-filter-group="[TAXONOMY_SLUG]"><button class="[BUTTON_CLASSES]" value="">[ALL_LABEL]</button><button class="[BUTTON_CLASSES]" value=".balancing">Balancing</button></div></div>
3.4.5. Display as Select Box
You can alternatively display the filter options within a selectbox. This is usually prefered when ther are more than four or five options.
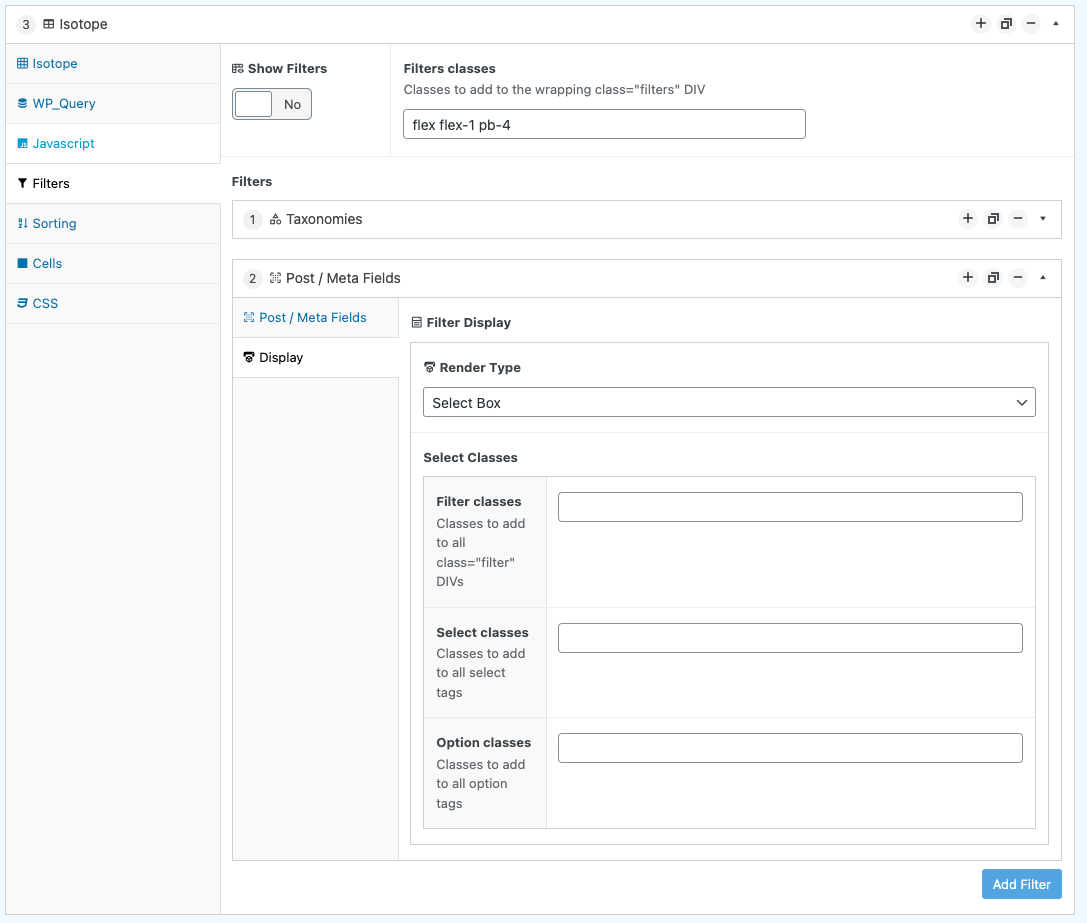
Render Type : Select Box
Select Classes
- Filter Classes. Add any class names to the (individual) wrapper.
- Select Classes. Add any class names to the <select> tag.
- Option Classes. Add any class names to all <option> tags.
The dropdown select options are render like this:
<div class="filters [FILTERS_CLASSES]"><div class="filter [FILTER_CLASSES]" data-filter-group="[TAXONOMY_SLUG]"><select class="tutorials-tutorial_category [SELECT_CLASSES]"><option class="option [OPTION_CLASSES]" value="">[ALL_LABEL]</option><option class="option [OPTION_CLASSES]" value=".balancing">Balancing</option><option class="option [OPTION_CLASSES]" value=".climbing">Climbing</option><option class="option [OPTION_CLASSES]" value=".coaching">Coaching</option></select></div></div>
3.5. Sorting
Sorting allows you to display an option in a special select box that organises the grid in a particular order.
For the sorting to work, there are three steps :
- The Isotope Javascript needs to register the classes / data-attributes you wish to sort on. When creating the isotope object, define the “getSortData” property. Here's an example:
<javascript>var elem = document.querySelector('.isotope-grid');var iso = new Isotope( elem, {itemSelector: '.grid-item',layoutMode: 'fitRows',getSortData: {title: '.title',unixdate: '[data-unixdate]'}});</javascript>
This indicates that you wish to sort on the element with the class .title and the element with the data property of [data-unixdate].
- Add those classes / data-attributes into the grid-item cell template. By default, every grid-item wrapper DIV has the taxonomy classes and a data-unixdate attribute that you can use. For additional fields, add in classes to sort on. For example:
<div class="title text-white text-md max-h-8 leading-4 mb-1 truncate">{{post_title}} </div>
- Add the sorting options.
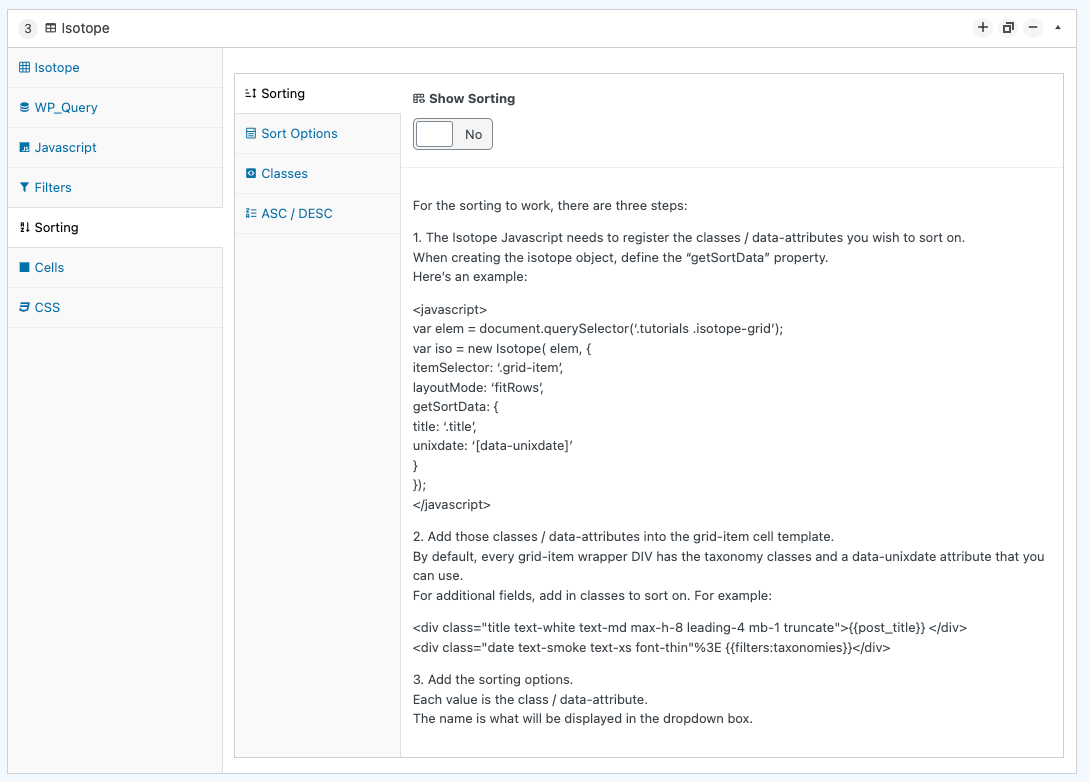
- Sorting. Yes / No. Toggle the sorting select-box on or off.
3.5.1. Sort Options
The sorting options describe the options listed in the select box.
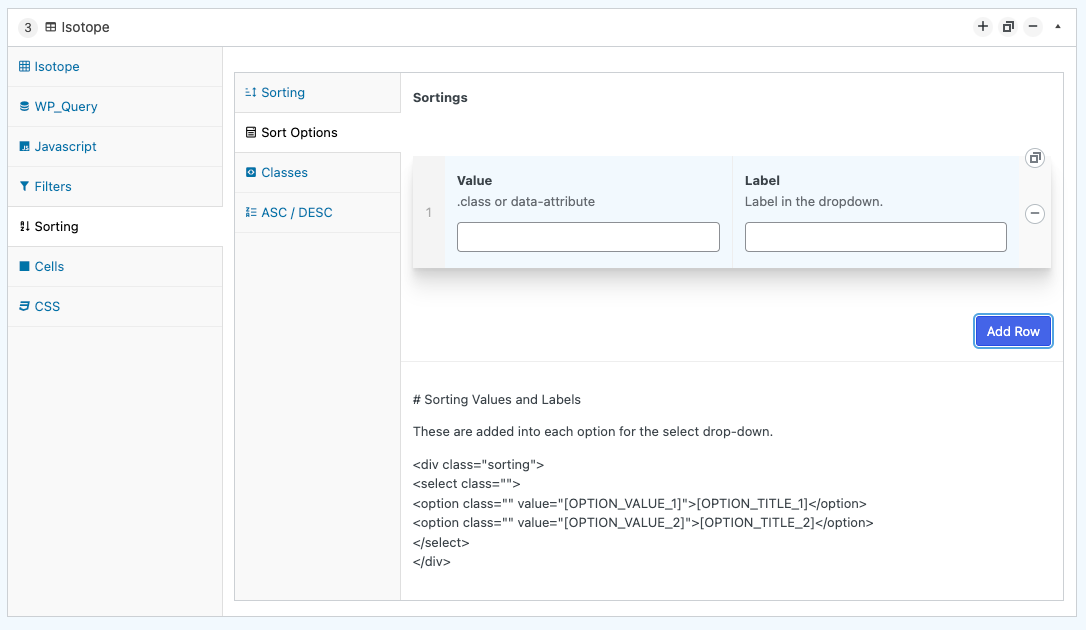
- Sortings (row)
- Value. The class or data-attribute isotope is looking for in a cell.
- Label. What the selectbox option should say.
These are added into each option for the select drop-down.
<div class="sorting"><select class=""><option class="" value="[OPTION_VALUE_1]">[OPTION_TITLE_1]</option><option class="" value="[OPTION_VALUE_2]">[OPTION_TITLE_2]</option></select></div>
3.5.2. Sorting Classes
These are additional class names to add to each part of the sorting select box.
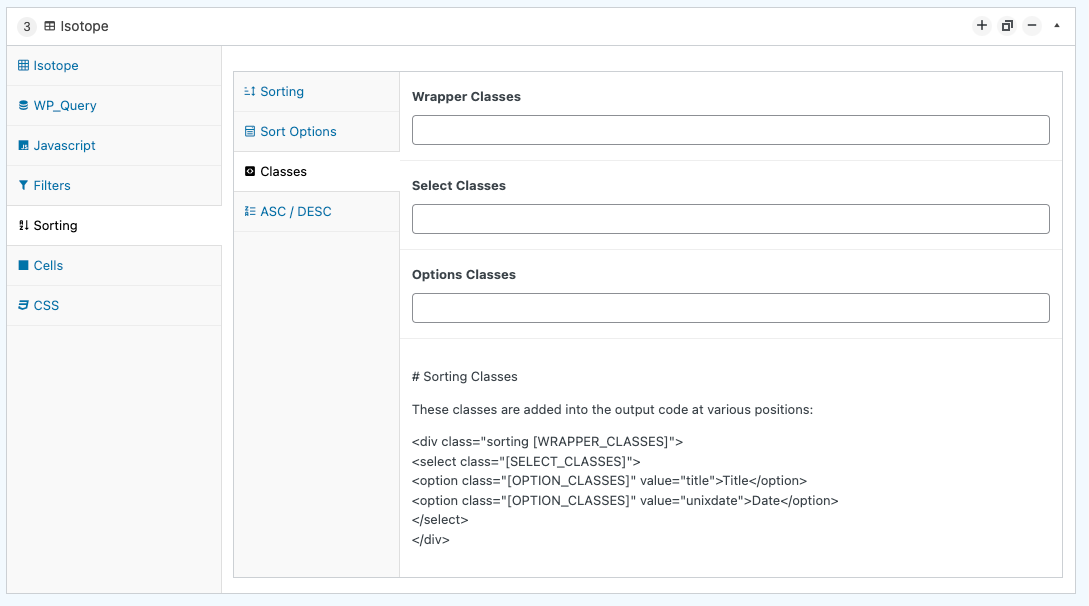
- Wrapper Claases.
- Select Classes.
- Options Classes.
These classes are added into the output code at various positions:
<div class="sorting [WRAPPER_CLASSES]"><select class="[SELECT_CLASSES]"><option class="[OPTION_CLASSES]" value="title">Title</option><option class="[OPTION_CLASSES]" value="unixdate">Date</option></select></div>
3.5.3. Sorting Direction (ASC/DESC)
Should there be an Ascending / Descending button to reeverse the sort order.
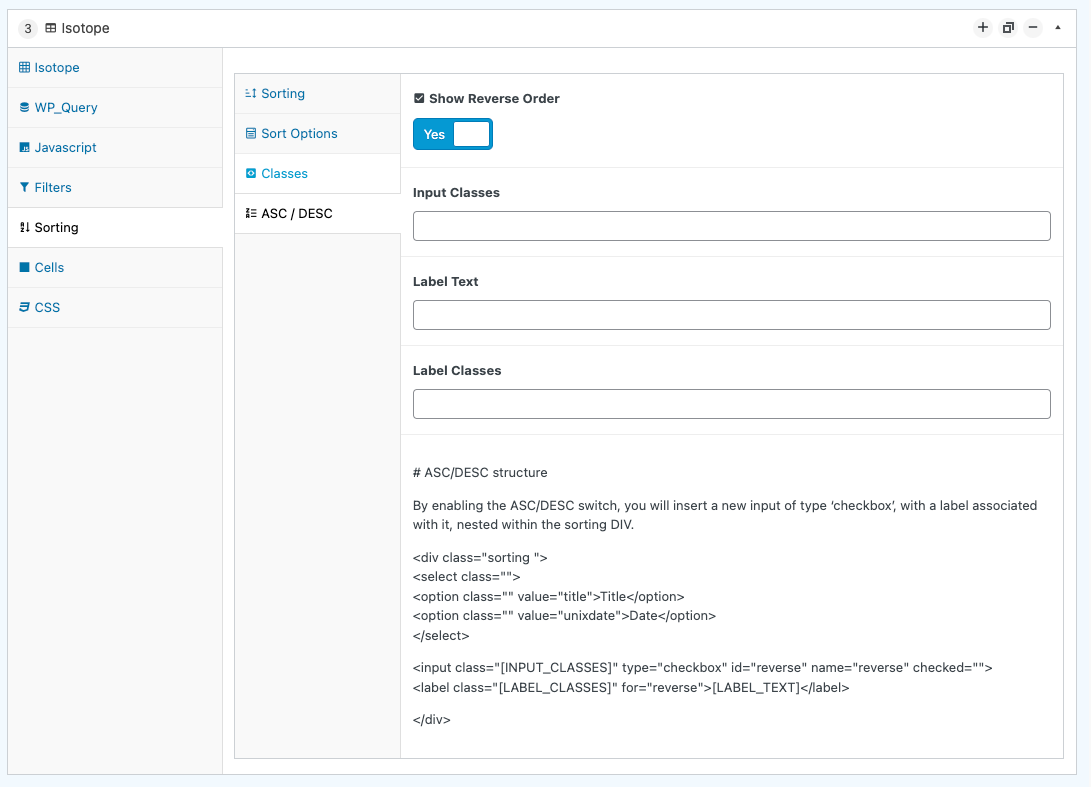
- Show Reverse Order. Yes / No. Toggle whether to render a button or not.
- Input Classes.
- Label text.
- Label Classes.
By enabling the ASC/DESC switch, you will insert a new input of type checkbox, with a label associated with it, nested within the sorting DIV.
<div class="sorting "><select class=""><option class="" value="title">Title</option><option class="" value="unixdate">Date</option></select><!-- ORDER DIRECTION--><input class="[INPUT_CLASSES]" type="checkbox" id="reverse" name="reverse" checked=""><label class="[LABEL_CLASSES]" for="reverse">[LABEL_TEXT]</label></div>
3.6. Cells
The cell is how each result of the query is rendered. This is the template to use when outputing each item.
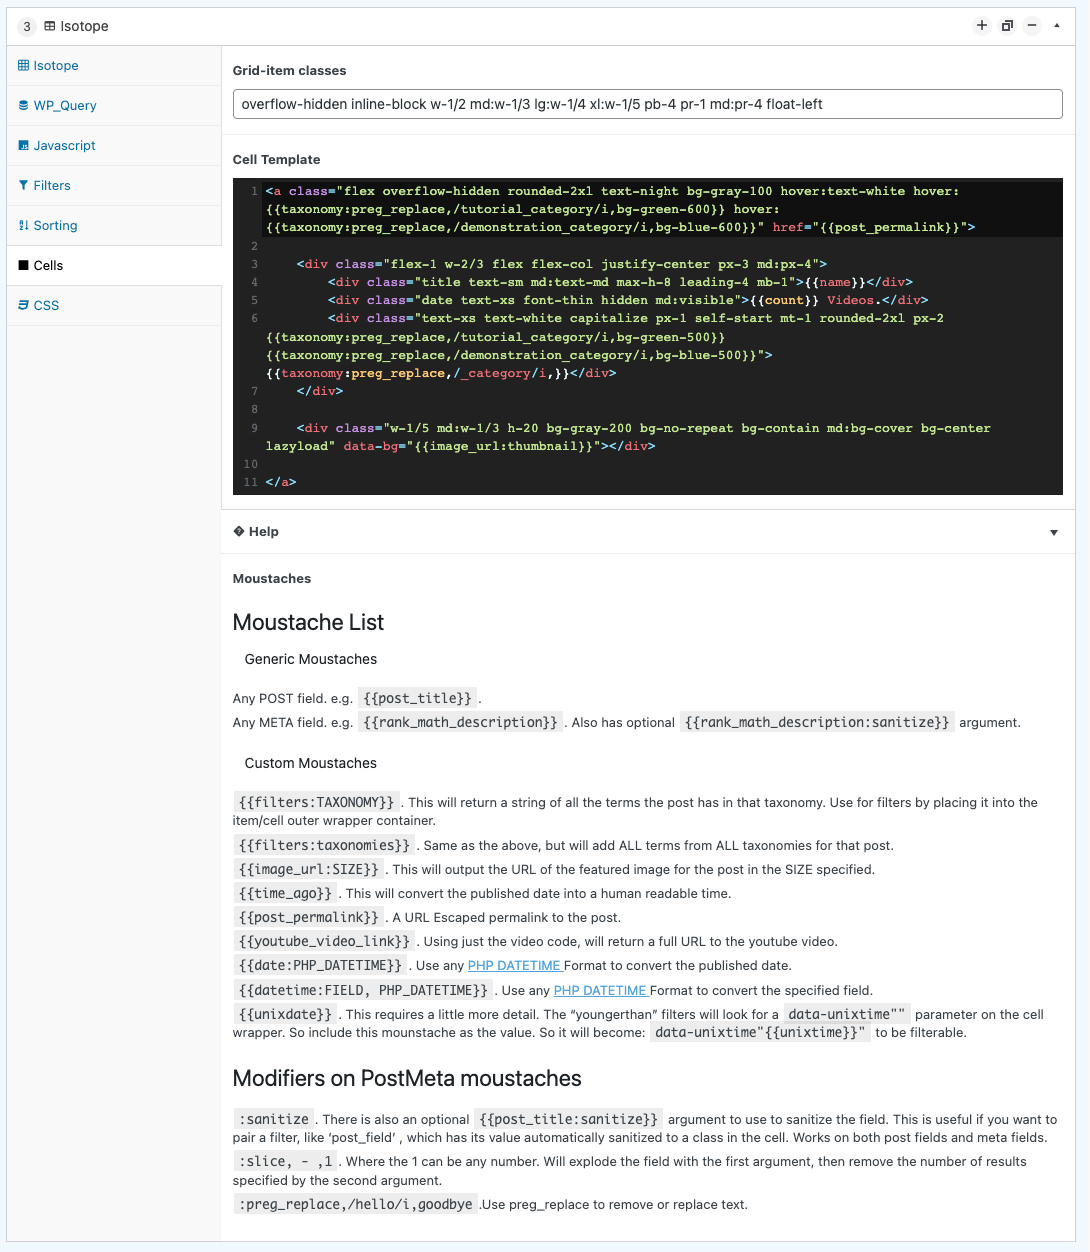
Grid-item Classes. These class names are given to every cell item in the grid.
Cell Template. The template is an HTML description of how each item should be output.
Example 1 - Simple Image and title template
This template renders a link to each post with the post's title and thumbnail image in it. Notice the title class on the post_title - this is so it's filterable later.
<a class="flex overflow-hidden rounded-2xl text-night bg-gray-100 hover:text-white" href="{{post_permalink}}"><div class="title text-sm md:text-md max-h-8 leading-4 mb-1">{{post_title}}</div><div class="w-1/3 h-20 bg-gray-200 bg-no-repeat bg-contain md:bg-cover bg-center lazyload" data-bg="{{image_url:thumbnail}}"></div></a>
Example 2. Complex template with regexes.
This example uses the preg_replace modifier to replace words for others.
<a class="flex overflow-hidden rounded-2xl text-night bg-gray-100 hover:text-white hover:{{taxonomy:preg_replace,/tutorial_category/i,bg-green-600}}" href="{{post_permalink}}"><div class="flex-1 w-2/3 flex flex-col justify-center px-3 md:px-4"><div class="title text-sm md:text-md max-h-8 leading-4 mb-1">{{name}}</div><div class="text-xs font-thin hidden md:visible">{{count}} Videos.</div><div class="text-xs text-white capitalize px-1 self-start mt-1 rounded-2xl px-2">{{taxonomy:preg_replace,/_category/i,}}</div></div><div class="w-1/3 h-20 bg-gray-200 bg-no-repeat bg-contain md:bg-cover bg-center lazyload" data-bg="{{image_url:thumbnail}}"></div></a>
3.6.1. {{Moustaches}} List Reference.
Below is a list of the avaialbe {{moustaches}} yyou can use in the cell template.
Generic Moustaches
- Any POST field. e.g. {{post_title}}.
- Any META field. e.g. {{rank_math_description}}.
Custom Moustaches
{{filters:TAXONOMY}}. This will return a string of all the terms the post has in that taxonomy. Use for filters by placing it into the item/cell outer wrapper container.
{{filters:taxonomies}}. Same as the above, but will add ALL terms from ALL taxonomies for that post.
{{image_url:SIZE}}. This will output the URL of the featured image for the post in the SIZE specified. (small, medium, large, original, thumbnail, etc...)
{{time_ago}}. This will convert the published date into a human readable time.
{{post_permalink}}. A URL Escaped permalink to the post.
{{youtube_video_link}}. Using just the video code, will return a full URL to the youtube video.
{{date:PHP_DATETIME}}. Use any PHP DATETIME Format to convert the published date.
{{datetime:FIELD, PHP_DATETIME}}. Use any PHP DATETIME Format to convert the specified field.
{{unixdate}}. This requires a little more detail. The “youngerthan” filters will look for a data-unixtime"" parameter on the cell wrapper. So include this mounstache as the value. So it will become: data-unixtime"{{unixtime}}" to be filterable.
Modifiers on Post / Meta moustaches
The modifiers allow you to alter the default output of the field.
:sanitize. Use the {{post_title:sanitize}} secondary argument to use to sanitize the field. This is useful if you want to pair a filter, like post_title , which has its value automatically sanitized to a class in the cell. Works on both post fields and meta fields.
:slice,[SEPARATOR],[COUNT]. e.g. {{post_title:slice, - ,1}} Where the 1 can be any number. Will explode the field with the first argument " - ", then remove the number of results specified by the second argument (The first in this example).
:preg_replace,[REGEX],[REPLACEMENT] e.g. {{post_content:preg_replace,/hello/i,goodbye}}. Use preg_replace to remove or replace text.
3.7. CSS
Add additional CSS in an inline <style> tag above the isotope grid.
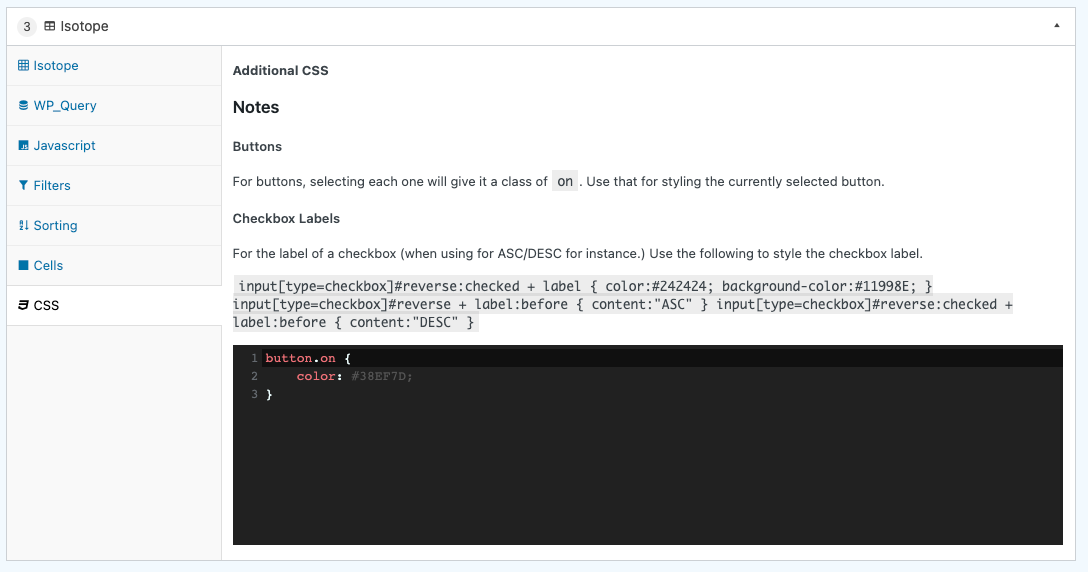
3.7.1. Notes on CSS.
Buttons For buttons, selecting each one will give it a class of on. Use that for styling the currently selected button.
Checkbox Labels
For the label of a checkbox (when using ASC/DESC for instance.) Use the following to style the checkbox label:
input[type=checkbox]#reverse:checked + label {color:#242424;background-color:#11998E;}input[type=checkbox]#reverse + label:before {content:"ASC"}input[type=checkbox]#reverse:checked + label:before {content:"DESC"}
4. Customising
This example will initiate sorting with upper/lowercase normalised.
var elem = document.querySelector('.tutorials .isotope-grid');var iso = new Isotope( elem, {itemSelector: '.grid-item',layoutMode: 'fitRows',getSortData: {title: function( itemElem ) {var title = itemElem.querySelector('.title').innerText;return title.toLowerCase();},unixdate: '[data-unixdate]'}});
5. Troubleshooting
None.
6. Contributing
Contributions are what make the open source community such an amazing place to learn, inspire, and create. Any contributions you make are greatly appreciated.
If you have a suggestion that would make this better, please fork the repo and create a pull request. You can also simply open an issue. Don't forget to give the project a star! Thanks again!
- Fork the Project
- Create your Feature Branch (git checkout -b feature/AmazingFeature)
- Commit your Changes (git commit -m 'Add some AmazingFeature')
- Push to the Branch (git push origin feature/AmazingFeature)
- Open a Pull Request
7. License
Distributed under the MIT License.
MIT License
Copyright (c) 2022 Andy Pearson
Permission is hereby granted, free of charge, to any person obtaining a copy of this software and associated documentation files (the "Software"), to deal in the Software without restriction, including without limitation the rights to use, copy, modify, merge, publish, distribute, sublicense, and/or sell copies of the Software, and to permit persons to whom the Software is furnished to do so, subject to the following conditions:
The above copyright notice and this permission notice shall be included in all copies or substantial portions of the Software.
THE SOFTWARE IS PROVIDED "AS IS", WITHOUT WARRANTY OF ANY KIND, EXPRESS OR IMPLIED, INCLUDING BUT NOT LIMITED TO THE WARRANTIES OF MERCHANTABILITY, FITNESS FOR A PARTICULAR PURPOSE AND NONINFRINGEMENT. IN NO EVENT SHALL THE AUTHORS OR COPYRIGHT HOLDERS BE LIABLE FOR ANY CLAIM, DAMAGES OR OTHER LIABILITY, WHETHER IN AN ACTION OF CONTRACT, TORT OR OTHERWISE, ARISING FROM, OUT OF OR IN CONNECTION WITH THE SOFTWARE OR THE USE OR OTHER DEALINGS IN THE SOFTWARE.
8. Contact
Author Link: https://github.com/IORoot
9. Changelog
- v1.1.4 - 14/03/2022
Added a modifier on taxonomies to only return a single one. {{filters:syllabus_category:0}}
Ordered the taxonomy filter to return the parent first and child after in the return array.
Added the {{admin}}...{{/admin}} moustache to only display cell content if you're an admin.
Added an {{field:admin}} modifier to only display post / meta field if user is and admin.
Added an "Admin" tab and toggle for filters to be only for administrators.
- v1.1.3 - 27/02/2022
Removed the window.addEventListener (enqueue.php) from the inline JS.
Added searchbox to filters.
Fixed numerical classes to have the filter name prefixed onto it. This means all numerical classes (that are invalid) will now have the filter name added on the front. i.e. The class .9 will actually be .award_level9 if the filter-group is called 'award_level'. This also means that the cell will require that inside too.
`<div class="award_level award_level{{award_level}} hidden">{{award_level}}</div>`
v1.1.2 - 23/02/2022 - Filter selects are organised alphabetically. Help explains about sorts & filters in the cell.
v1.1.1 - 11/01/2022 - Add {{loop_index}} as a new field for the cell.
v1.1.0 - 06/01/2022 - Added all taxonomies into the cells so filtering works for any taxonomy.
v1.0.0 - 01/01/2022 - Working Isotope instance.