

Pipeline Processor
The Processor allows you to combine records. Part of the Pipeline Project
1. Table of Contents
The Pipeline Project
The pipeline project was one where I wanted to be able to do the following:
- Query YouTube / Instagram for specific videos and download the results (video file, post content, meta, etc).
- Automatically create some cover art.
- Combine the videos to create a quick trailer.
- Export the results to my social media.
This then became the components of the pipeline project:
2. About The Project
This project focuses upon "The Processor". It's a rule based system that takes multiple posts and will combine them in a multitude of ways.
Thee idea is that you can query for a number of posts and then combine them by specifying exactly what you're going to do with each field.
You can mutate and alter the fields as you combine them.
You can manipulate multiple images at once if you have the pipeline generative-images plugin installed.
Any video files can also be combined through the use of FFMpeg. Download and install FFMpeg as a dependency.
2.1. Built With
This project was built with the following frameworks, technologies and software.
3.2. Installation
This was built with ACF PRO - Please make sure it is installed before installing this plugin.
These are the steps to get up and running with this plugin.
- Clone the repo into your wordpress plugin foldergit clone https://github.com/IORoot/wp-plugin__pipeline--processor ./wp-content/plugins/pipeline-processor
- Activate the plugin.
4. Usage
There are eight tabs in the the processor:
Job.
The job allows you to pick which parts of the processor you want combine and run together.
- Enabled. Run this particular job on save. On or off.
- Job ID. Identifier to distinguish between each job.
- Content. Reference to any Content ID's that are enabled.
- Process. Reference to any Process ID's that are enabled.
- Combine. Reference to any Combine ID's that are enabled.
- Mappings. Reference to any Mappings ID's that are enabled.
- Save. Reference to any Save ID's that are enabled.
- Housekeep. Reference to any Housekeep ID's that are enabled.
- Schedule. Reference to any Schedule ID's that are enabled.
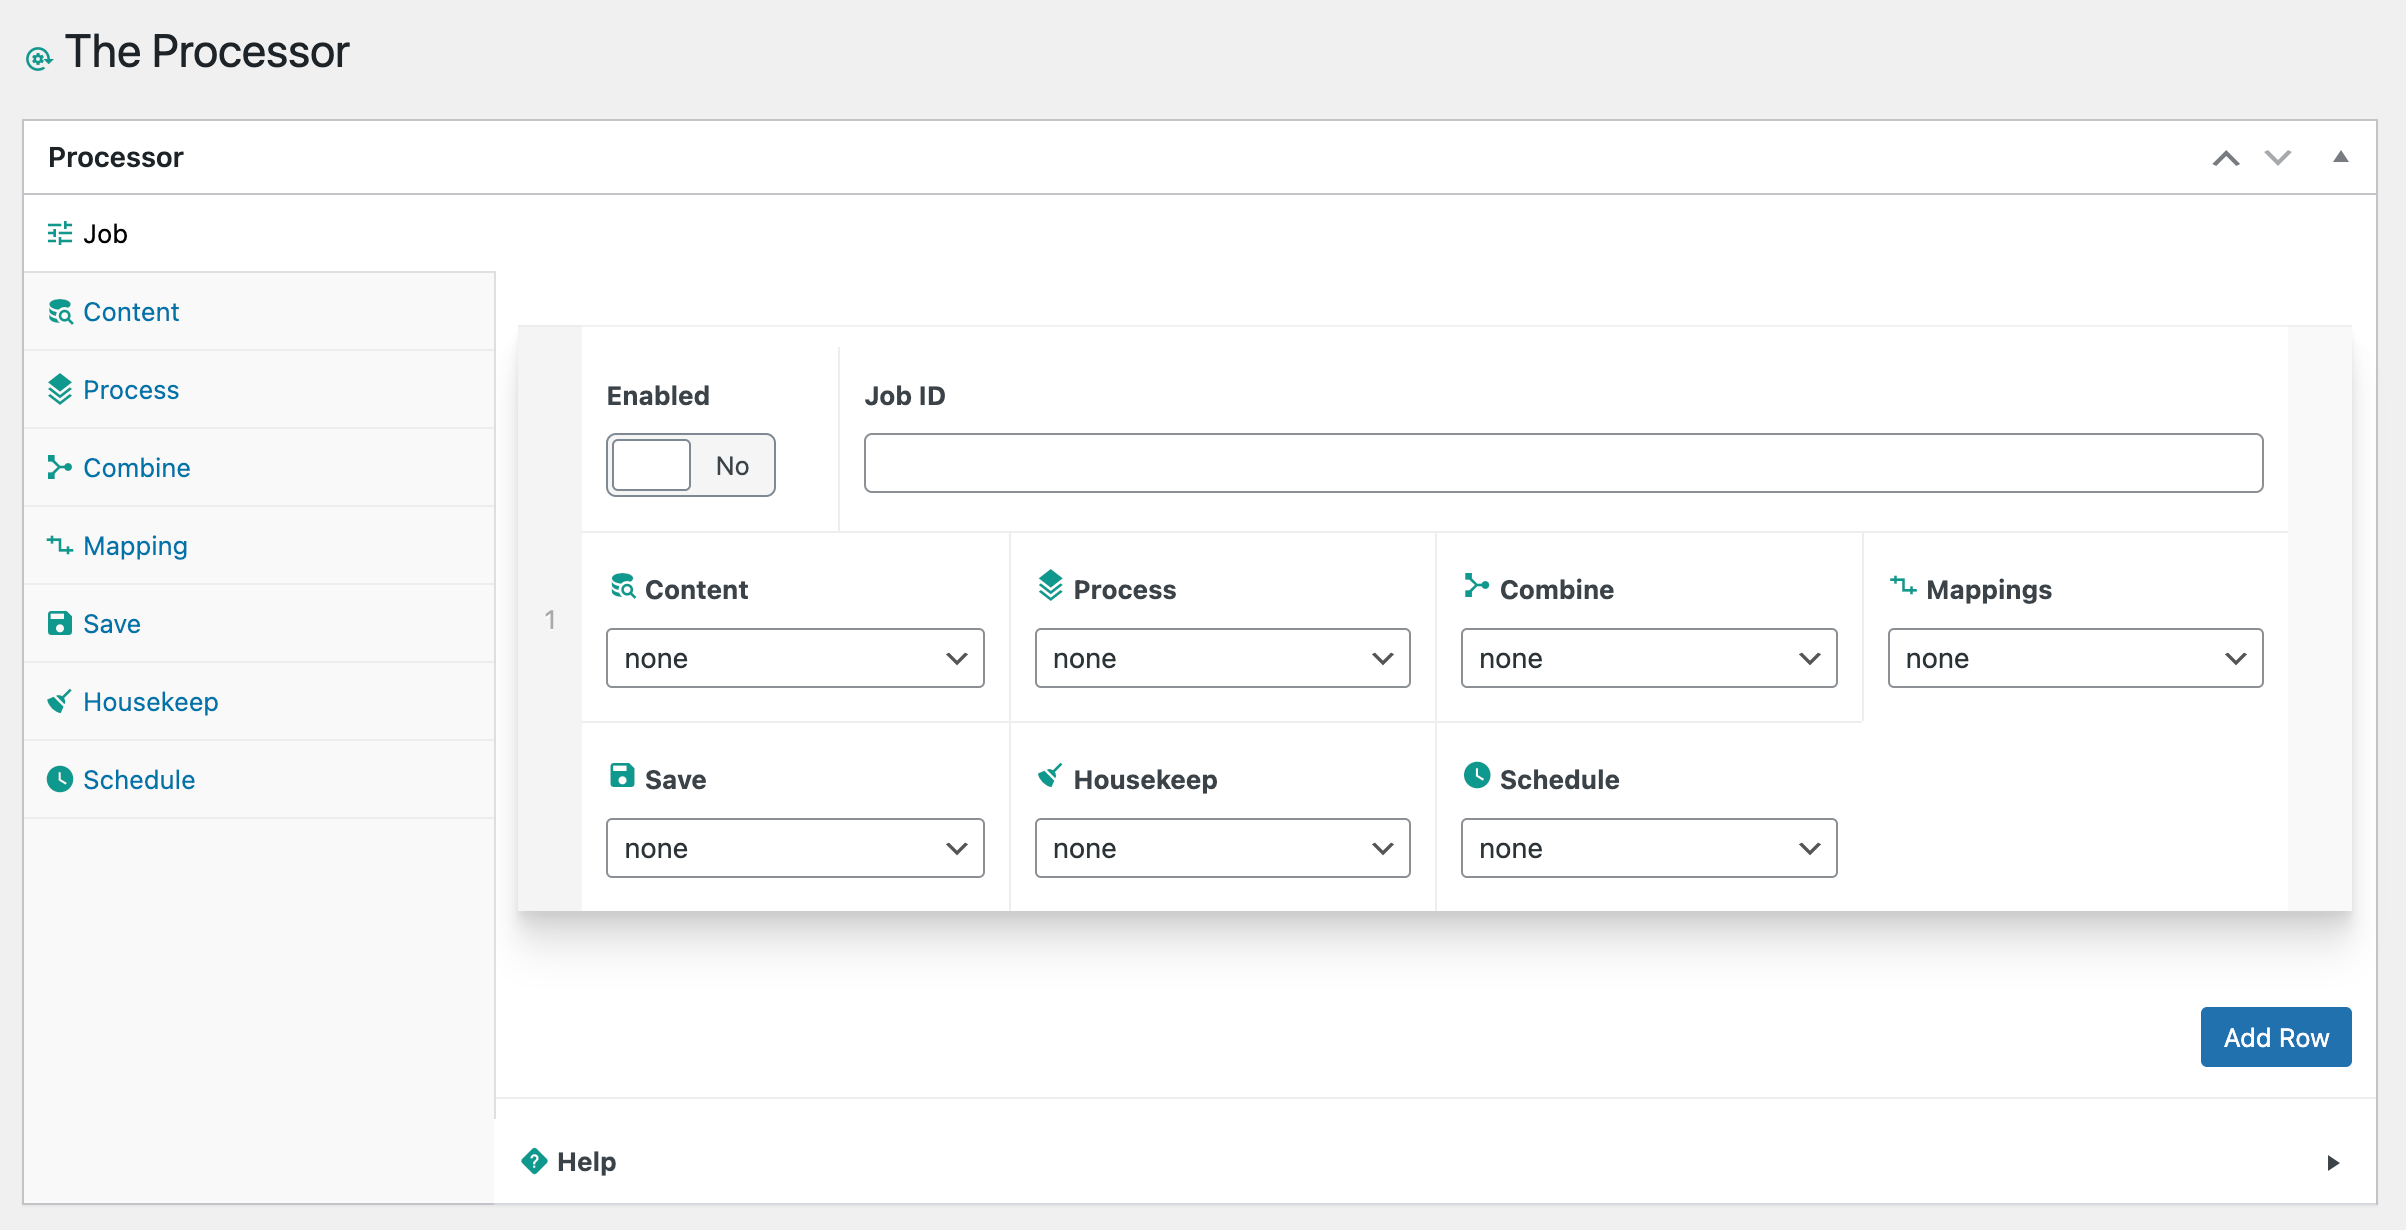
Example:
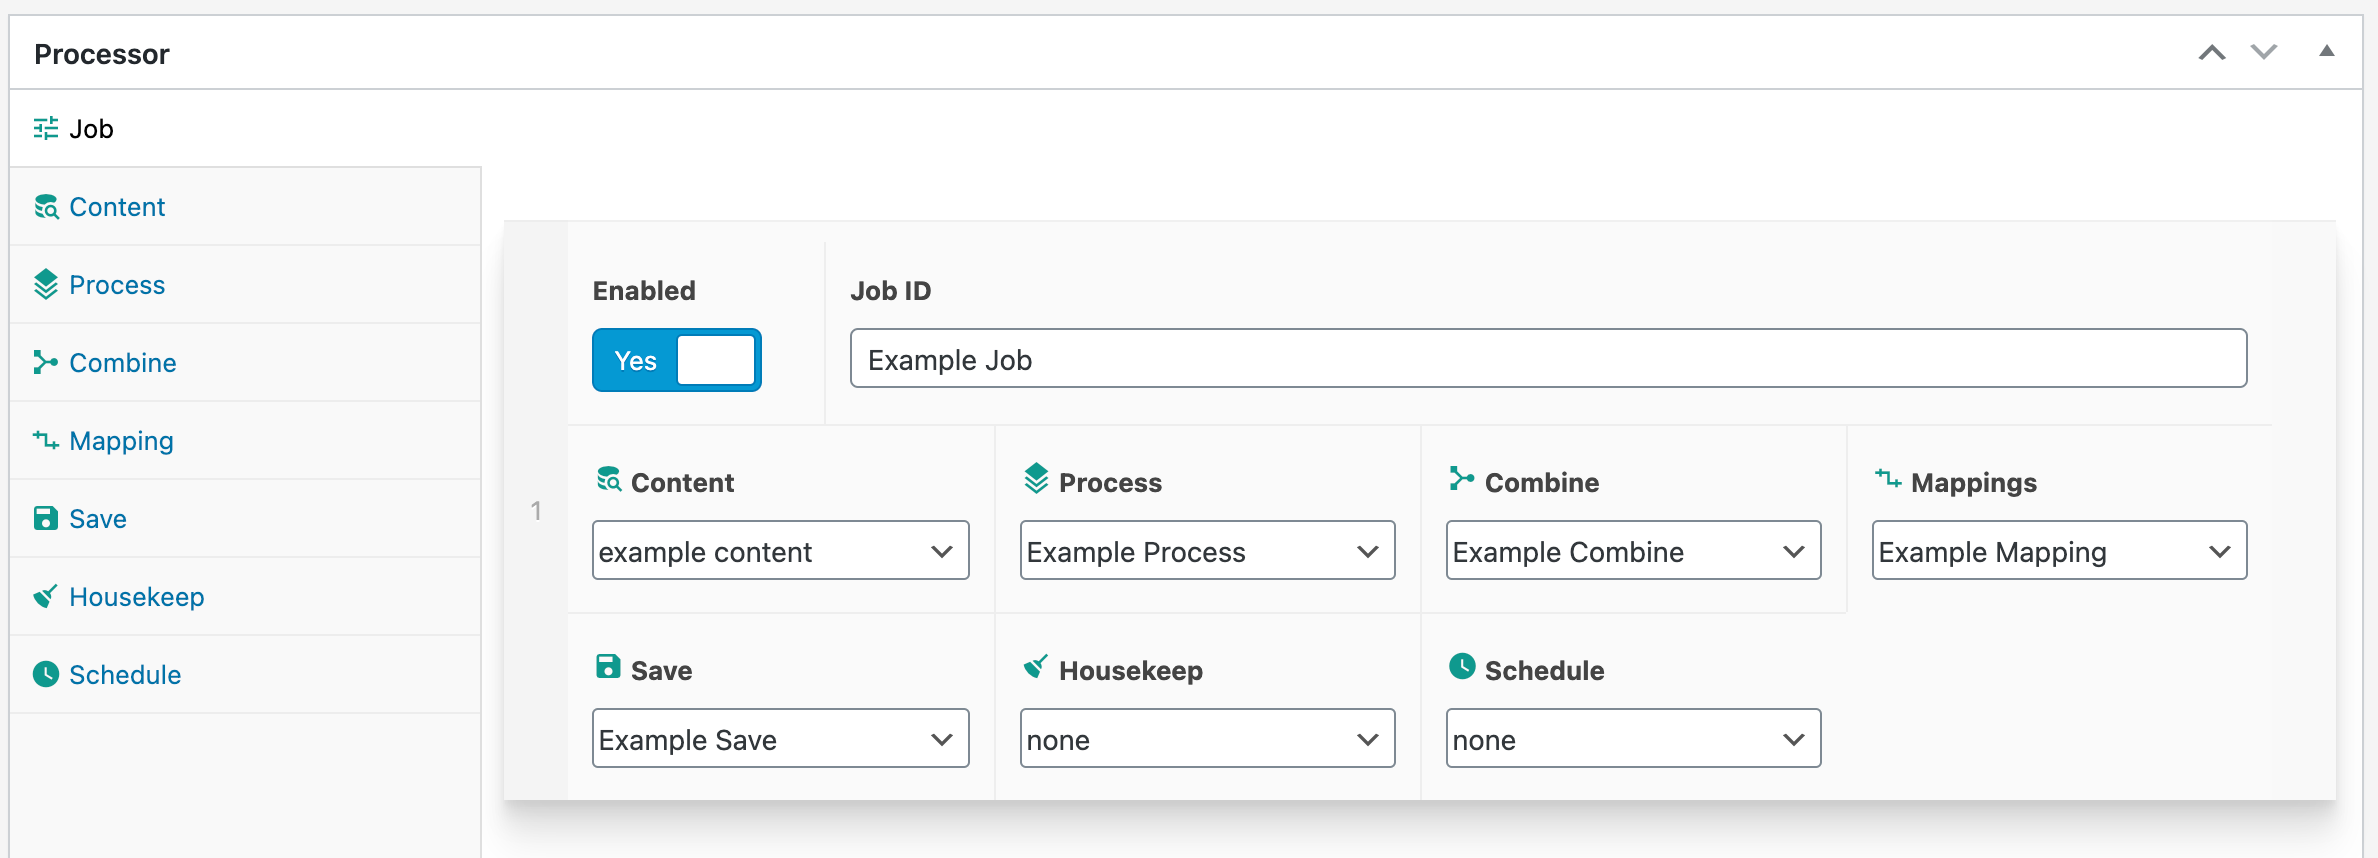
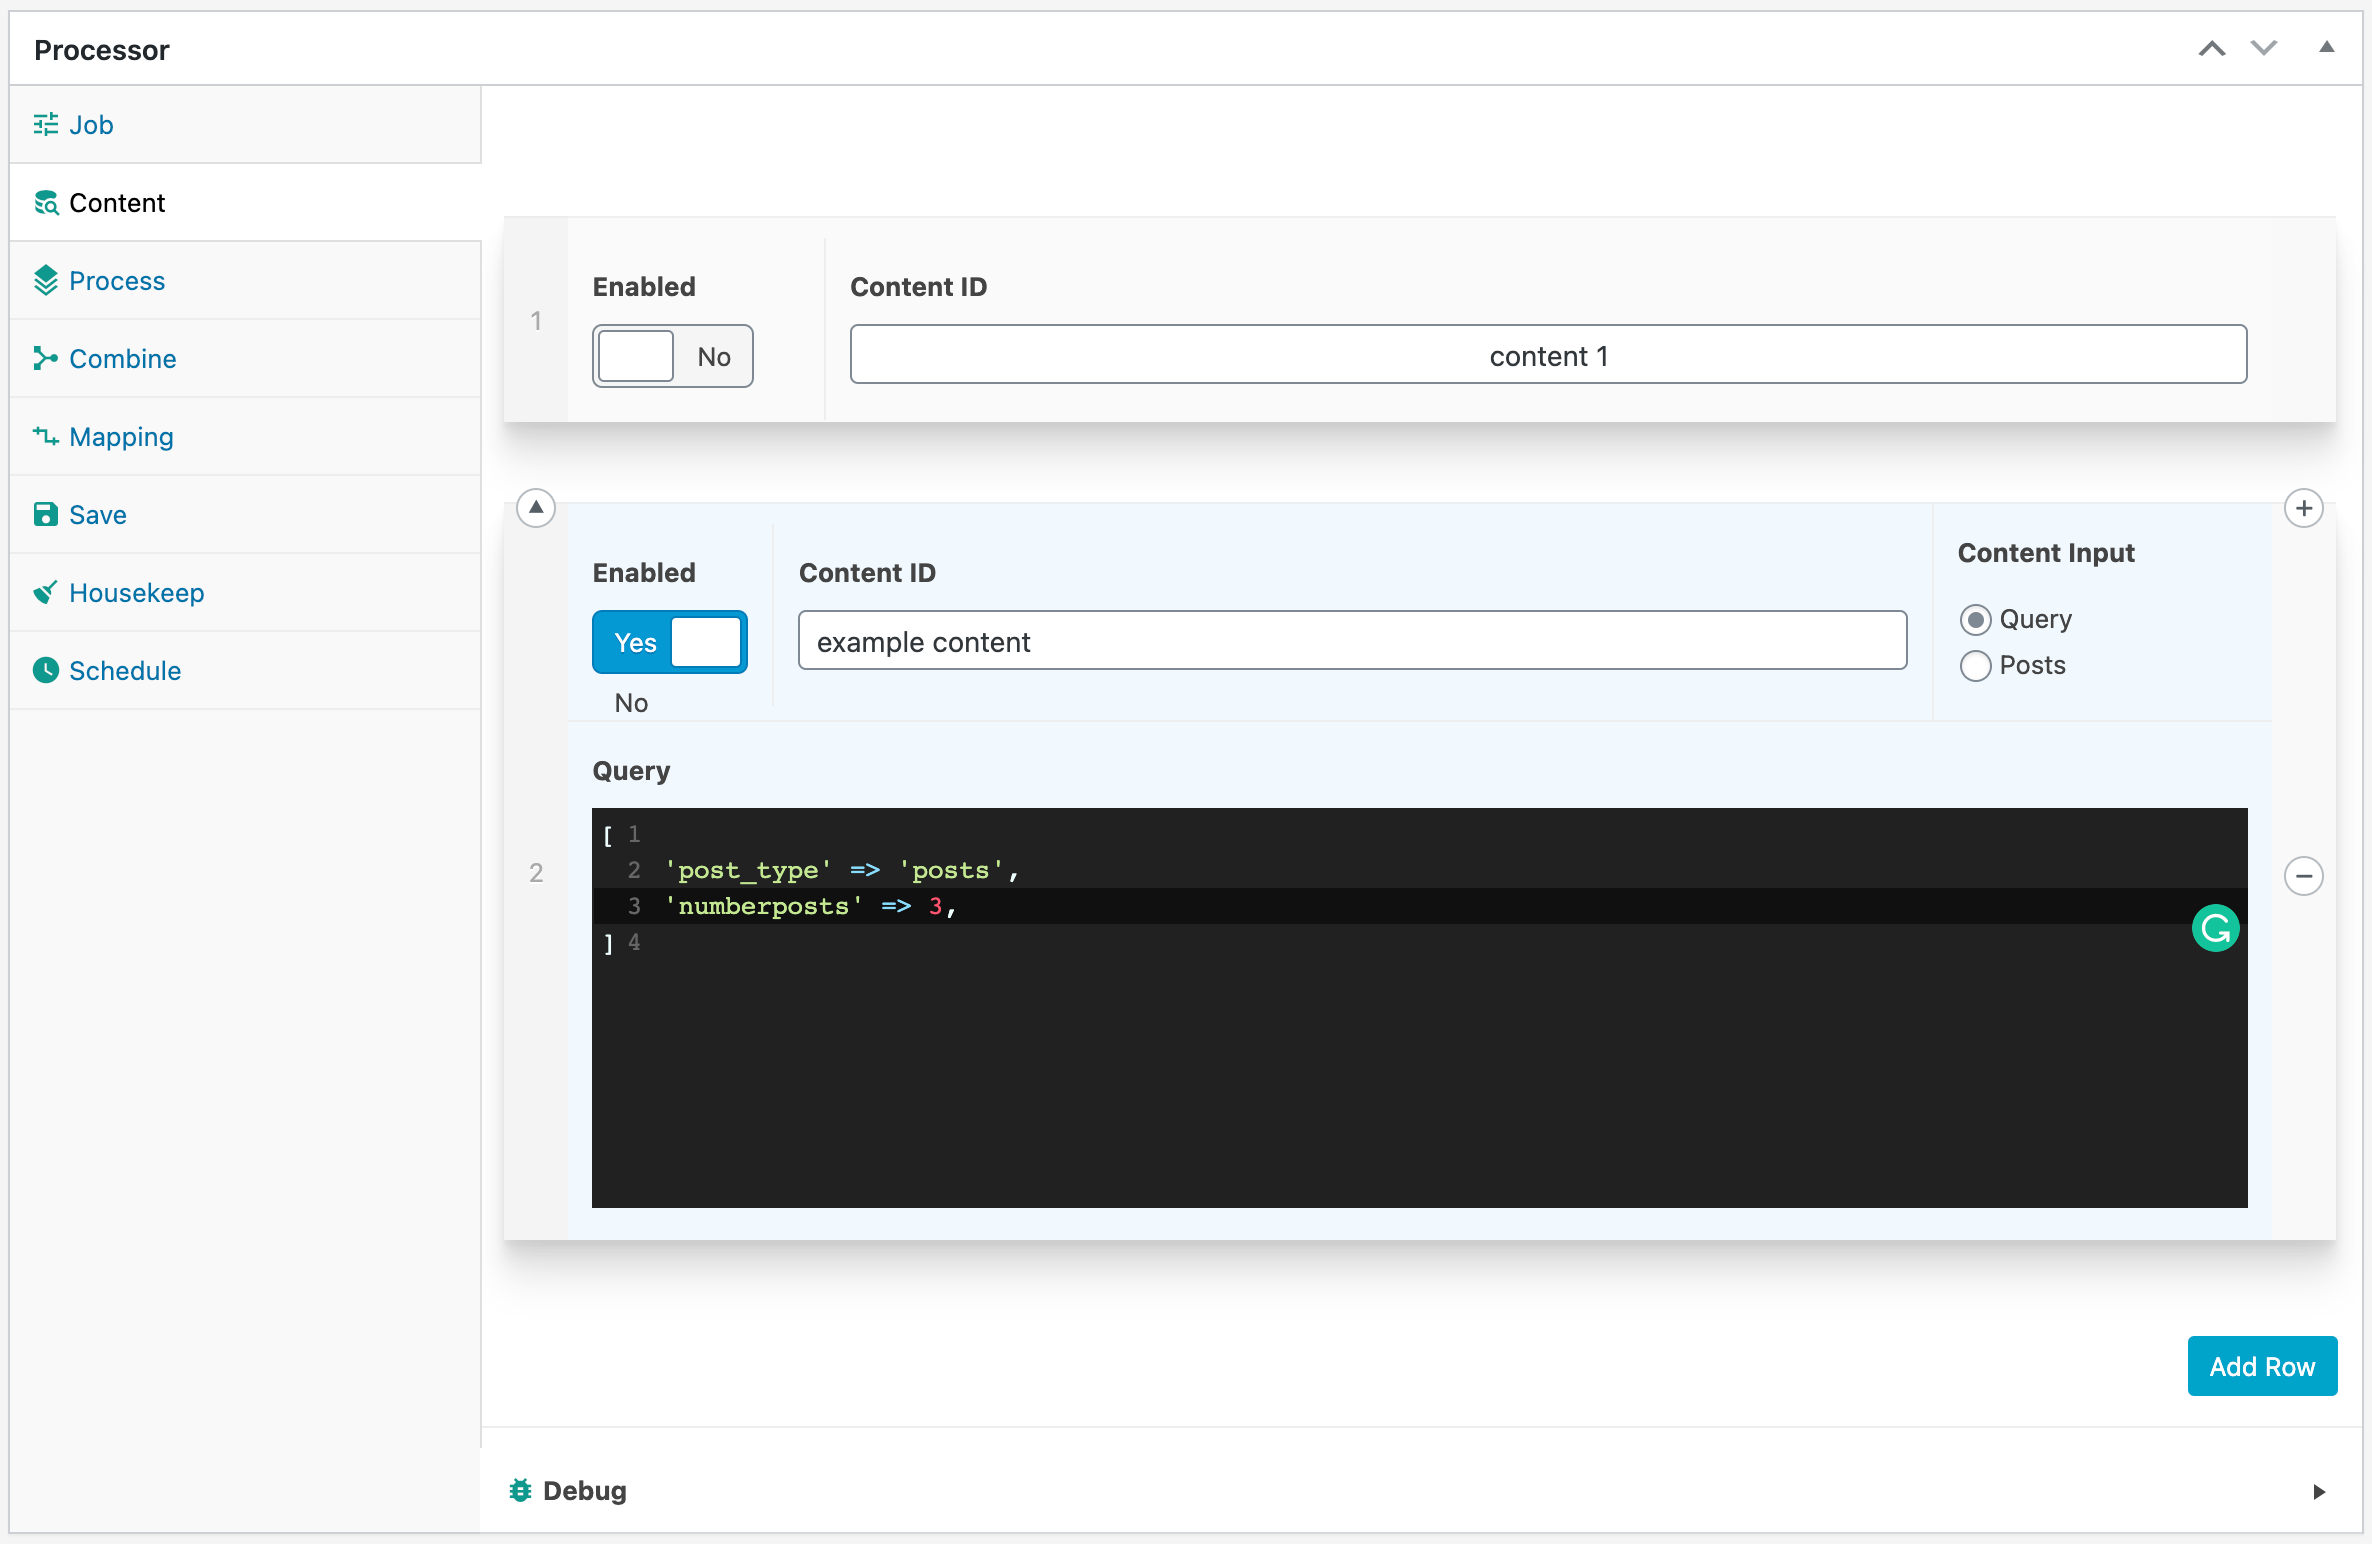
Content.
Pick which posts you wish to combine.
- Enabled. Allow this particular ID to be selectable in the Job tab.
- Content ID. Identifier for the Job tab.
- Content Input. Select how you wish to pick the posts to combine. Via a query or manually picked.
- Query. Use a WP_Query array to specify which posts you wish to return.
- Posts. Multi-select of all post types.
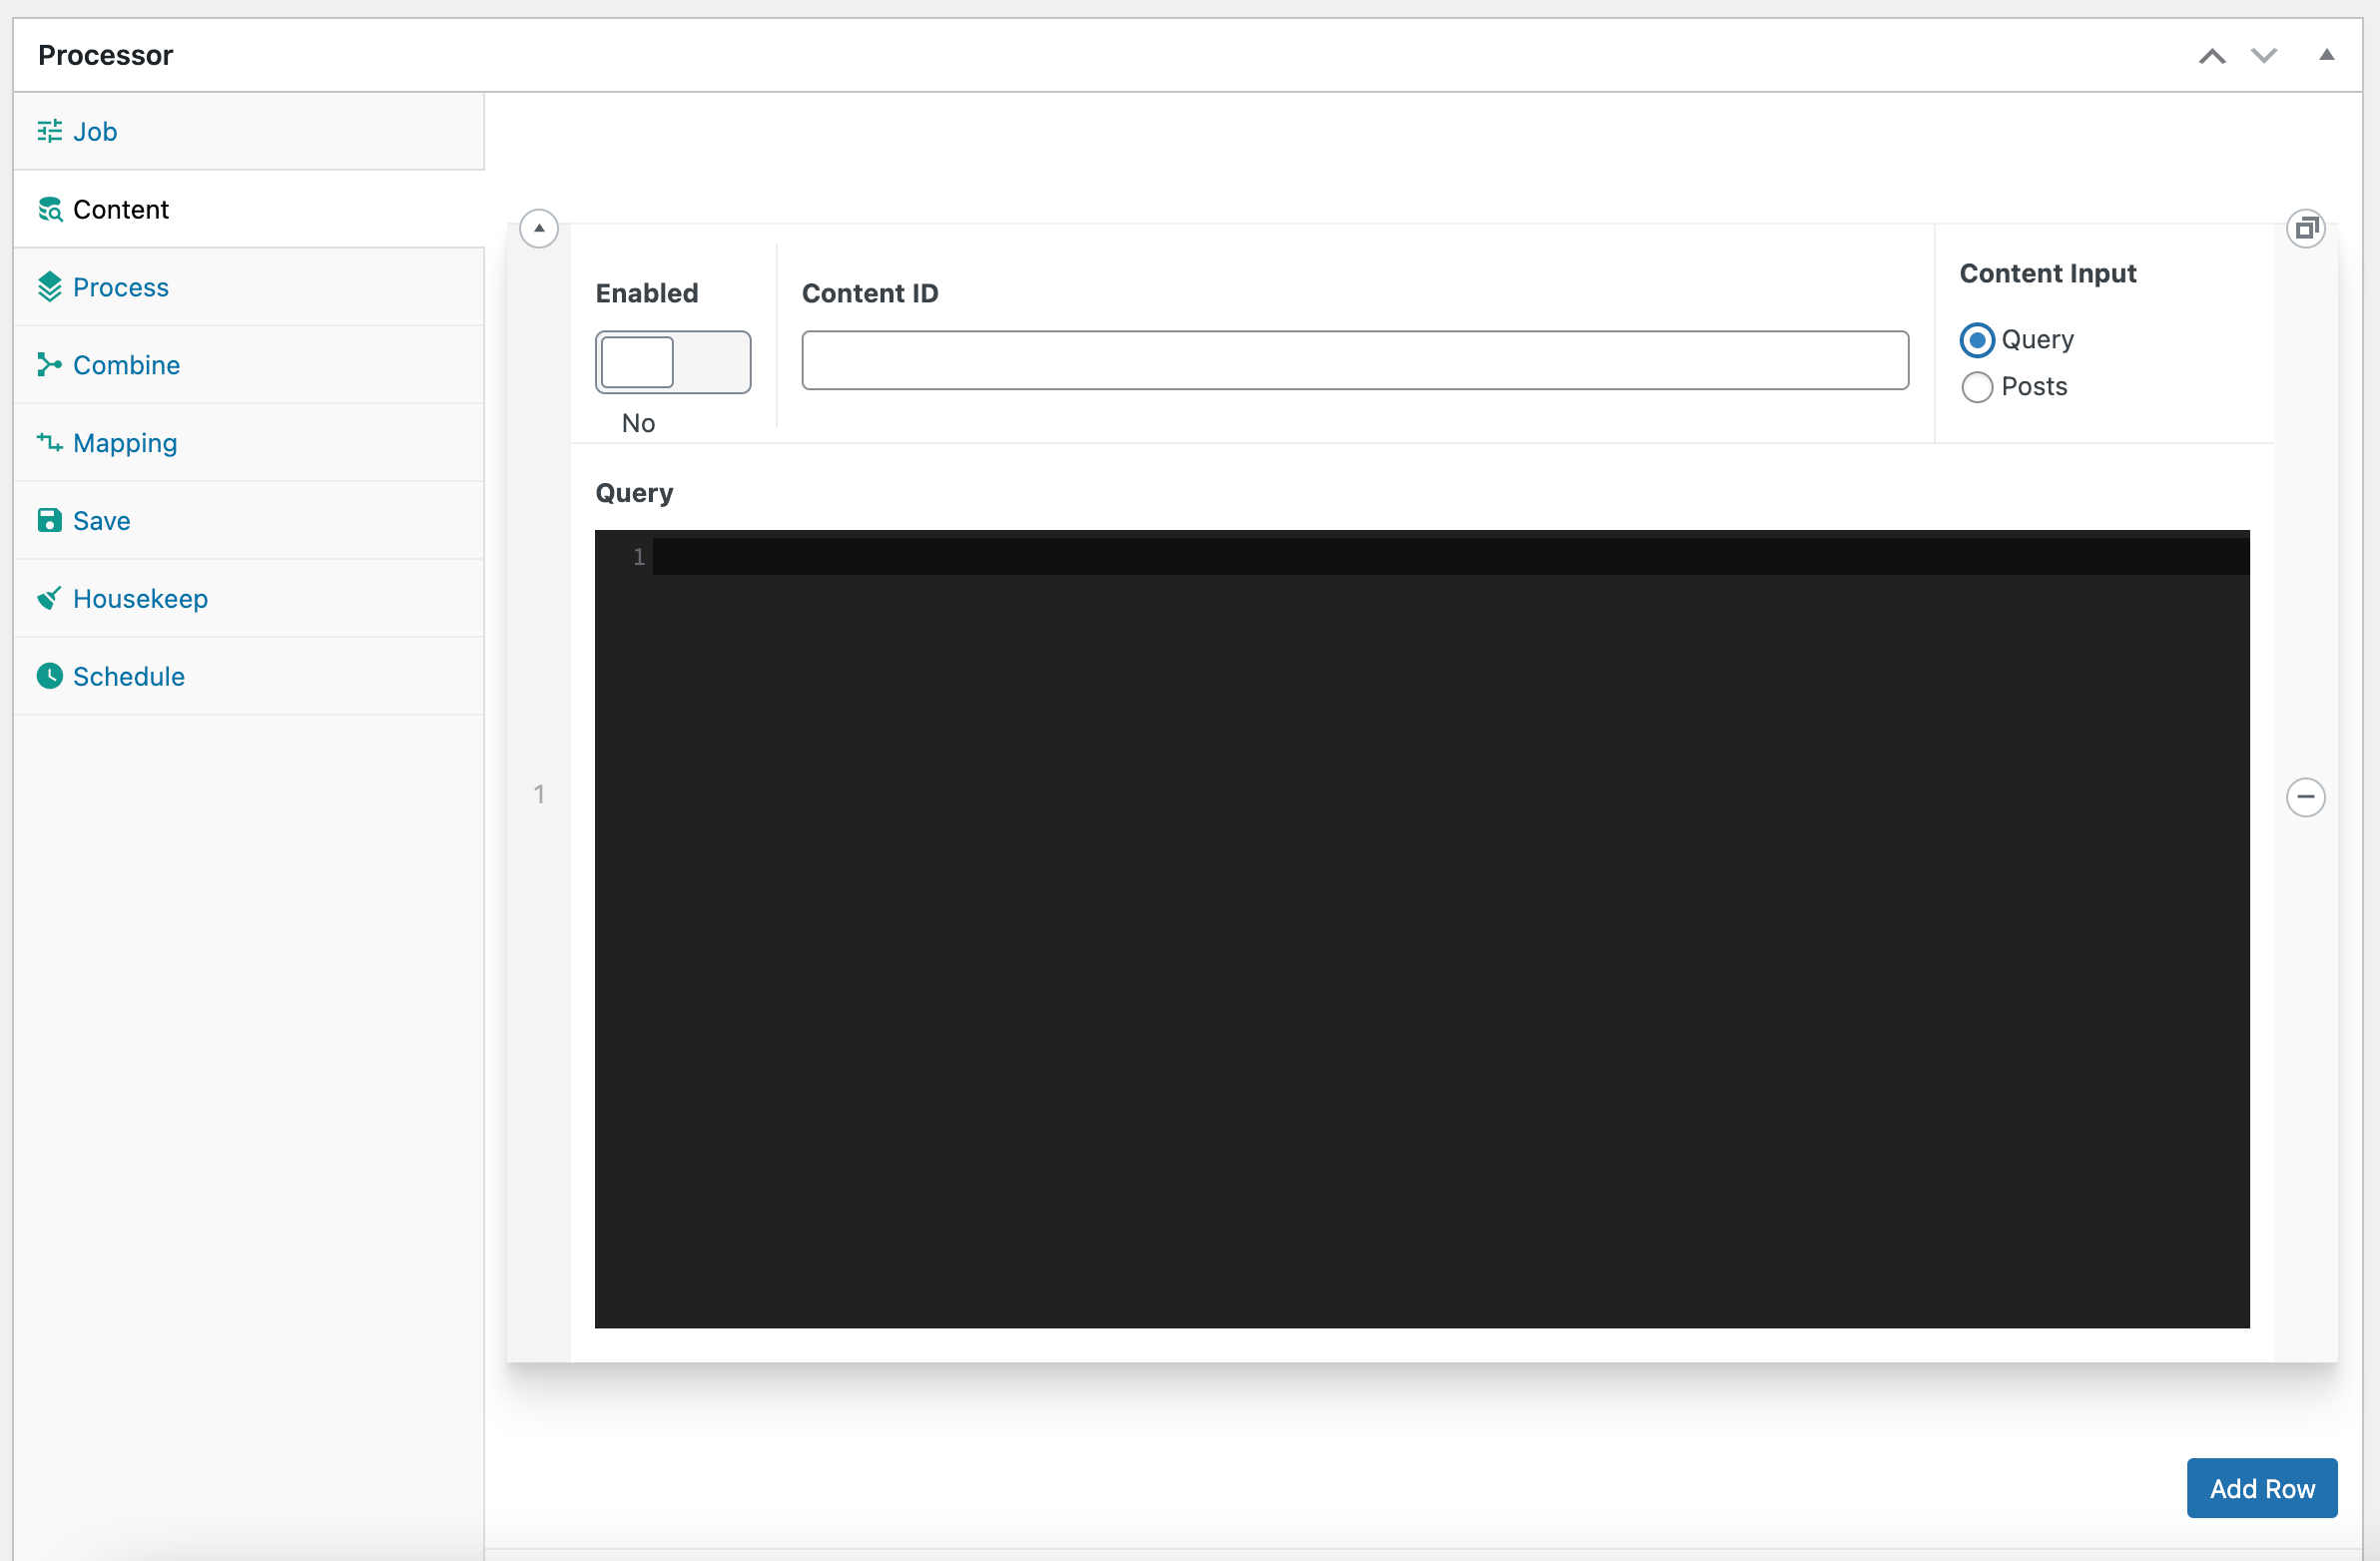
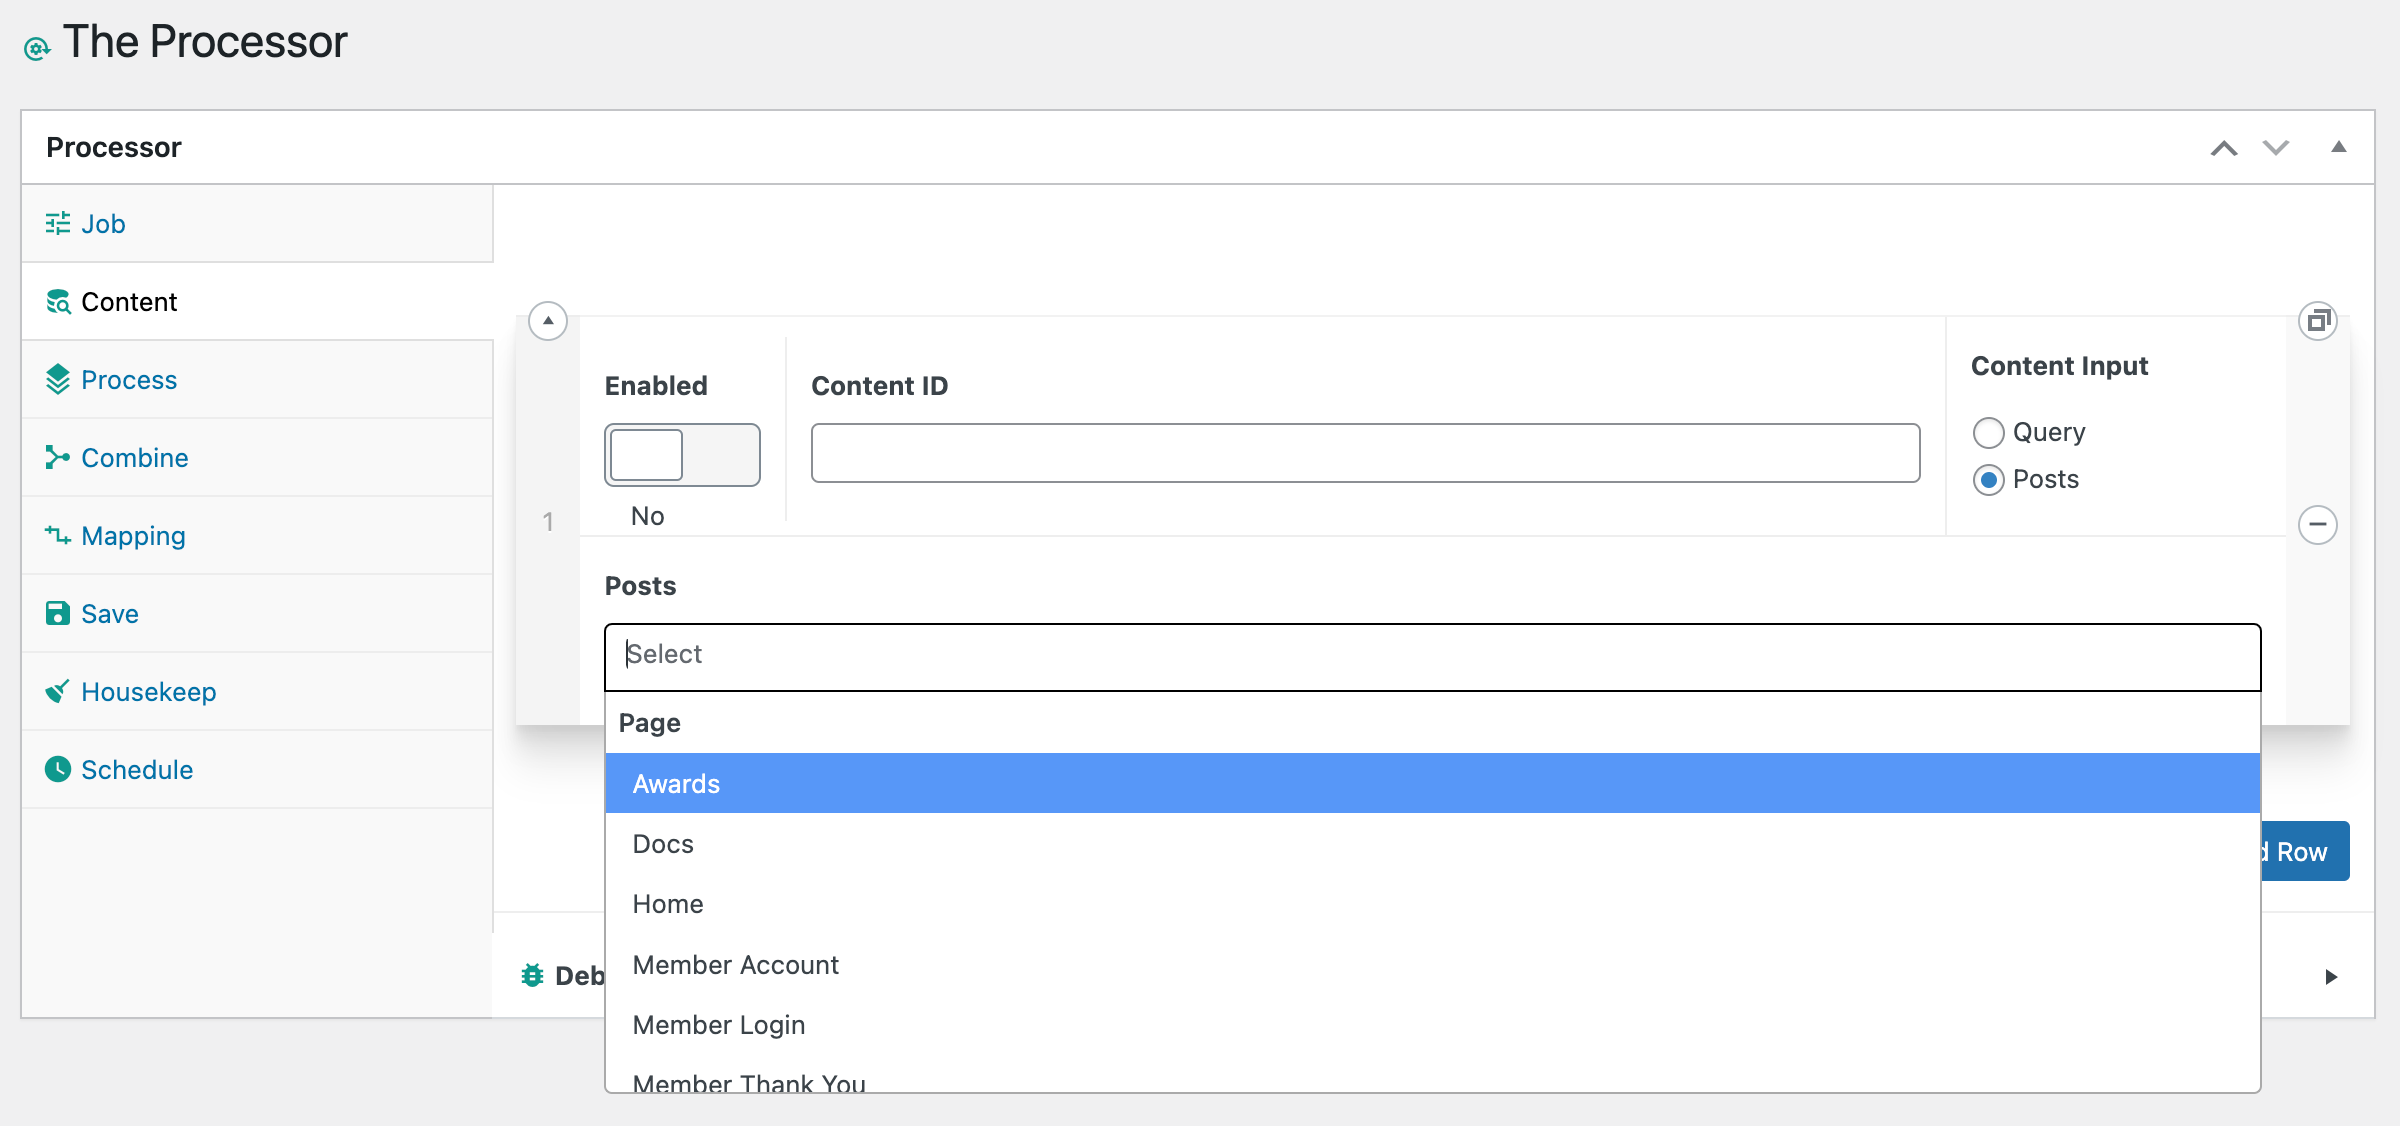
Example:
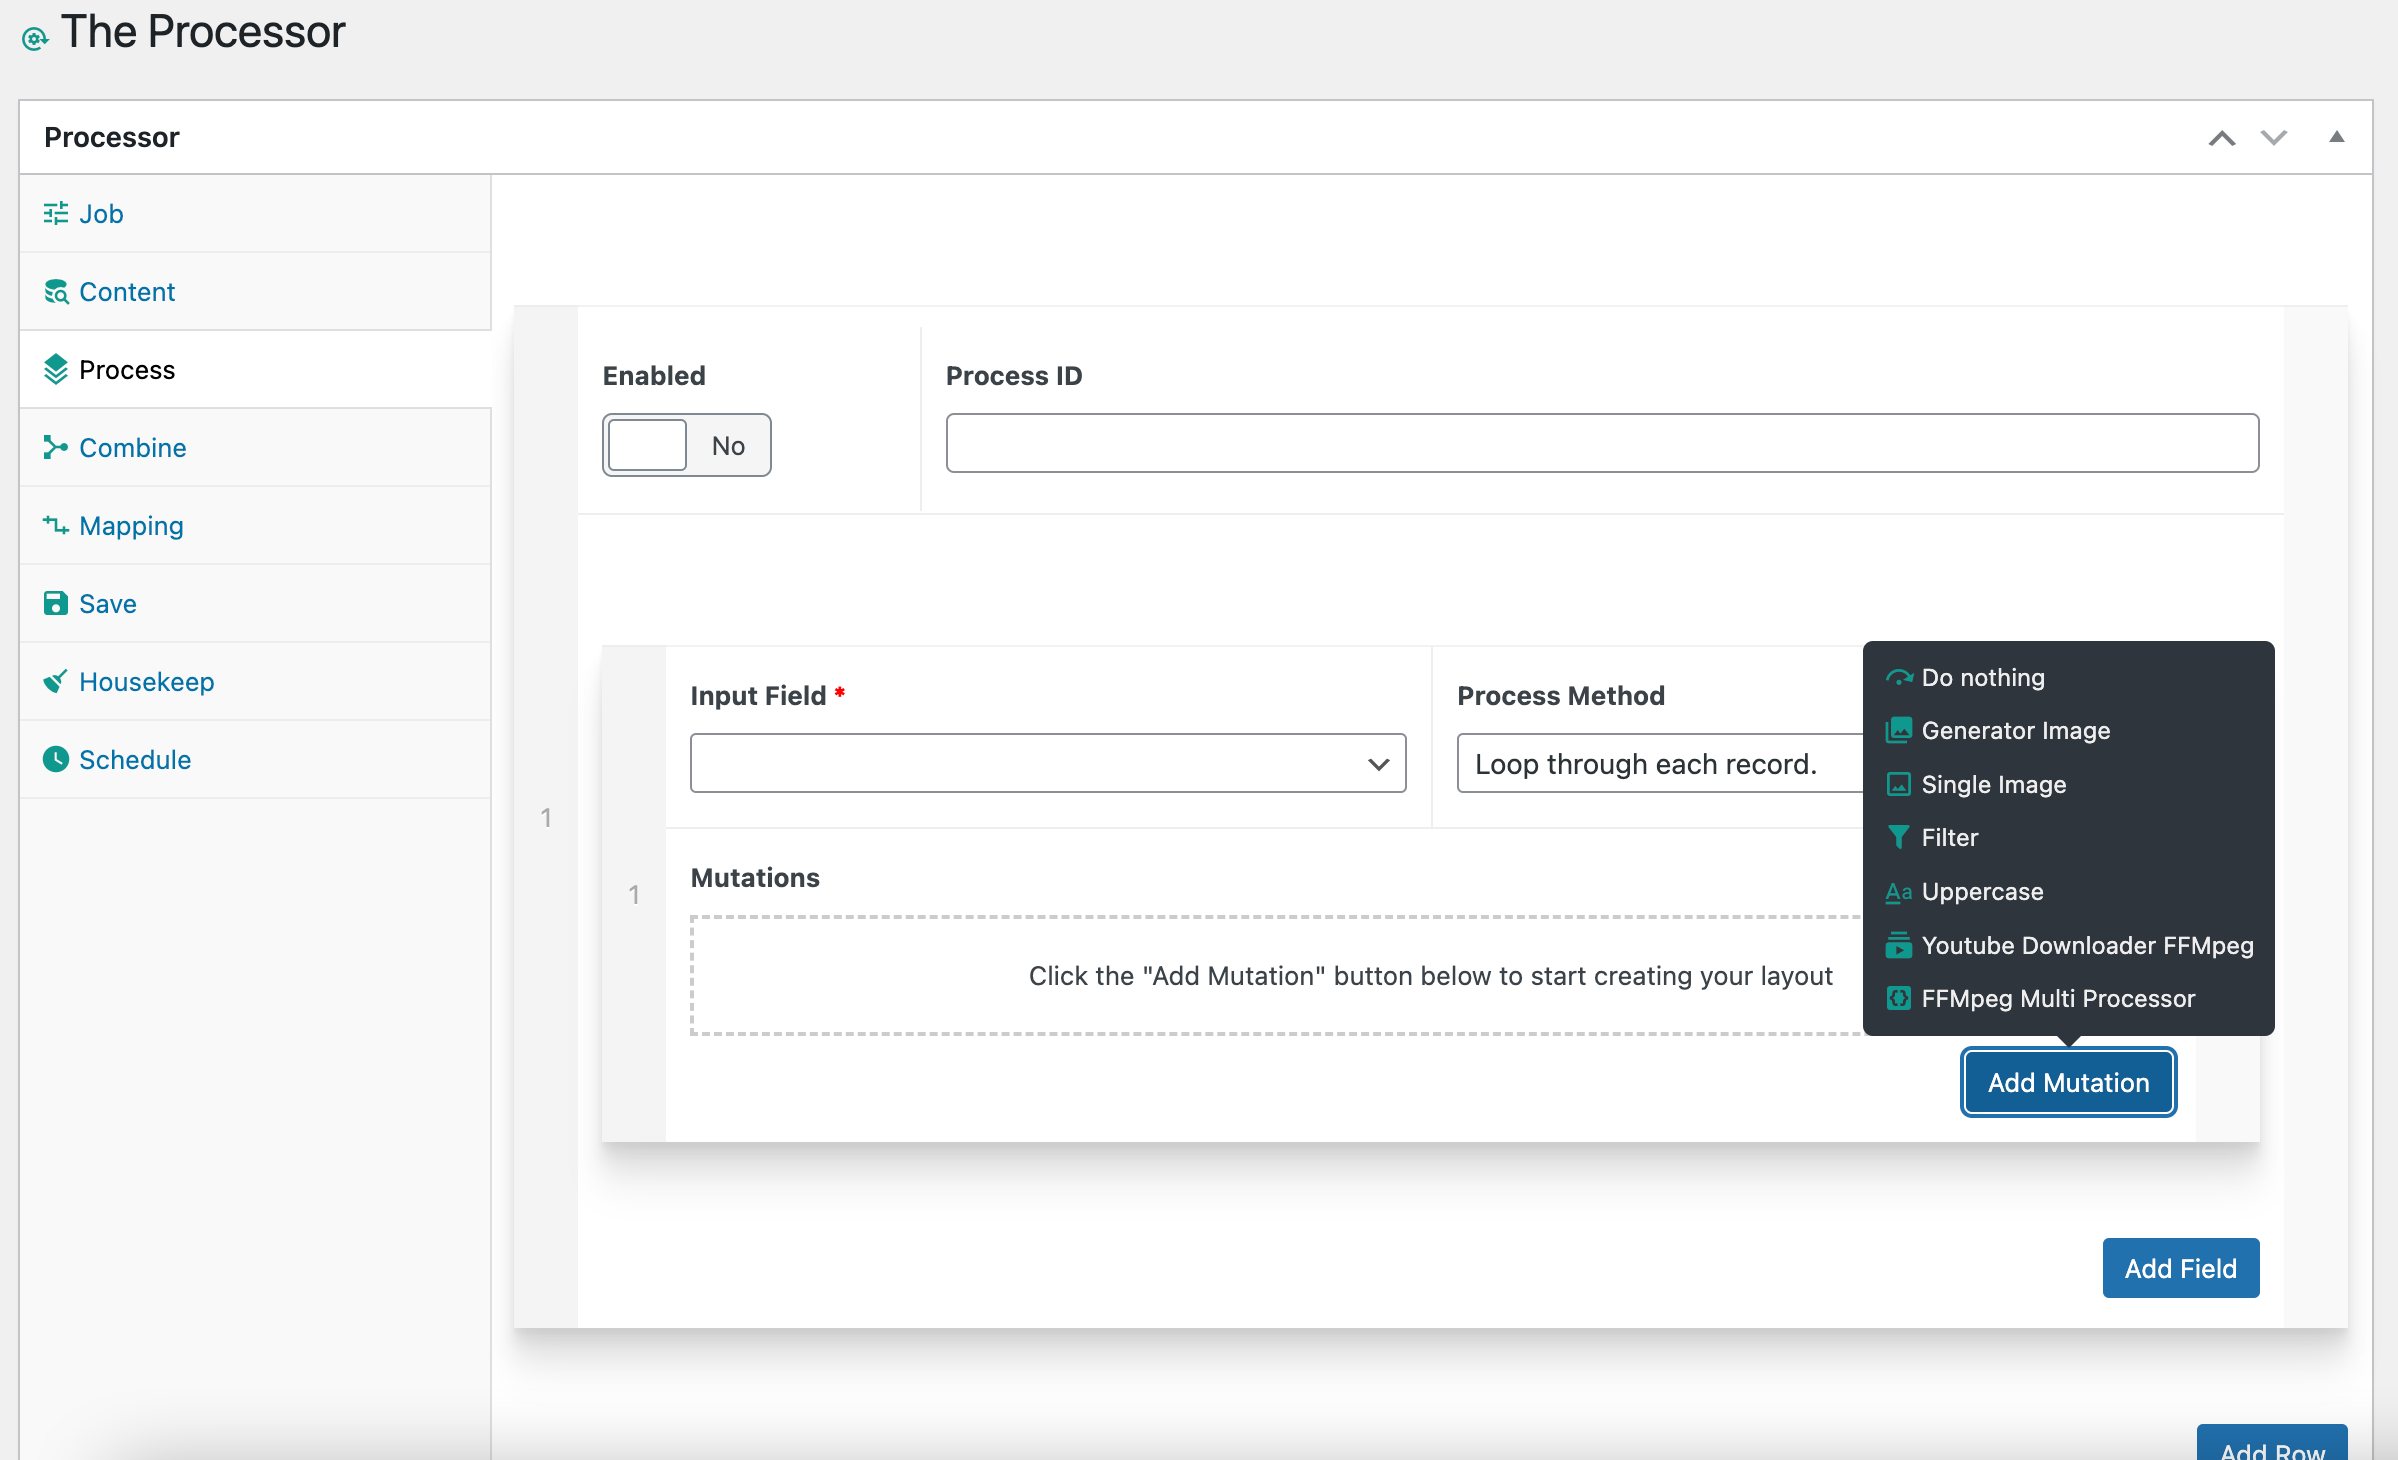
Process.
- Enabled. Allow this particular ID to be selectable in the Job tab.
- Process ID. Identifier for the Job tab.
- Fields. Specify how to handle each post field (Row)
- Input Field. The post field that you wish to combine.
- Process Method. You can loop through each result or process entire colleection at once.
- Mutations. These are things you can do to the fields.
Input Field *
The field in the record you want to use as the source. The select box will “flatten” the post so that any arrays will have -> arrow functions to signify each element of the array.
An example would be the array _Attachment_Metadata['width'] would become “_Attachment_Metadata->width” as an option.
Process Method
The process will normally loop through the entire collection, then each record, and then each field. However, sometimes, you only want to perform a task once on the entire collection and copy the results onto each record.
Example 1 - Loop through each record. post_title. Lets say you retrieve two results from the database. The collection is two WP_Posts. The processor will look at the first post first, then the post_title of that record and perform the mutation on it… Let's say uppercase it. Then it will loop onto the next record and repeat the process.
Example 2 - Process entire collection at once ID. The second example also retrieves two records. The collection is two WP_Posts also. Lets say you want use the 'Generator_Image' mutation to create some coverart that creates a grid of both WP_Post thumbnails. Well, you need to send both images into this mutation, so you can't loop each post individually, so instead, this mode will collect ALL the ID's in the collection and pass them all to the mutation. Each specific mutation will identify if it requires this mode or not.
Mutations
Do Nothing.
Output value is same as input value.
Generator Image
Connect to the generative-images plugin if installed.
- Enabled. Run or not.
- Filter slug. The filter to run in the generator.
- Source Images. Send all results of the query or just each one individually.
- Save as. Output file type. JPB, PNG, SVG.
- Image width. Output width of image.
- Image height. Output height of image.
The image generator plugin allows you to select some input posts and it uses their thumbnail images to create new artwork and imagery. This is done by using SVGs and building up layers to apply.
This mutation runs that Image Generator Plugin by sending the following settings:
Filter Slug : The name of the filter group in the generator image plugin you wish to run. Source Images : An array of WP_Posts or a casted array of a single WP_Post need to be sent to the Image generator. It will look for the posts ID field to convert to a real WP_Post object if the WP_Post/WP_Term is not found. The Source Images field allows you to send each post individually, or as an entire collection. The one you need will depend on the Filter you want to run. Save As : The formats you wish to save as the output result image as. Height / Width : By default, the size of the input image dimensions are used to dictate the output size. You can specify a custom width and height here. This is optional.
Single Image
Allows you to rewrite the contents of a field with the URL of a specified image. Helpful if you want to pass through a consistent image like a watermark.
- Enabled. On or off.
- Image. Select the image to use.
Filter (wordpress filter)
- Enabled. On or off.
- Filter Name. The name of the wordpress filter you wish to send the field data to.
- Filter Arguments. Arguments array to pass to apply_filters_ref_array()
The Filter mutation allows you to send the input posts to any Wordpress filter of your choosing. Gives you the ability to write your own Wordpress filters to hook into.
This mutation runs the apply_filters_ref_array() function with the specified filter name and arguments you provide.
There are four {{moustache}} variables you can use.
'{{field_key}} : This will replace the moustache with the current input field key. '{{field_value}} : This will replace the moustache with the input fields real value. '{{record}} : The moustache will be the entire current record, if that needs to be passed into the filter. '{{collection}} : This is an array of the entire result collection from the input query.
Uppercase
Simple mutation to change all text into uppercase.
- Enabled. On or off.
Youtube Downloader FFMpeg
- Enabled. On or Off.
- YouTube Video Code. The code for thee video you wish to download. You can usee {{moustache}} brackets.
- Override existing files. Existing videos will be re-downloaded if already found.
- Video Seek Start Point. Partial downloads - The [hh:mm:ss] time of where to start downloading.
- Video Seek Duration. Partical downloads - The [hh:mm:ss] time of how much to download.
YouTube Downloader Plugin.
This downloader allows you to capture partial video from youtube. This speeds up processing time because you don't need to wait for the entire video unless needed.
Prerequisites
- The wordpress_youtube_downloader plugin installed.
- FFMpeg installed on the system.
Input Video Code
The input video code can be a few different formats.
The code.
The actual youtube video code you wish to use. Eg. dQw4w9WgXcQ The Code is at the end of the video URL, after the v= part. For example https://www.youtube.com/watch?v=dQw4w9WgXcQ {{field_key}}. Using this moustache-bracket string will use the input field you have selected above (Like, say Video->0) and will replace it with that KEY. (In this case, Video->0) {{field_value}}. Using this moustache-bracket string will use the input field you have selected above (Like, say Video->0) and will replace it with the VALUE of that field. (In this case, the actual video code. dQw4w9WgXcQ)
Timings
Start Time : An hh:mm:ss notation of where in a video you want to start downloading. Duration : An hh:mm:ss notation of how much, from the start time, you want to download.
Output Folder
All downloaded videos are placed into the Wordpress /uploads directory in the current year and month.
This mutation is “collection” processing enabled. Meaning that you only have to run it once on the entire collection, rather than multiple times for each record. Switch the field “Processing Method” to “Process entire collection once.” to enable this feature.
Output Filename
All video files that are downloaded have the filename of the video code followed by a suffix. So the filename will look like this: dQw4w9WgXcQ_video.mp4
The suffix for all files will be _video.
FFMpeg Multi Processor
Use FFMpeg to process the video with the arguments you supply. The power of FFMpeg allows you to do most things with video - cutting, editing, colour-grading, use of LUTS, etc...
- Enabled. On or off.
- Description. Short summary of what this does.
- FFMpeg arguments. These are just the arguments to FFMPeg, They will be prefixed with '/usr/local/ffmpeg'.
FFMpeg Multi Processor
This mutation allows you to use FFMpeg to process any video files as a group or individually.
Prerequisites
- Downloaded video files.
- FFMpeg installed on the system.
Details
This mutation is “collection” processing enabled. Meaning that you only have to run it once on the entire collection, rather than multiple times for each record. Switch the field “Processing Method” to “Process entire collection once.” to enable this feature.
This will take all records {{collection}} and run multiple FFMpeg steps on those records. Each input record can be referenced in the script with $0, $1, $2, etc…
Arguments
The Arguments : These are just the arguments to the FFMPeg program, They will be prefixed with /usr/local/ffmpeg
Variables
There are the following variables available to use within the arguments.
$inputs : This will represent a string of inputs on the command line with a -i prefix to each one. -i input1.mp4 -i input2.mp4 -i input3.mp4 $upload_dir : This is the location of the current upload directory. Use for output file location. e.g. $upload_dir/output.mp4 $date : This will insert the current DateTime in the format Ymd_Hms. This is useful for naming output files. Note. Using a DateTime on the output filename will always generate a new file and never overwrite an existing one. The DateTime will make a unique filename every time. For example: $upload_dir/output_$date.mp4 $timestamp : This will insert the current DateTime in the format U. Which is the Unix timestamp. Again, this is useful for naming files. Note. Using a timestamp on the output filename will always generate a new file and never overwrite an existing one. The timestamp will make a unique filename every time. For example: $upload_dir/output_$timestamp.mp4
Example
This following example will concatenate the video and audio of four videos together.
-n $inputs -filter_complex "[0:v] [0:a] [1:v] [1:a] [2:v] [2:a] [3:v] [3:a] concat=n=4:v=1:a=1 [v] [a]" -map "[v]" -map "[a]" -strict -2 $upload_dir/output.mp4
Combo : Download and Process
- Step 1. Use the Youtube Downloader FFMpeg mutation to download each youtube video using a field that contains a youtube video code. e.g. VideoId->0
This will download the videos into the current Wordpress uploads directory in the format dQw4w9WgXcQ_video.mp4
- Step 2. Use this FFMpeg Multi Processor plugin to pick up those downloaded files and process them.
Use the $inputs variable to specify you want to use those downloaded videos in the processing.
Example:
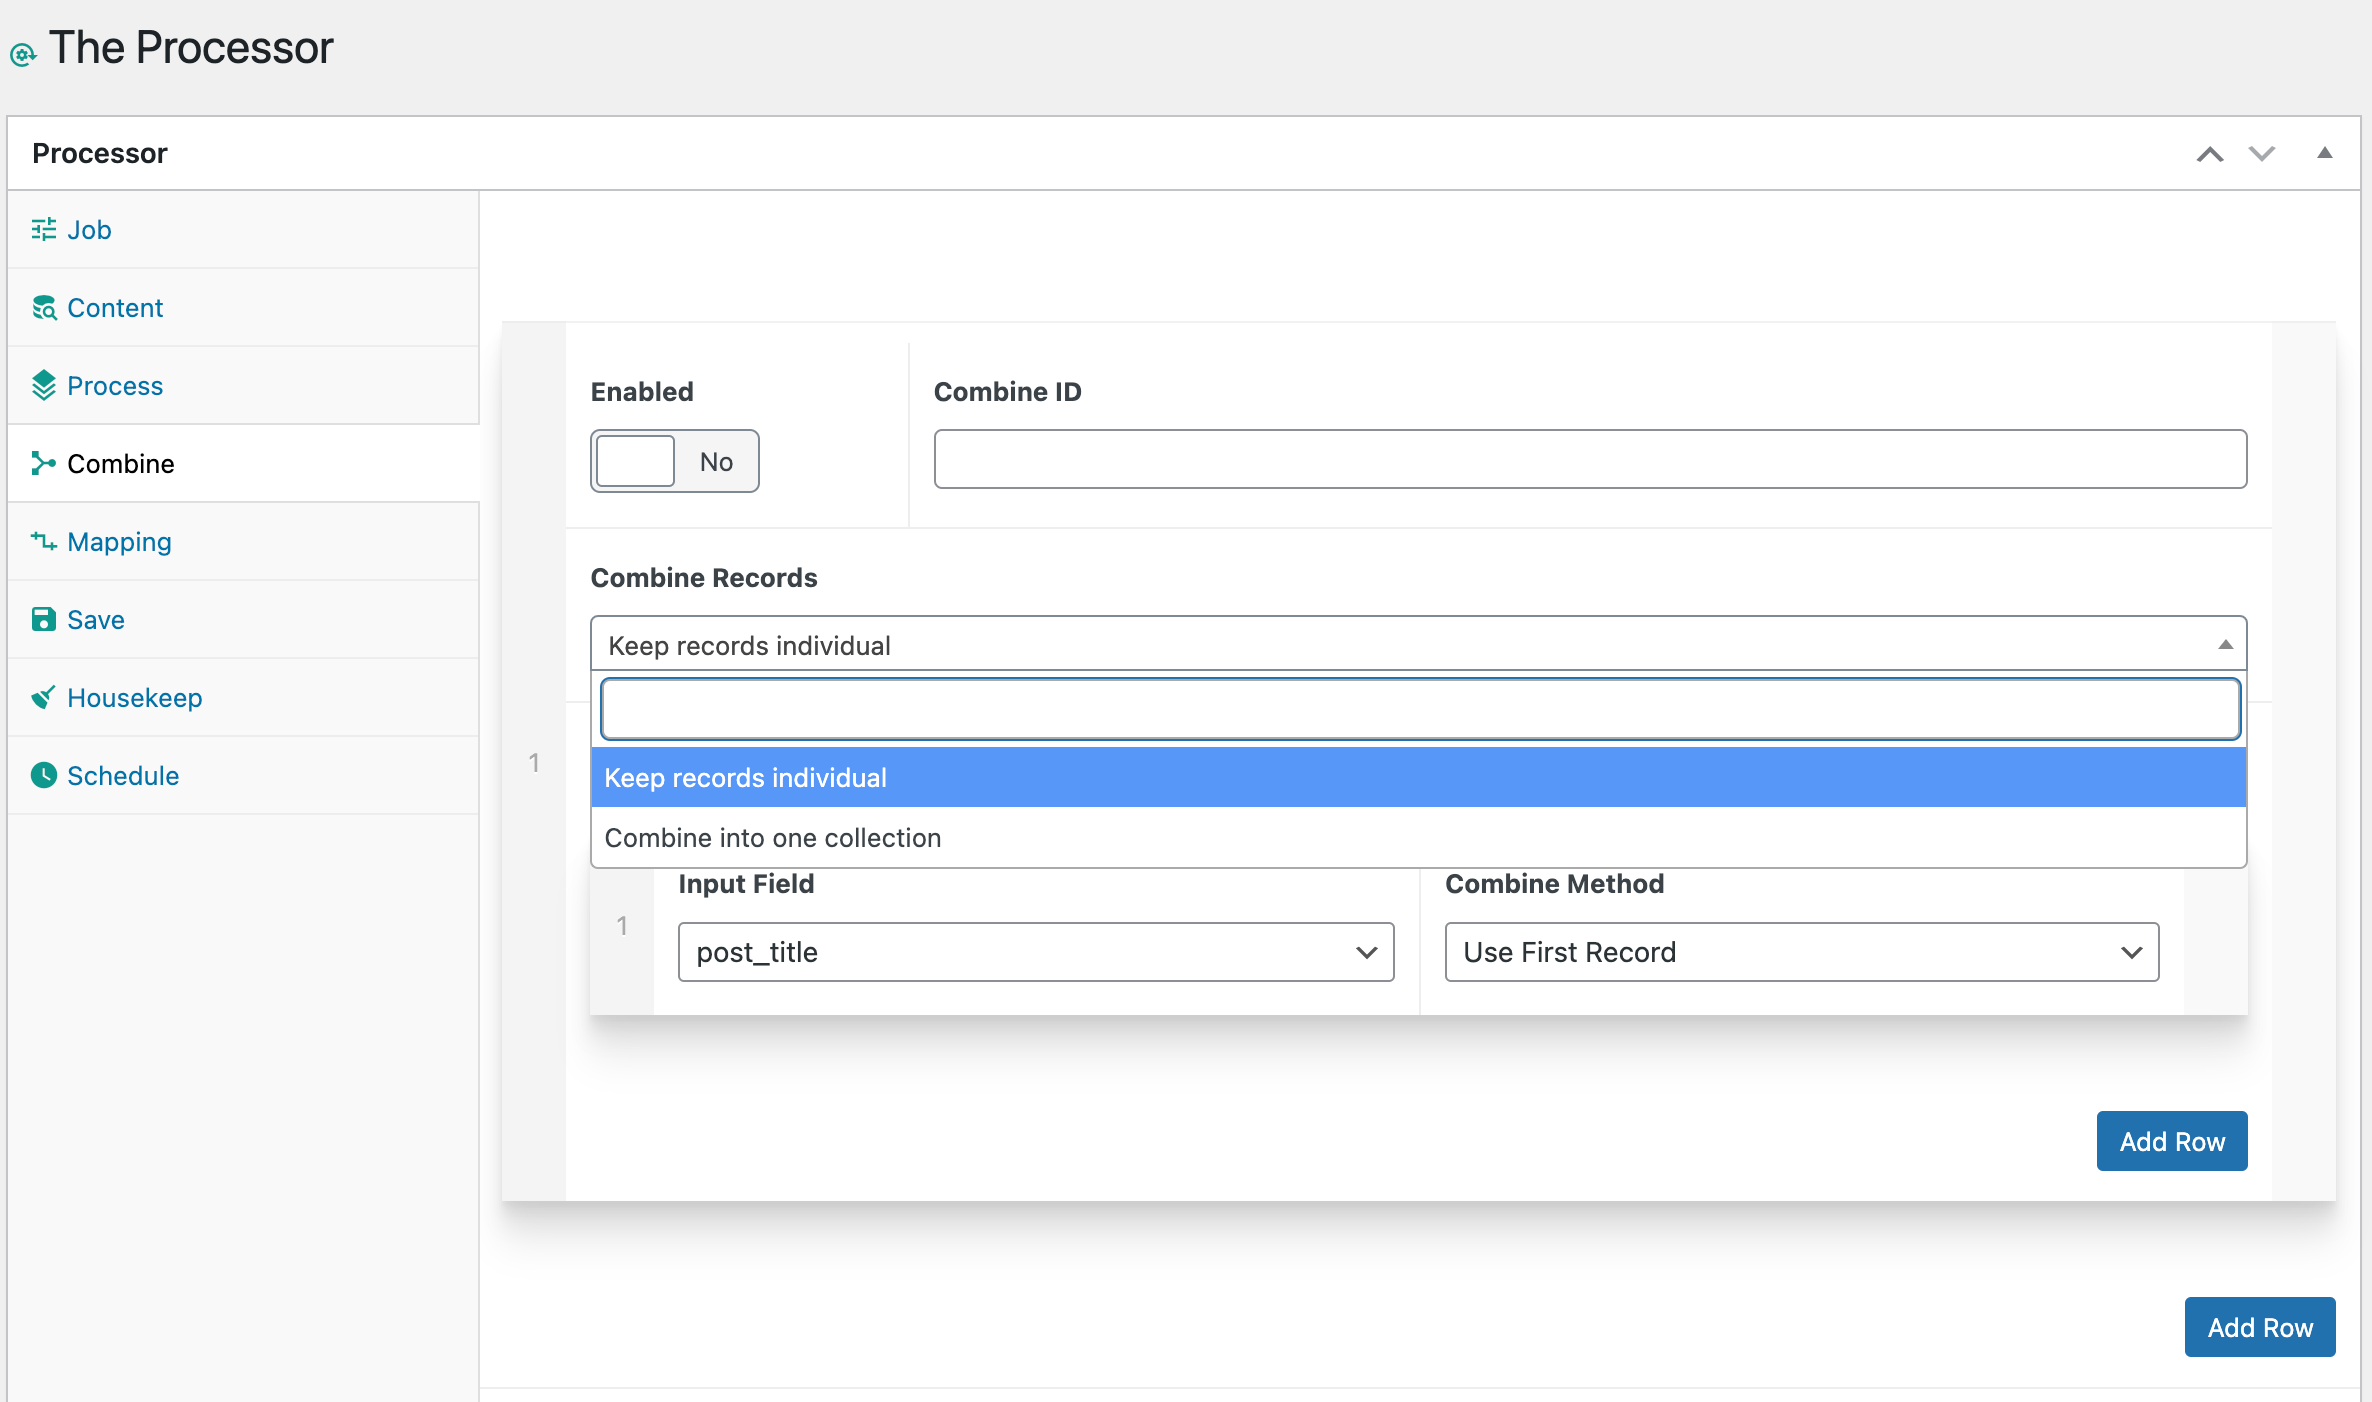
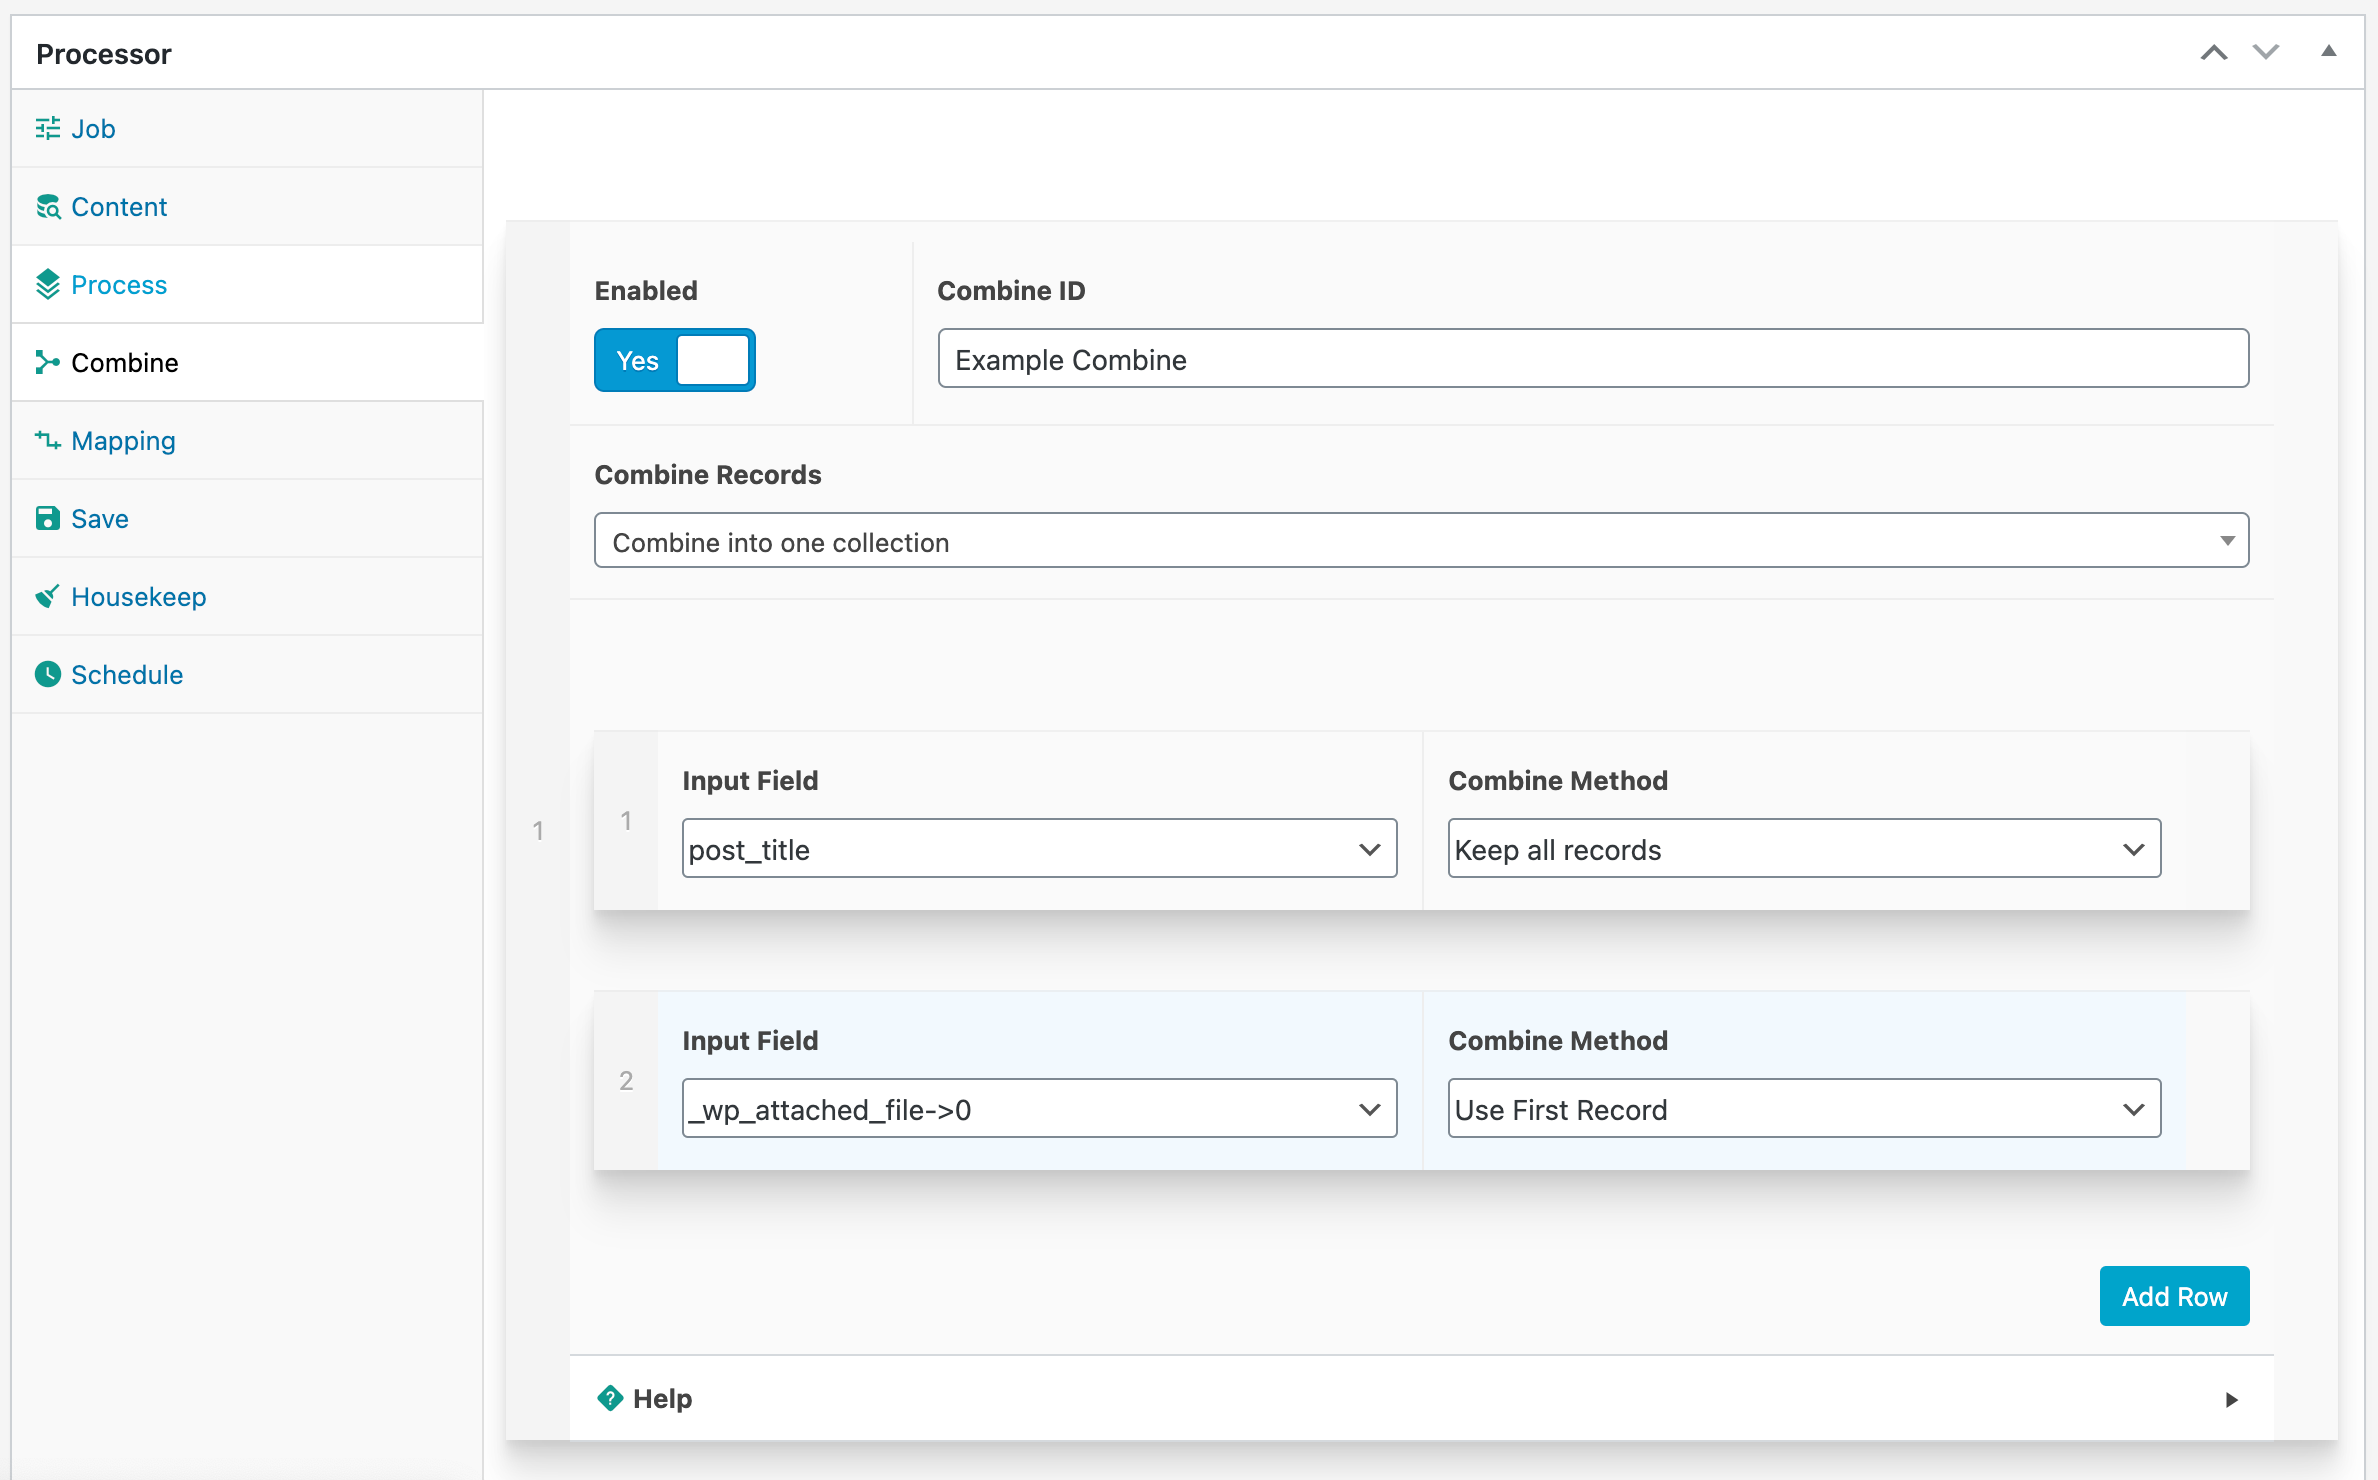
Combine.
The combine tool will help you decide how to process each record into one single record.
You can pick each field key you wish to keep in the output record and the method to generate it.
Input Field
The field key in a record coming out of the Process stage.
NOTE - Only the fields that have been processed in the Process stage will be available to the combine stage.
Use the debug tool in the Process tab to see what fields are available.
Combine Method
How to combine the records into one. The fields are “flattened” from arrays into single fields so each record is prefixed with the record number and identifiable.
The following combine methods are available:
Use First Record : This will keep the [key => value] array field of the first record only and ignore the rest. The resulting field will have the first records’ array field.
For example, if the collection array has three records in it, like this:
[[ 'post_title' => 'Post One' ],[ 'post_title' => 'Post Two' ],[ 'post_title' => 'Post Three' ],]
The result combined record would be:
['post_title' => 'Post One']
Use Last Record : This will keep the value of the last record in the collection and ignore the rest. The resulting field will have the last record’s value.
For example, if the collection array has three records in it, like this:
[[ 'post_title' => 'Post One' ],[ 'post_title' => 'Post Two' ],[ 'post_title' => 'Post Three' ],]
The result combined record would be:
['post_title' => 'Post Three']
Keep All Records : This will include the field from ALL records and prefix each field key with a record number.
For example, if the collection array has three records in it, like this:
[[ 'post_title' => 'Post One' ],[ 'post_title' => 'Post Two' ],[ 'post_title' => 'Post Three' ],]
The result combined record would be:
['0_post_title' => 'Post One','1_post_title' => 'Post Two','2_post_title' => 'Post Three']
Example:
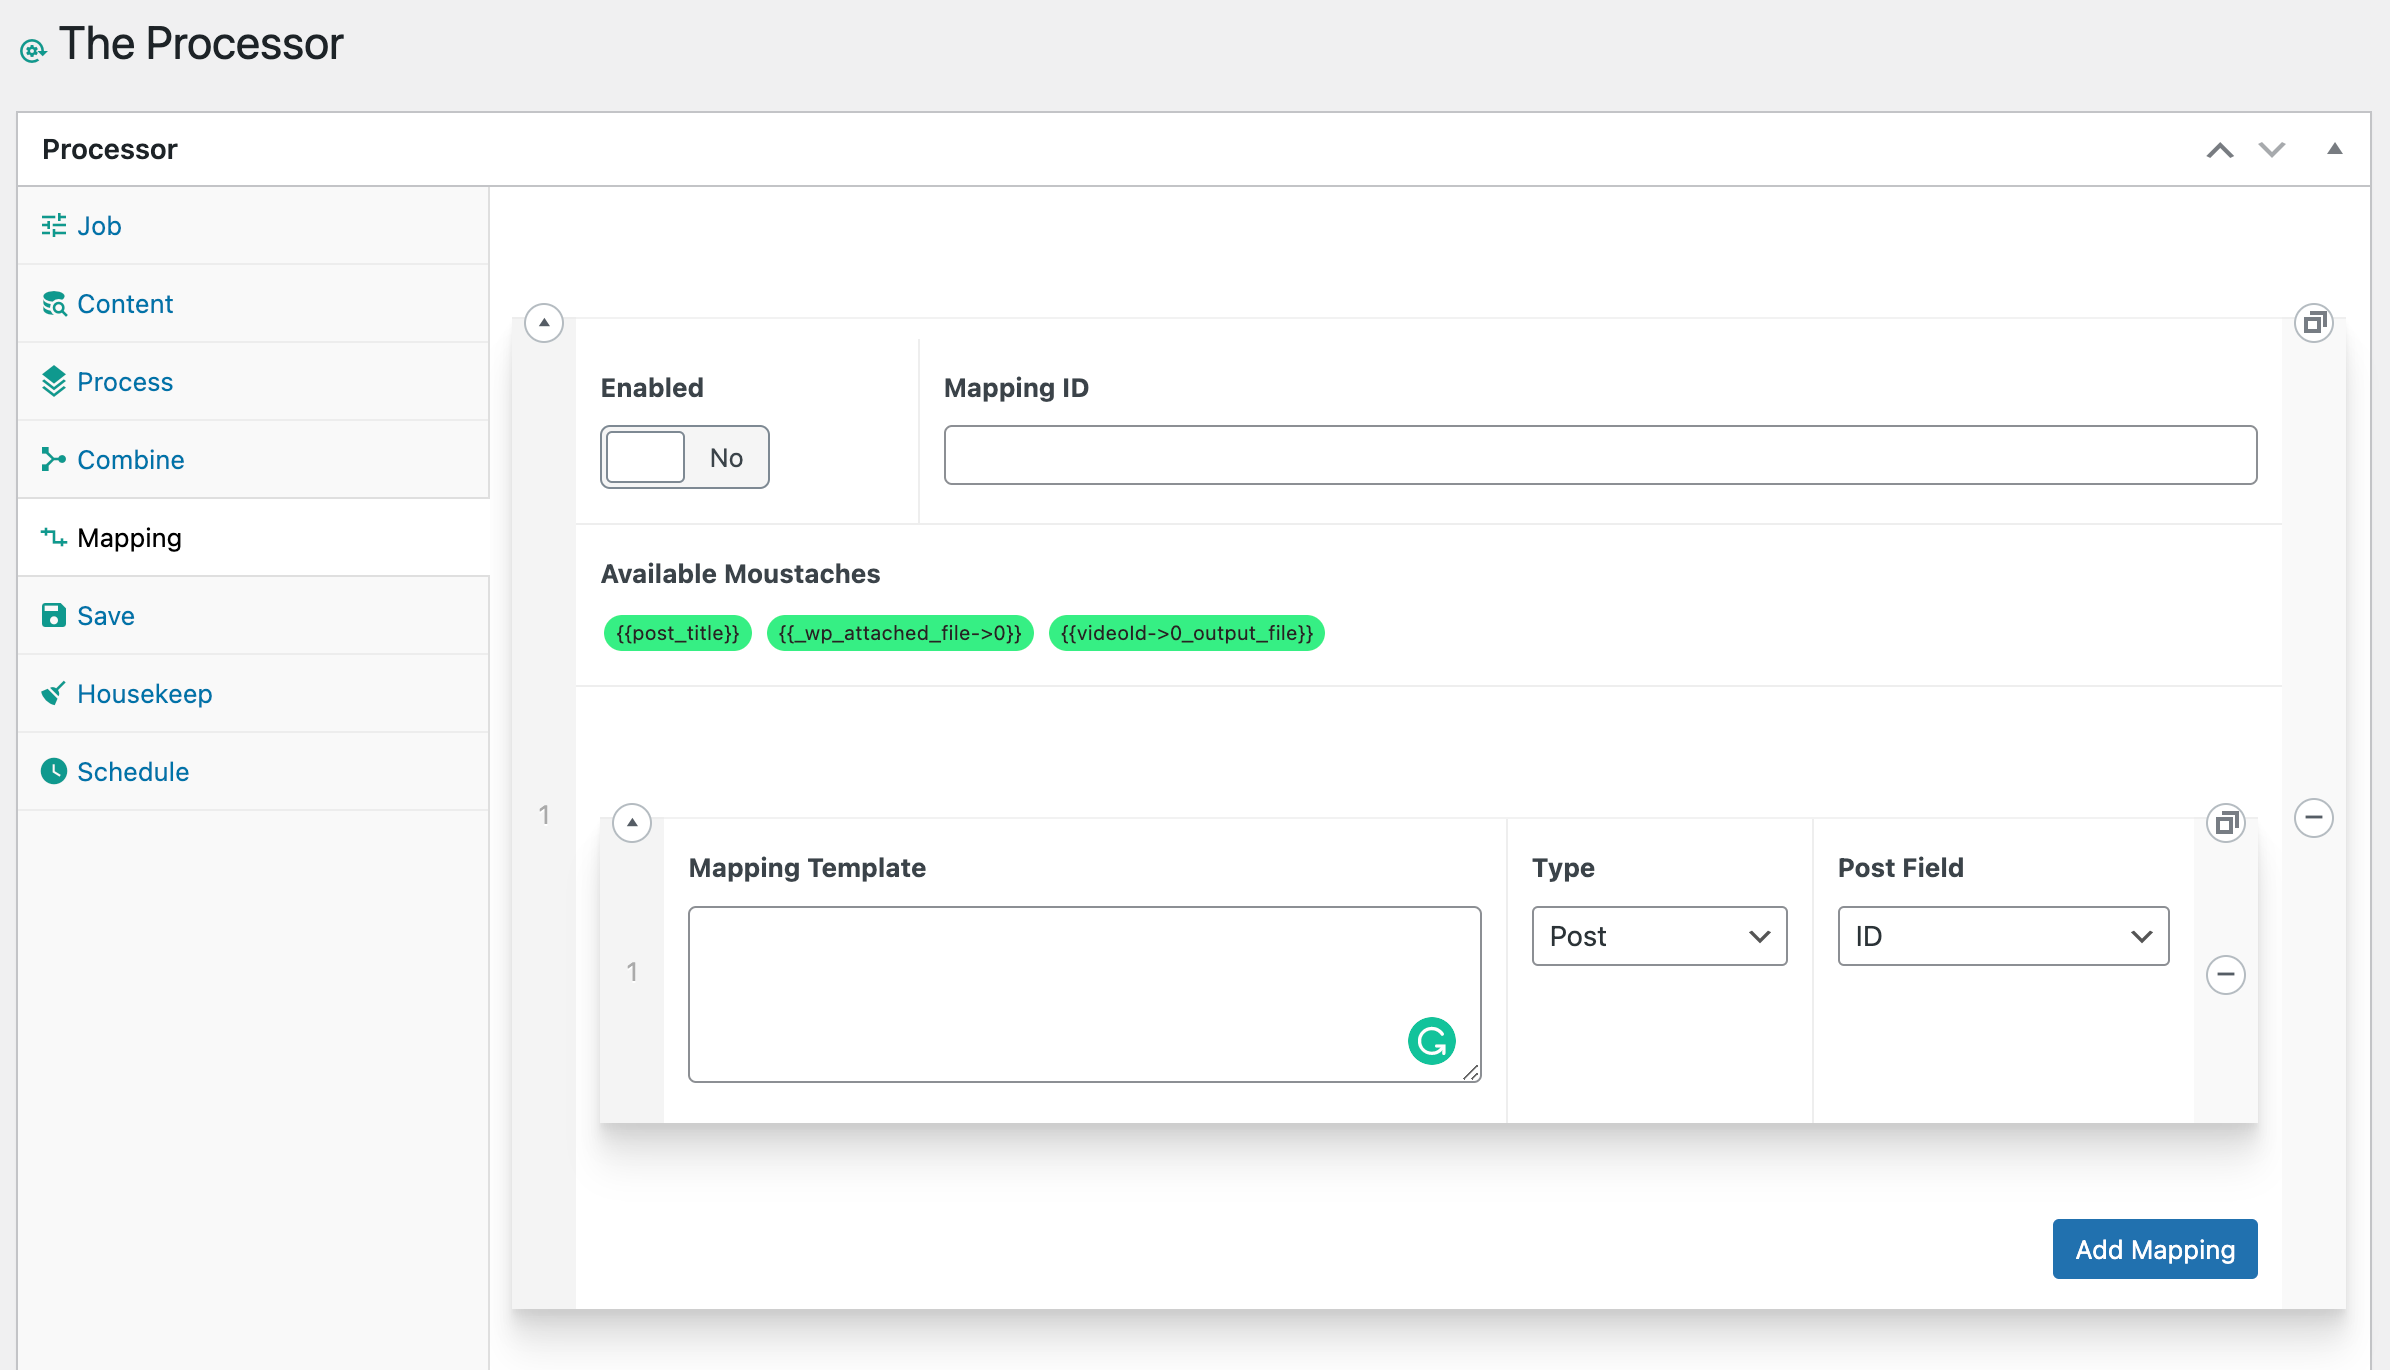
Mapping.
The mapping stage will allow you to populate the final output record with values. This is done using a template which can contain {{moustache}} fields that will be substituted with real values.
Required Minimum
To generate a successful post within Wordpress, you will need these fields to be declared:
- post_title
- post_status to be set to published
Mapping Template
The mapping template is the value you wish to put into the field. This can be a combination of raw text and {{moustache}} fields.
Example input :
Title one will be {{0_post_title}} and Title two will be {{1_post_title}} The output value, placed into the database will be something like this:
Title one will be FIRST POST TITLE and Title two will be THE SECOND POST TITLE
Date Moustache
The following additional {{date:PHP_DATE_FORMAT}} moustache is also available.
{{date:PHP_DATE_FORMAT}} : This allows you to insert the current DateTime into the field. See the PHP manual for formats to use.
Examples:
- {{date:U}} For a Unix Timestamp.
- {{date:c}} For an ISO 8601 date.
- {{date:d m Y}} For : day month year. dd mm yyyy.
Type
You can pick one of three post types:
- Post : This will allow you to insert values into the base WP_POST object. There are a strict number of fields for this object, so the “Post Field” values are restricted to those (see below).
- Meta : The Meta field allows you to specify any string as the field key. Post meta is stored as an array, so VideoID will become VideoID[0] => 'value'
- Image : The image type is an attachment post type and has the same fields as a WP_POST. There is a single required field to be set, and that is path. This needs to be the relative location to /wp-content/uploads/. E.g. /2020/11/my_image.jpg
Post Field
This will be a select dropdown box of all the fields available for a WP_POST.
Post Meta Field
This will be a text entry box to input the value of the meta key you want to create.
Post Image Field
This will be a text entry box to input the value of the key you want to create on an 'attachment' post.
Example:
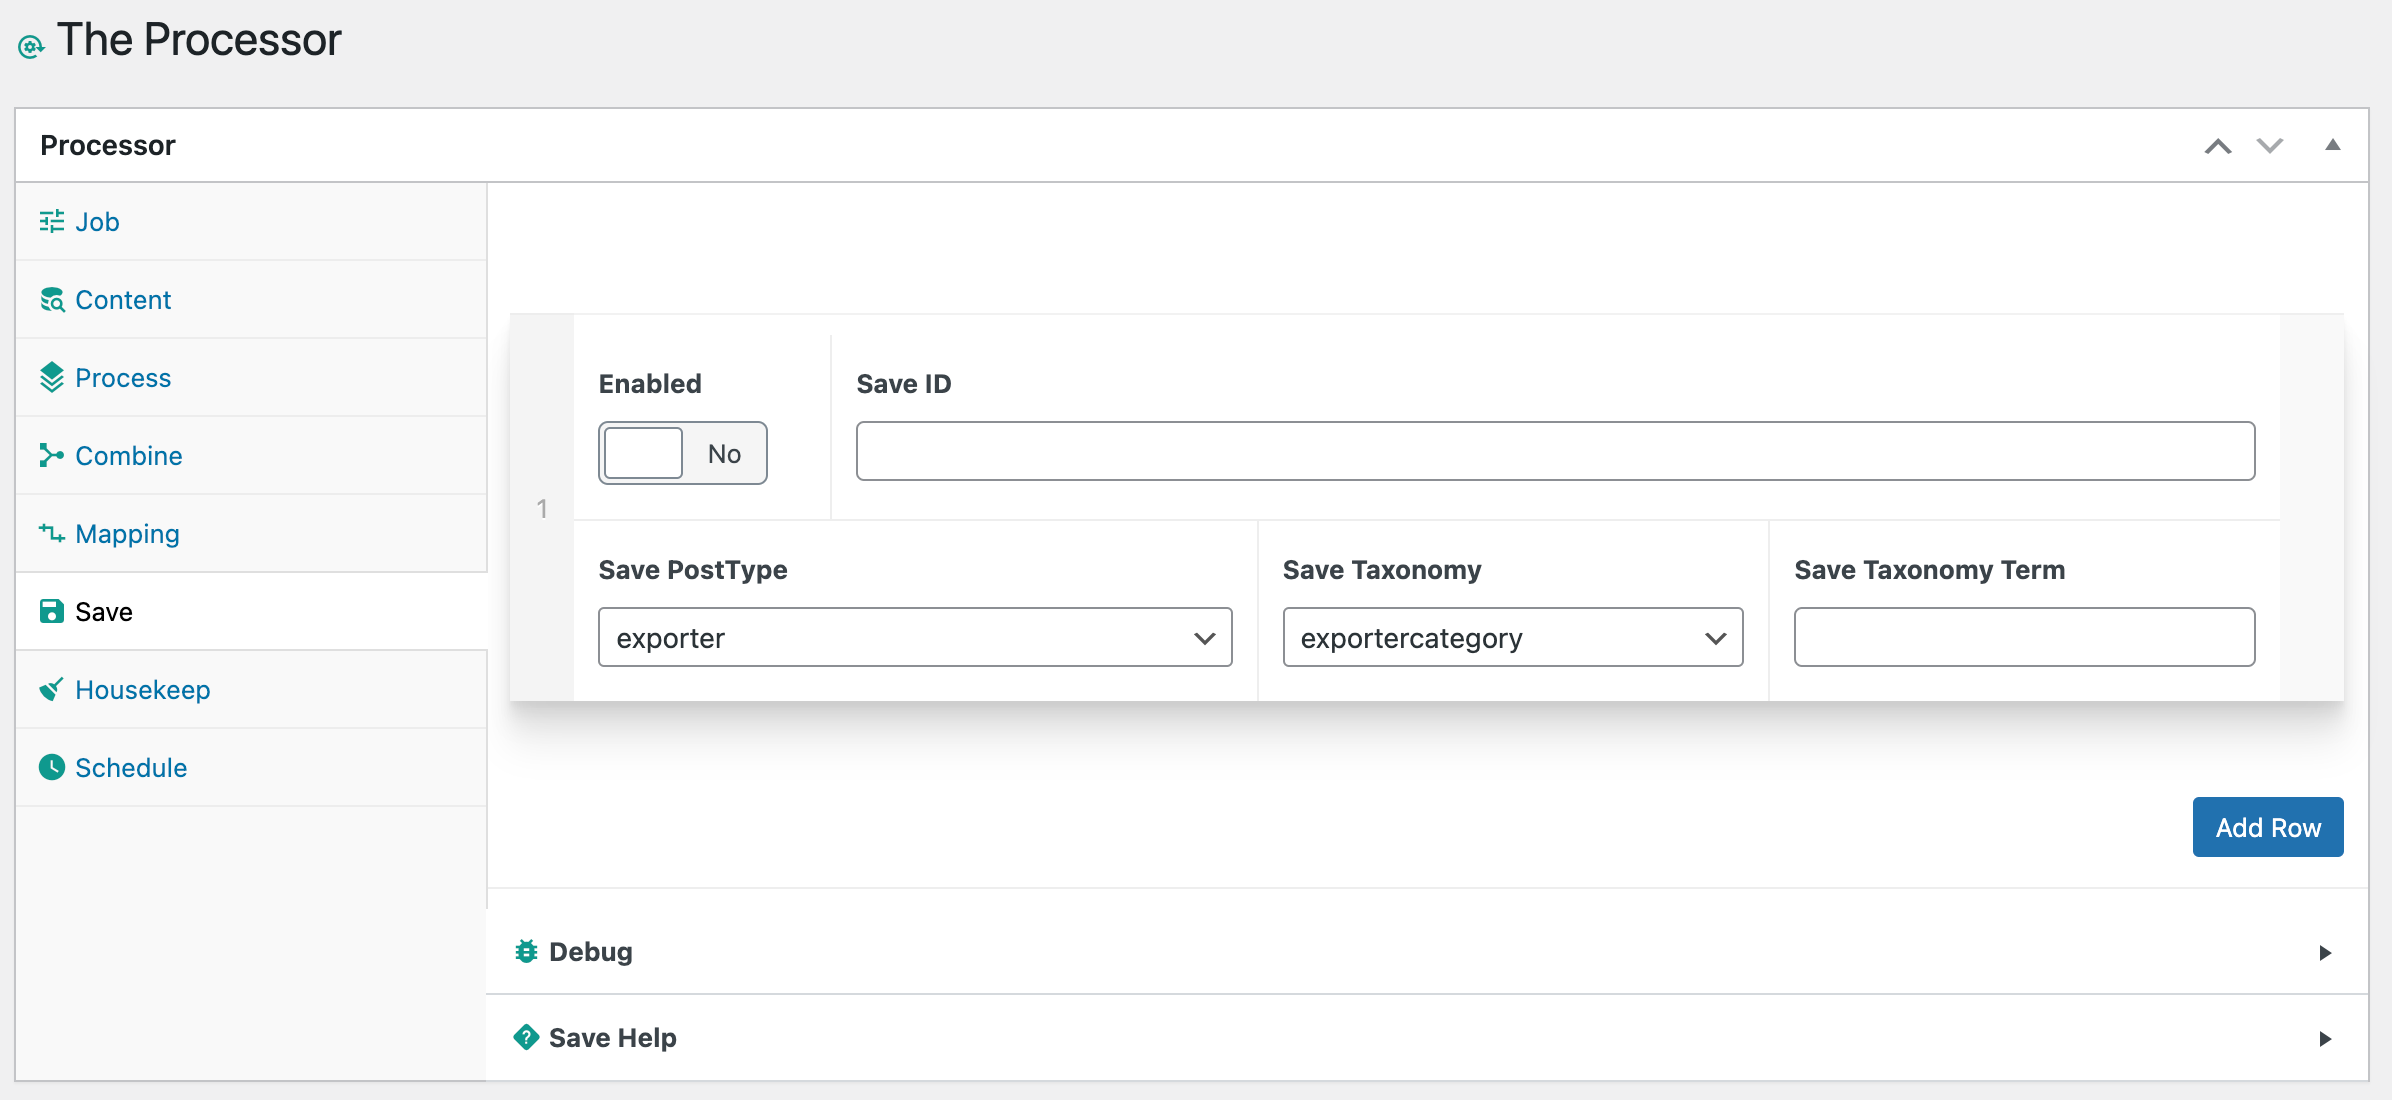
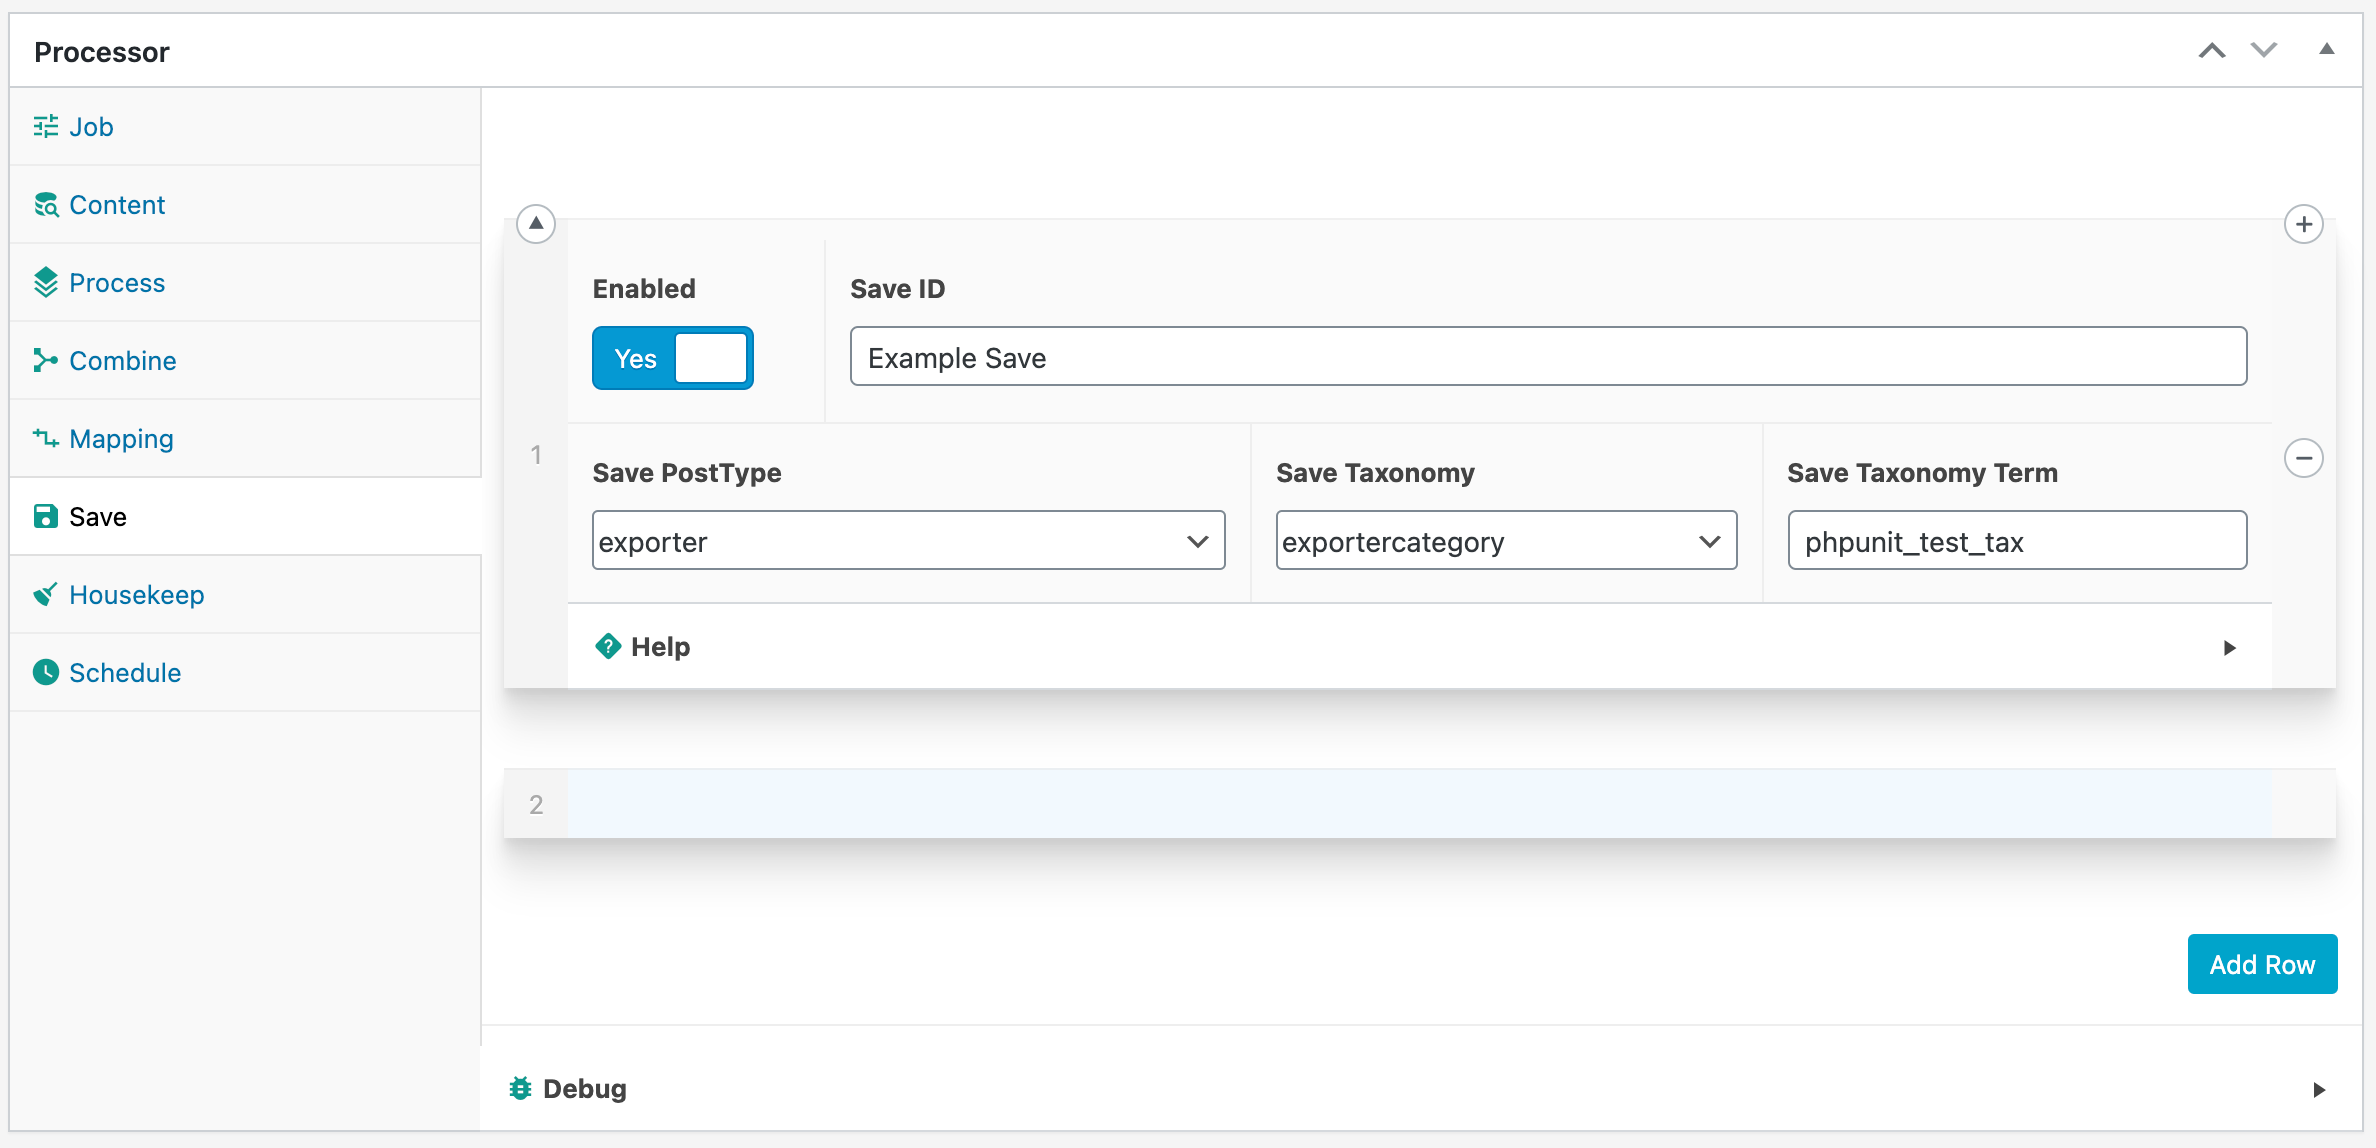
Save.
The saving stage lets you upload the final post into the WordPress system as a post.
Exporter - Custom Post Type (CPT)
Built into the Processor plugin is a custom post type called Exporter'. This can be found in the left admin sidebar. It has its own custom taxonomy called 'exportercategory'.
This allows you to keep the output separate from other post types if needed and comes with the added benefit of a “Featured Image” column in the list page that gives a preview of the attached image.
Save PostType
Select ANY post type to insert your new post into. This is an auto-populated list of all post types within your Wordpress system. It also includes the 'Exporter' CPT.
Save Taxonomy
Select ANY taxonomy to attach the post to. This is an auto-populated list of all taxonomies within your Wordpress system.
Note that it's probably best practice to only use a taxonomy that is assigned to the particular post type you have selected. For instance, only use the 'exportercategory' taxonomy for the 'exporter' post type
Save Taxonomy Term
A text box for you to give a custom term to the post within the selected taxonomy.
Useful for separating different content types.
Example:
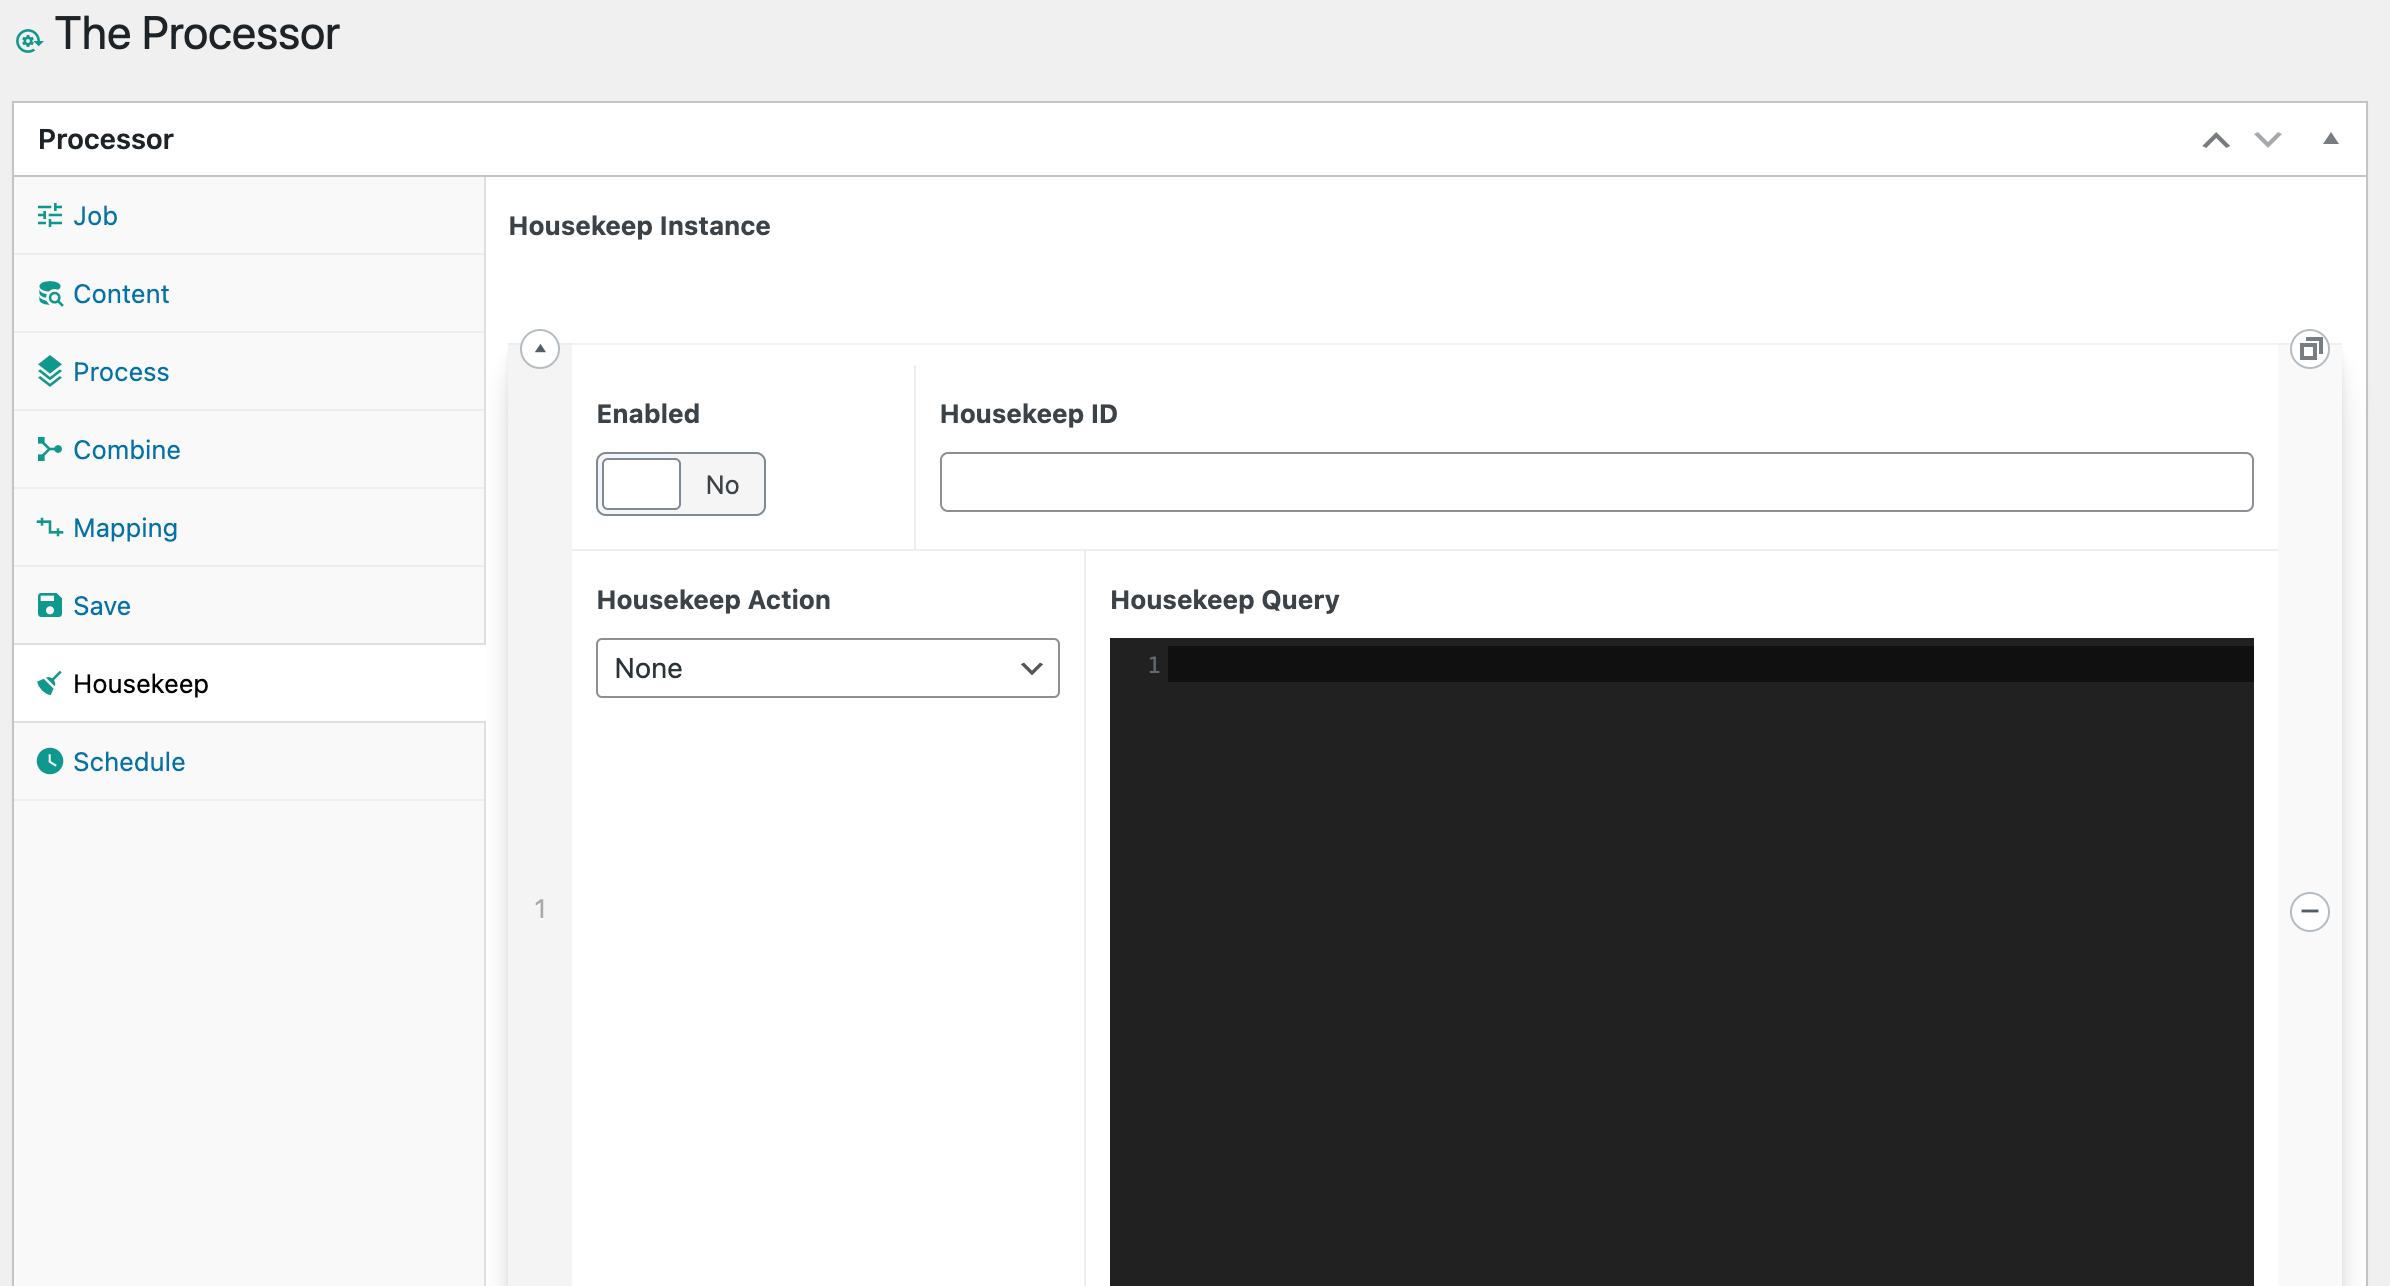
Housekeep.
The housekeep stage helps you clean up any posts, images or taxonomy you wish to remove after processing.
Example
If you are processing a particular type of post, say a youtube custom post type, to join together three posts into a single post in the exporter, you may want to delete the youtube posts afterwards.
To do this, you can use a simple query like this:
['post_type' => 'youtube','numberposts' => 3,]
The query can be as complex as you like, using all features of a WP_Query. See https://developer.wordpress.org/reference/classes/wp_query/ for more details.
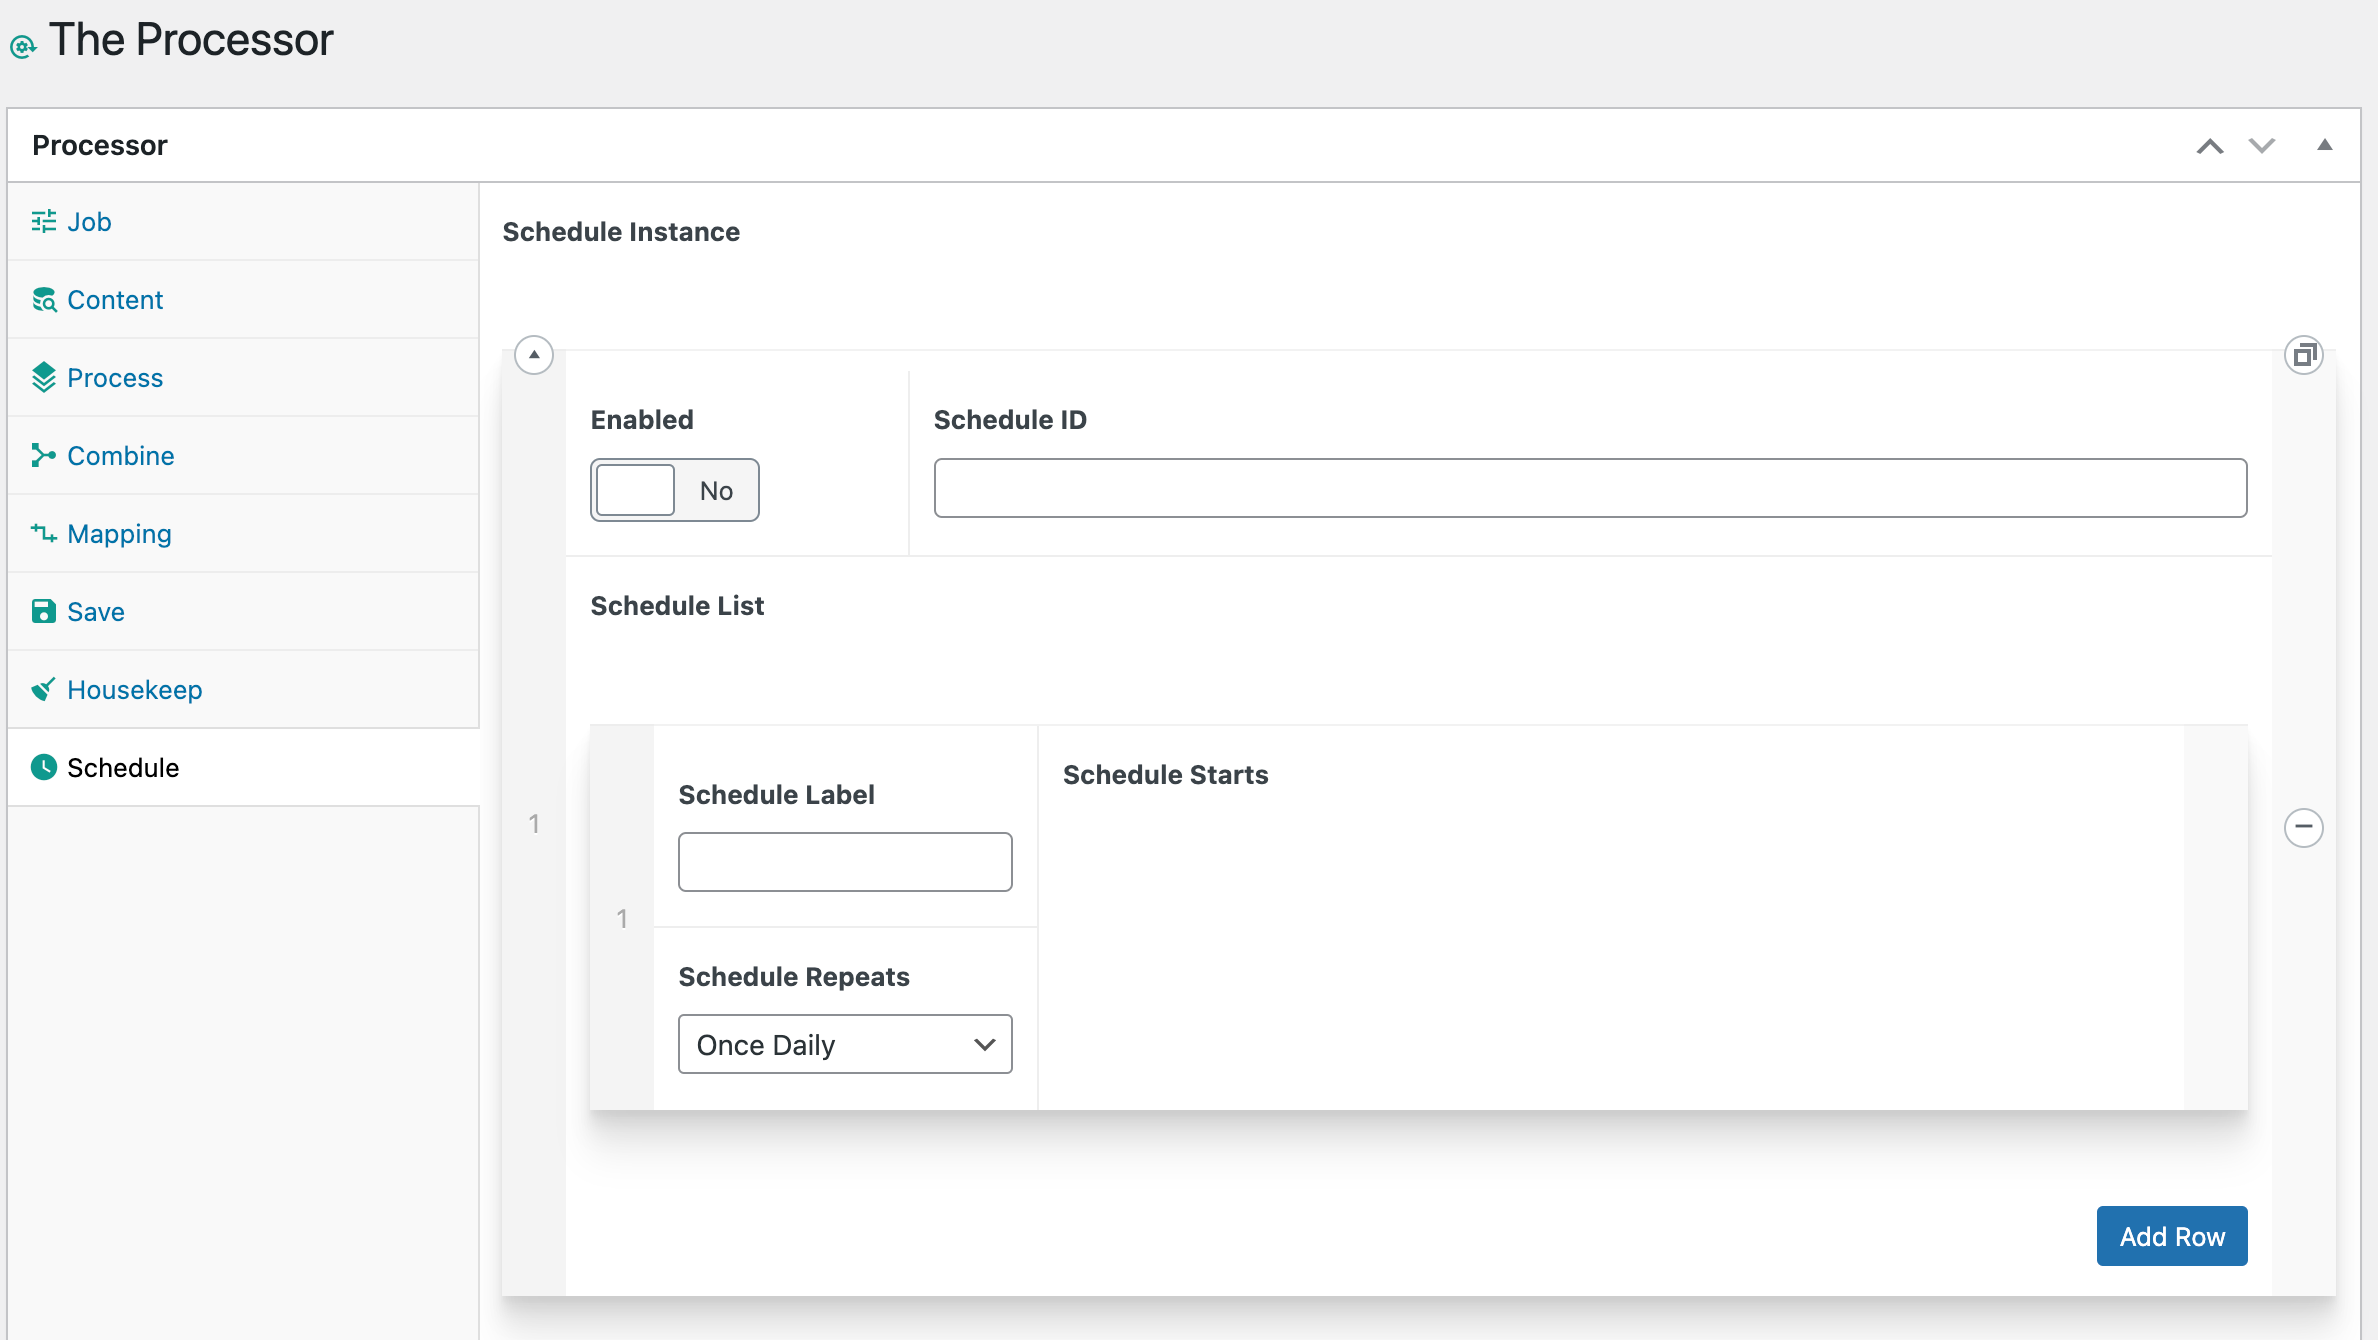
Schedule.
The scheduler allows you to repeat the processor job on a regular timer.
- Enabled. on or off.
- Schedule ID. Identifier for the job tab.
- Schedule List. (Row)
- Schedule Label - ID for each schedule instance.
- Schedule Repeats - How often should the schedule repeat. A relative date.
- Schedule Starts - A Start on a particular DateTime.
Basic Setup Example.
Basic Setup Example This is an example of how to setup a simple end-to-end processor. The idea is to take three posts out of Wordpress and combine them together to generate a single new post in the Exporter custom post type.
Requirements Three posts in the posts post type. Each must have a featured image attached.
Content
- Click > Add new row
- Enabled : Yes
- Content ID : “Example Content”
- Content Input : Query
- Query :
['post_type' => 'post','numberposts' => 3,]Process
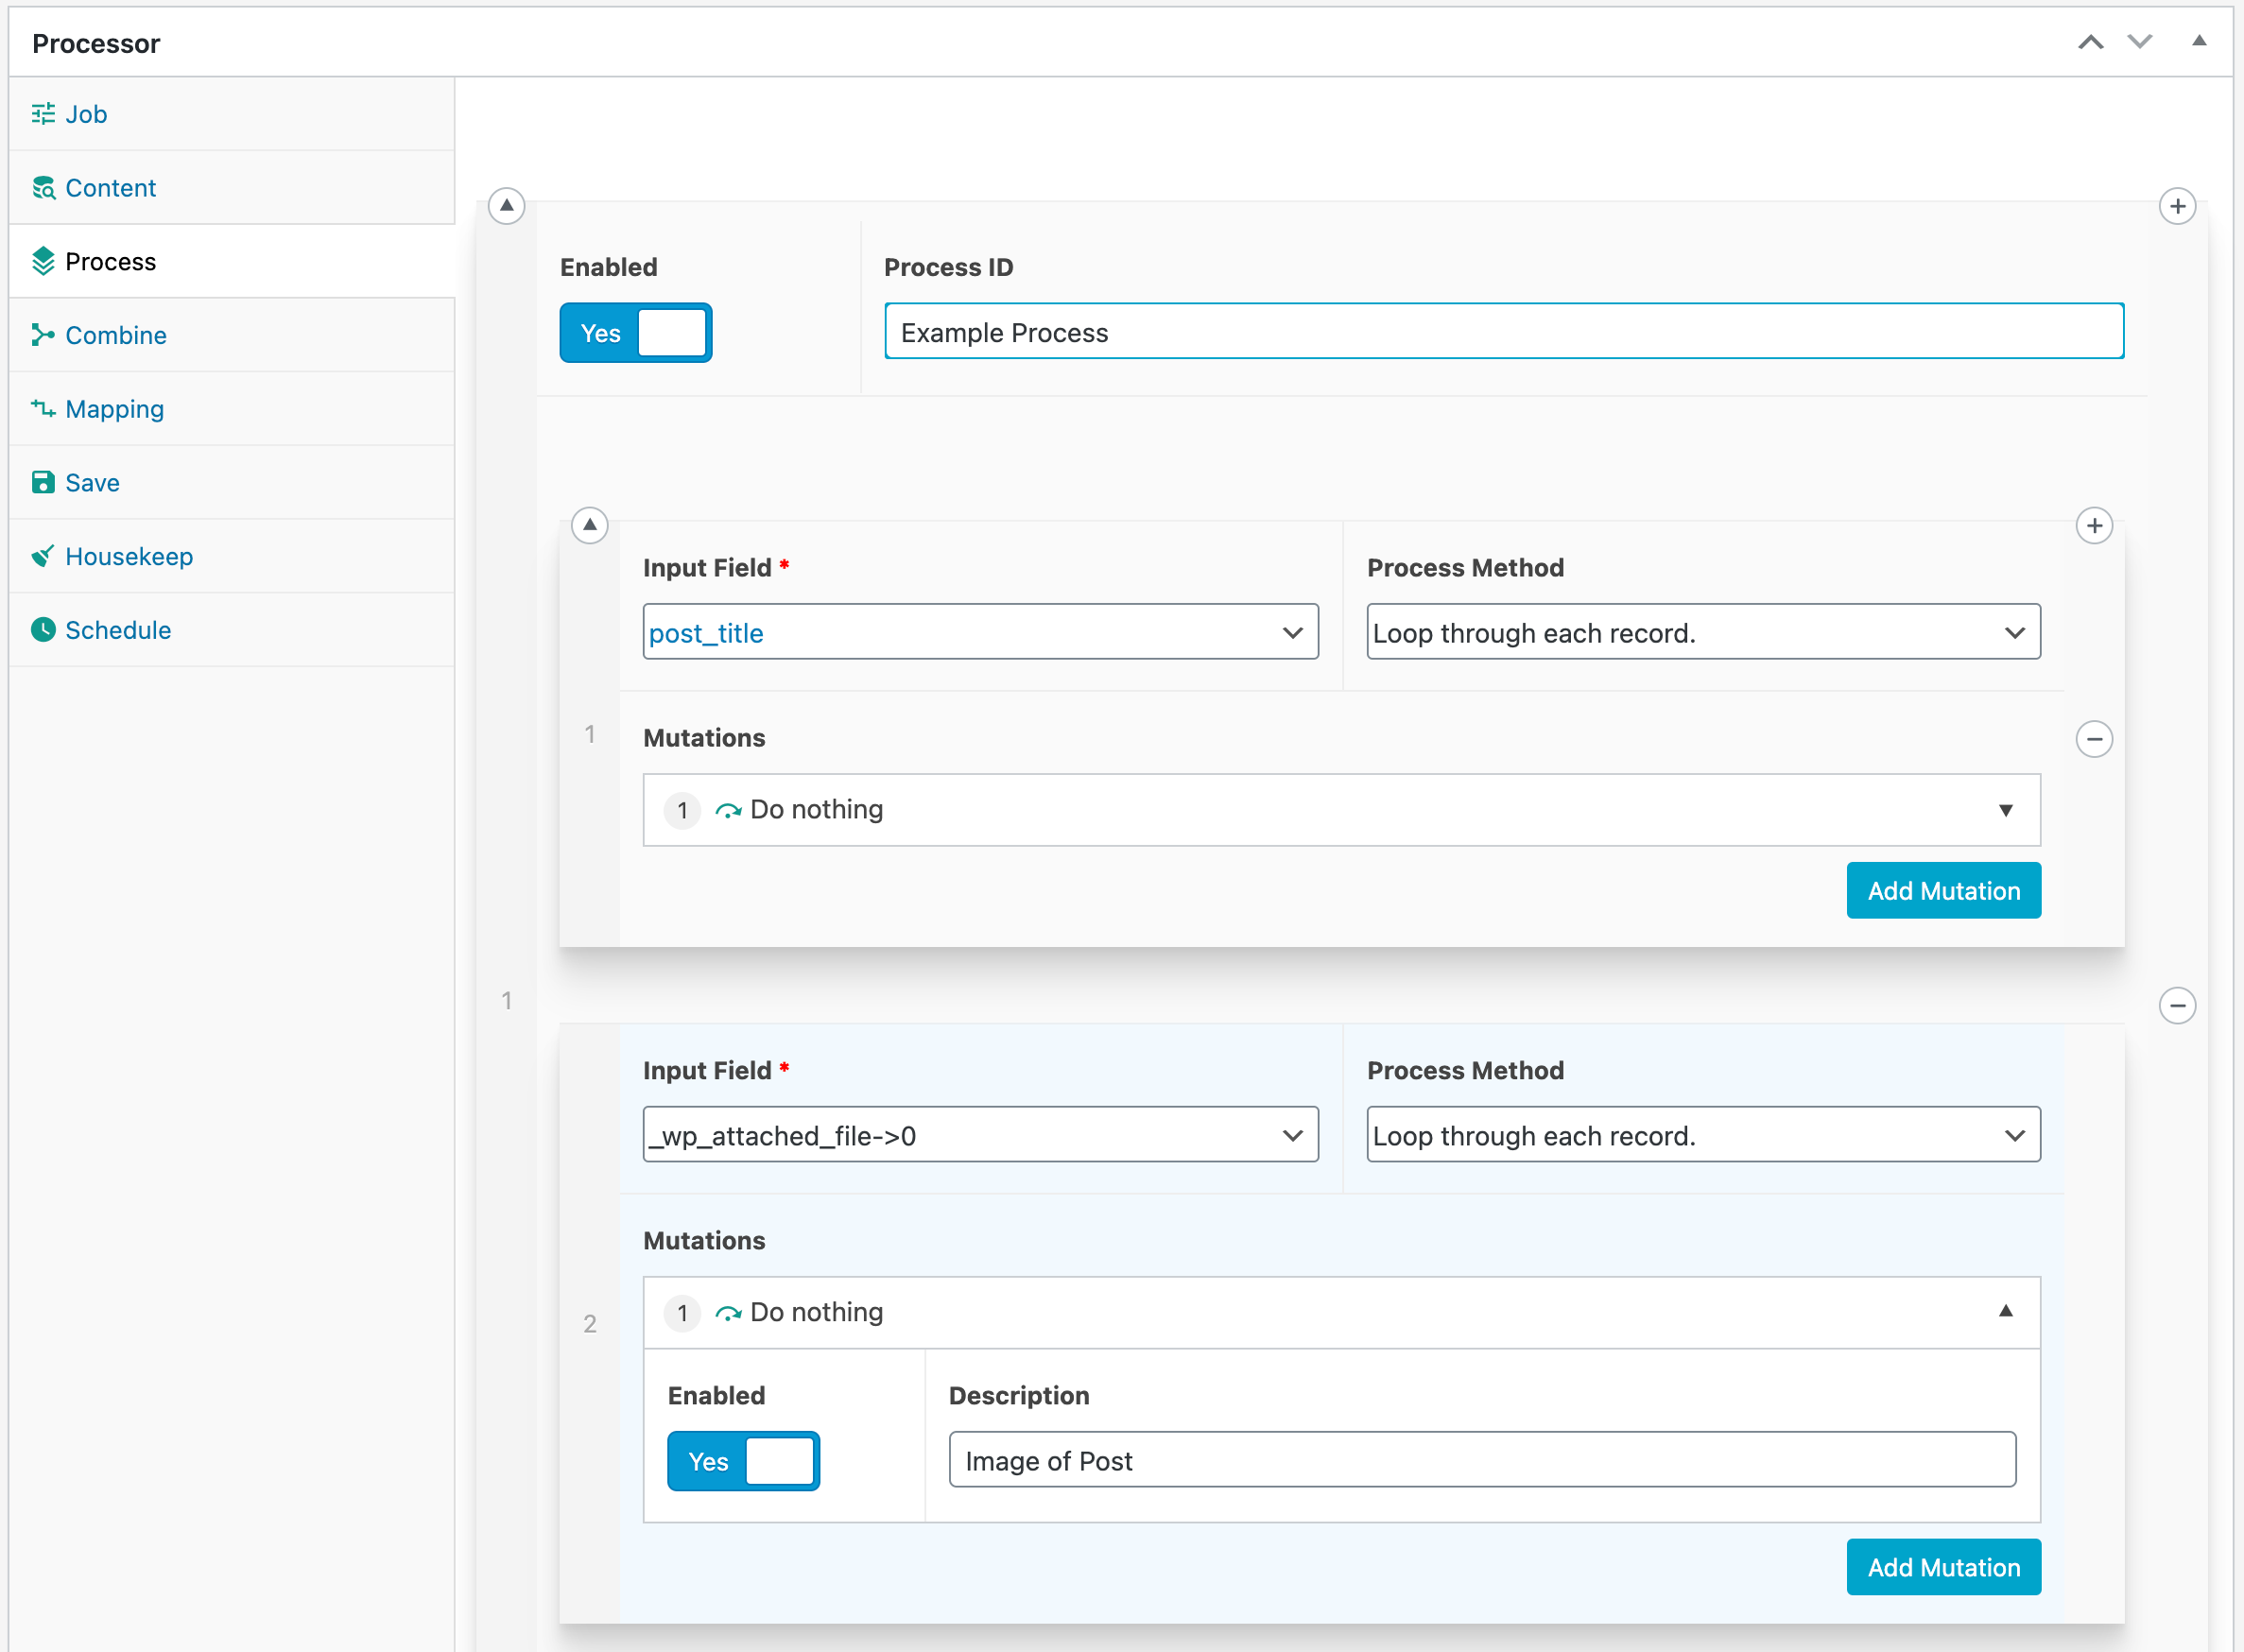
- Click > Add new row
- Enabled : Yes
- Process ID : “Example Process”
- Click > Add Field
- Input Field : post_title
- Process Method : Loop through each record.
- Click > Add Mutation
- Select > Do Nothing
- Enabled : Yes
- Description : Raw Title
- Click > Add Field
- Input Field : _wp_attached_file->0
- Process Method : Loop through each record.
- Click > Add Mutation
- Select > Do Nothing
- Enabled : Yes
- Description : Raw Image
- Combine
- Click > Add Row
- Enabled : Yes
- Combine ID : “Example Combine”
- Combine Records : Combine into one collection
- Click > Add Input Field Row
- Input Field : post_title
- Combine Method : Keep all records
- Click > Add Input Field Row
- Input Field : _wp_attached_file->0
- Combine Method : Use First Record
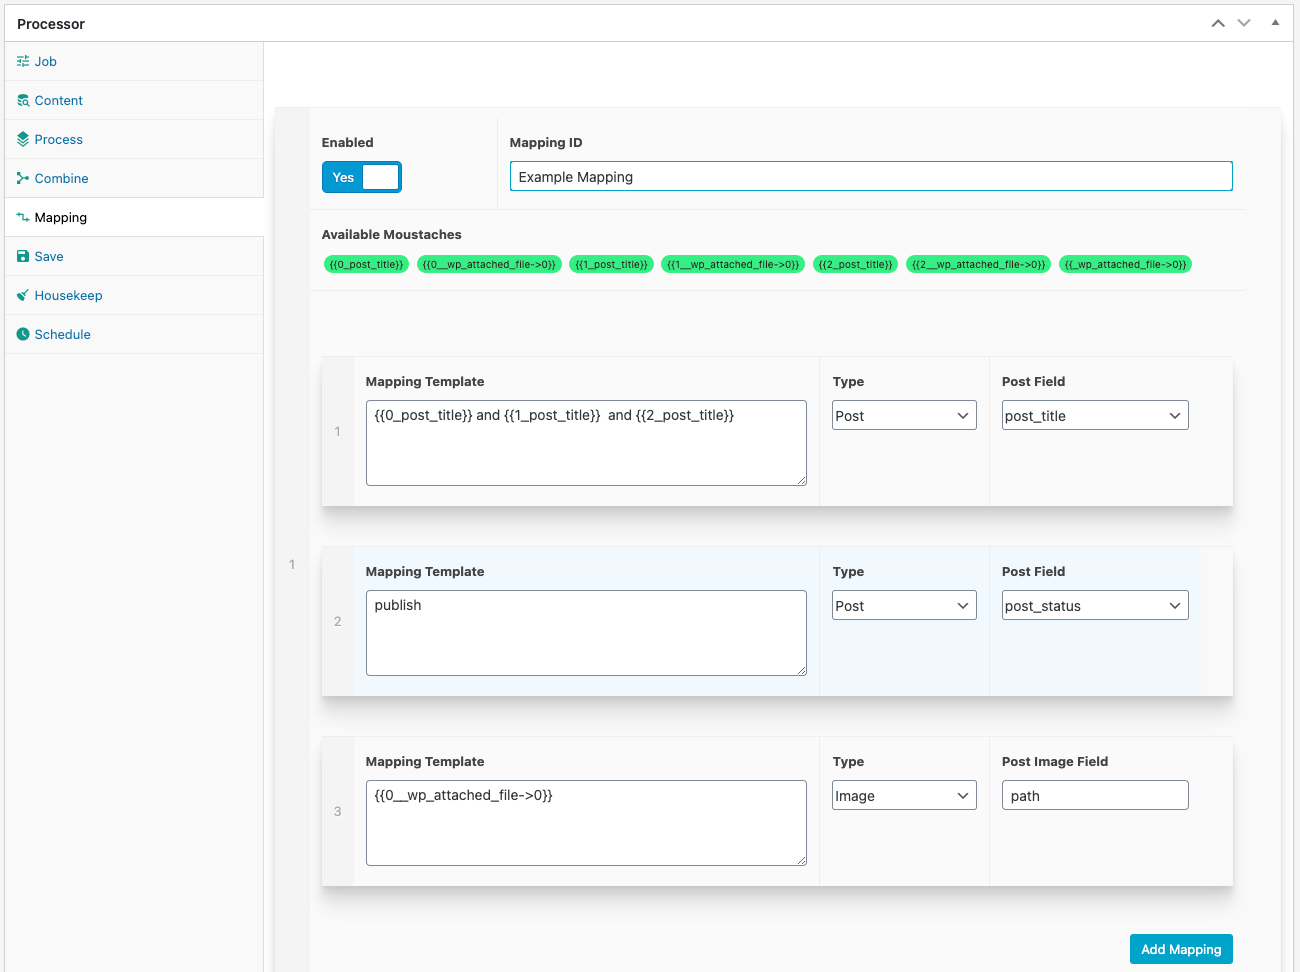
- Mapping
- Click > Add Row
- Enabled : Yes
- Mapping ID : “Example Mapping”
- Click > Add Mapping
- Mapping Template : {{0_post_title}} and {{1_post_title}} and {{2_post_title}}
- Type : Post
- Post Field : post_title
- Click > Add Mapping
- Mapping Template : publish
- Type : Post
- Post Field : post_status
- Click > Add Mapping
- Mapping Template : {{0__wp_attached_file->0}}
- Type : Image
- Post Field : path
- Save
- Click > Add Row
- Enabled : Yes
- Mapping ID : “Example Save”
- Save PostType : exporter
- Save Taxonomy : exportercategory
- Save Taxonomy Term: example_save_term
- Job
- Content : Example Content
- Process : Example Process
- Combine : Example Combine
- Mapping : Example Mapping
- Save : Example Save
- Housekeep : none
- Schedule : none
- Run
Once happy with all of the settings, you can click the update button to run the process.
5. Contributing
Contributions are what make the open source community such an amazing place to learn, inspire, and create. Any contributions you make are greatly appreciated.
If you have a suggestion that would make this better, please fork the repo and create a pull request. You can also simply open an issue. Don't forget to give the project a star! Thanks again!
- Fork the Project
- Create your Feature Branch (git checkout -b feature/AmazingFeature)
- Commit your Changes (git commit -m 'Add some AmazingFeature')
- Push to the Branch (git push origin feature/AmazingFeature)
- Open a Pull Request
6. License
Distributed under the MIT License.
MIT License
Copyright (c) 2022 Andy Pearson
Permission is hereby granted, free of charge, to any person obtaining a copy of this software and associated documentation files (the "Software"), to deal in the Software without restriction, including without limitation the rights to use, copy, modify, merge, publish, distribute, sublicense, and/or sell copies of the Software, and to permit persons to whom the Software is furnished to do so, subject to the following conditions:
The above copyright notice and this permission notice shall be included in all copies or substantial portions of the Software.
THE SOFTWARE IS PROVIDED "AS IS", WITHOUT WARRANTY OF ANY KIND, EXPRESS OR IMPLIED, INCLUDING BUT NOT LIMITED TO THE WARRANTIES OF MERCHANTABILITY, FITNESS FOR A PARTICULAR PURPOSE AND NONINFRINGEMENT. IN NO EVENT SHALL THE AUTHORS OR COPYRIGHT HOLDERS BE LIABLE FOR ANY CLAIM, DAMAGES OR OTHER LIABILITY, WHETHER IN AN ACTION OF CONTRACT, TORT OR OTHERWISE, ARISING FROM, OUT OF OR IN CONNECTION WITH THE SOFTWARE OR THE USE OR OTHER DEALINGS IN THE SOFTWARE.
7. Contact
Project Link: https://github.com/IORoot/...
8. Changelog
v1.0.0 - First version.